FlyWP White Label: Complete Setup Guide
FlyWP White Label lets you sell managed WordPress hosting under your own brand and at your own prices. You choose the plans, customer site limits, and hosting infrastructure. Your customers use your branded address to sign up and sign in.
This guide is for businesses configuring and operating White Label in FlyWP. Sign in at app.flywp.com, choose the correct team, and open White Label. In this guide, “you” means the hosting business and “your customer” means the person buying hosting from you.
Before you begin
Section titled “Before you begin”Have these details ready:
- Your business name, support email, optional phone number, logo, favicon, and brand colors.
- A preferred customer address. The hosted address becomes permanent when confirmed.
- Access to your business Stripe account and the details needed for verification.
- Your hosting plan names, monthly prices, customer site allowances, preferred provider and region, server sizes, and sites per server.
- For external billing, access to the system that will store the API key and call the White Label API.
Use Finish later to leave setup and return to outstanding items.
The screenshots below show the setup interface captured on September 22, 2026. Account details, prices, and available options are examples; use the values shown in your own account. Some screens show incomplete setup. Select any screenshot to view it at full size.
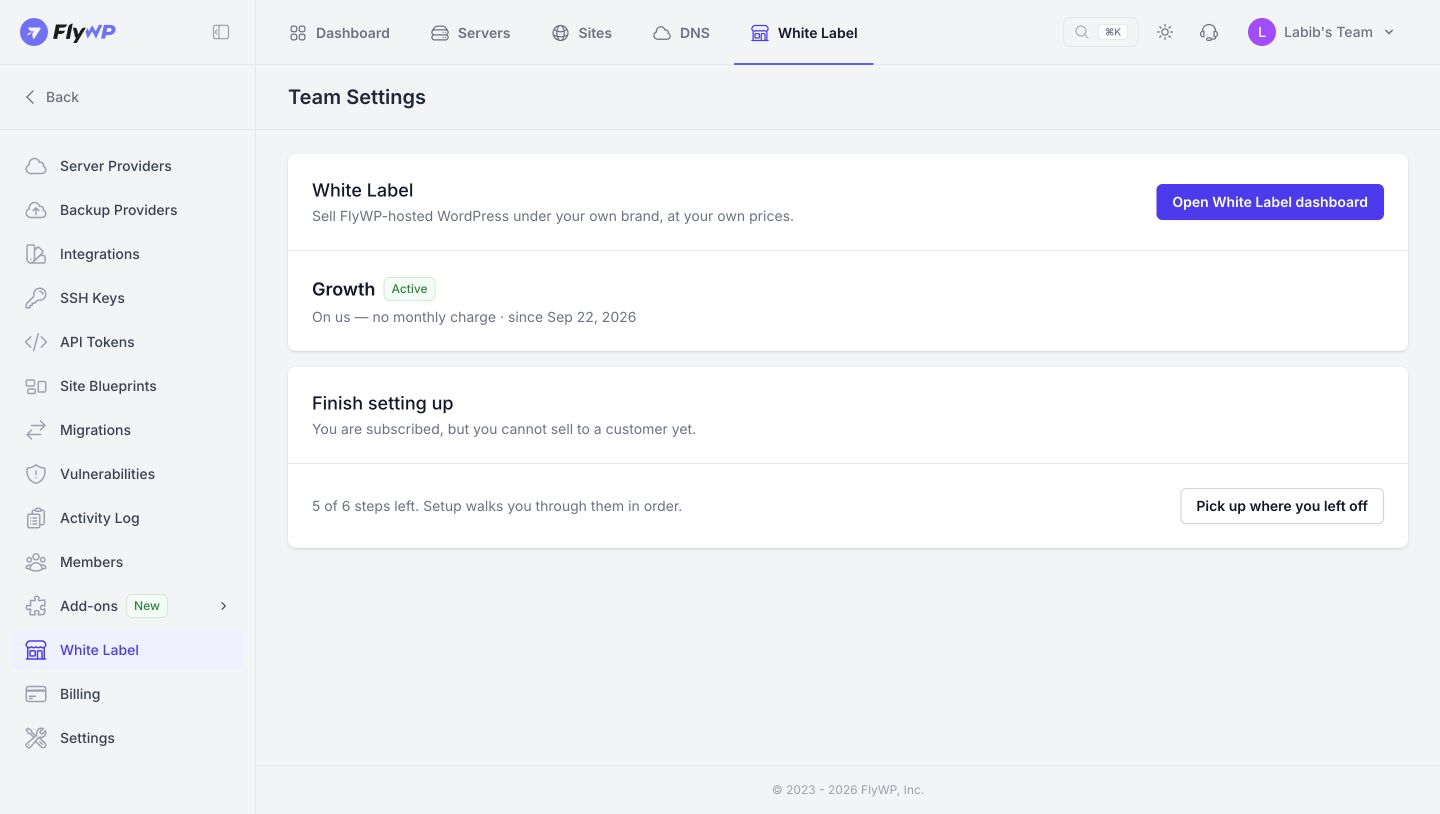
Open White Label
Section titled “Open White Label”- Sign in at app.flywp.com.
- Select the team that will operate your hosting business.
- Open White Label in the team settings.
- Choose Open White Label dashboard, or Pick up where you left off to resume setup.
Step 1: Choose how you sell
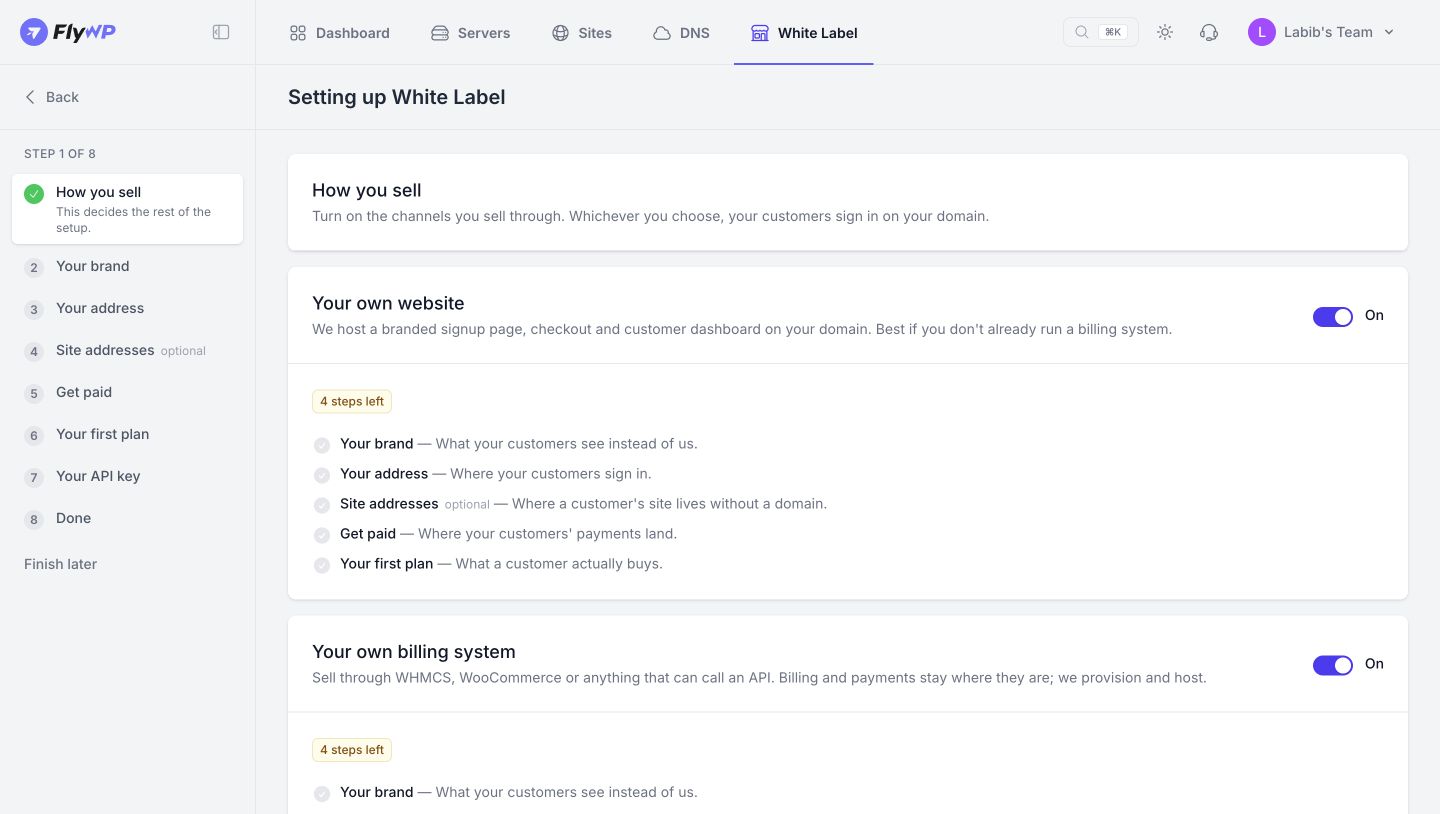
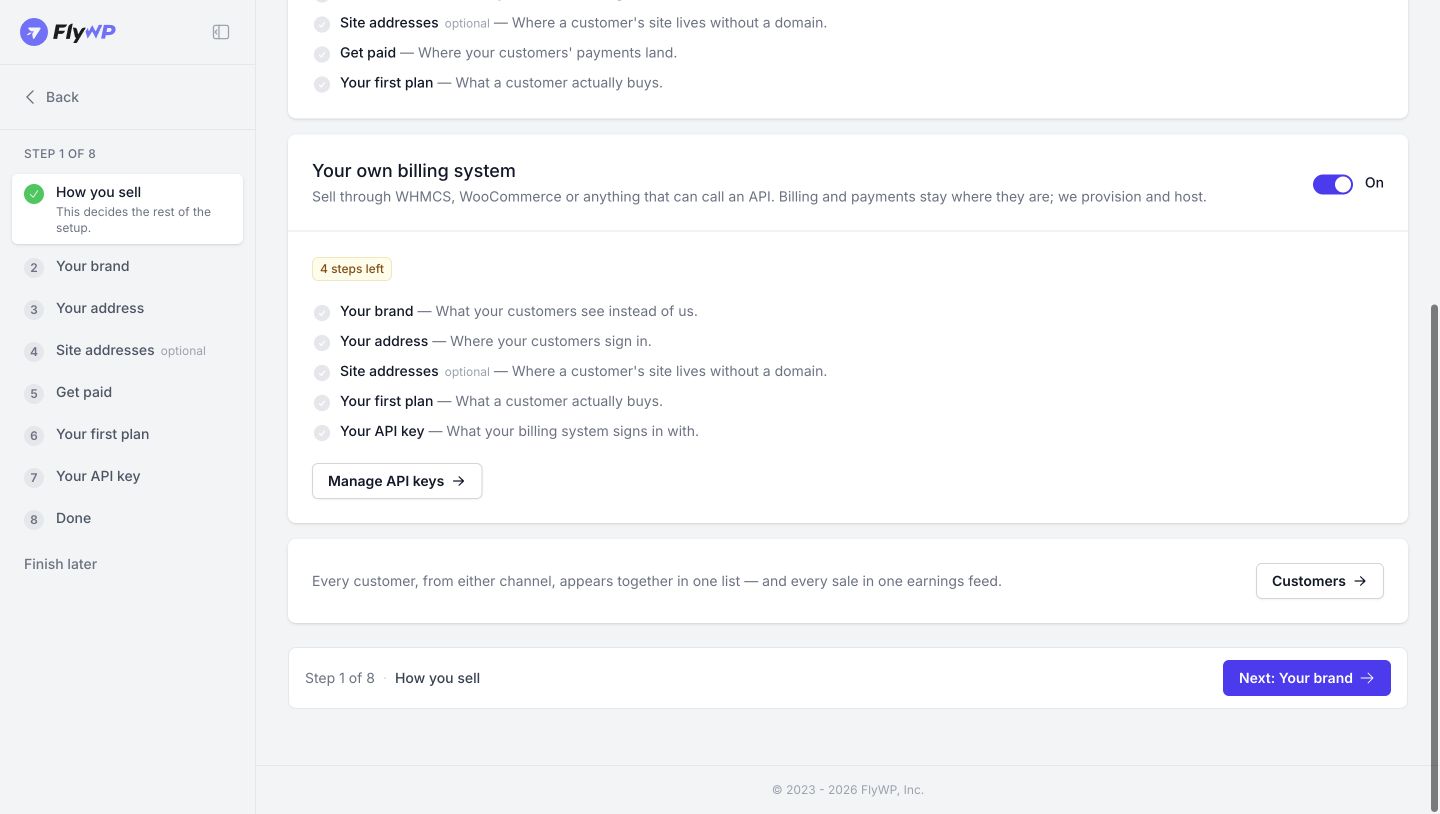
Section titled “Step 1: Choose how you sell”Open How you sell and enable the channels you need. Both channels share your branding and customer sign-in address. Customers from both channels appear in one customer list, with sales in one earnings feed.
Your own website provides a hosted branded signup page, checkout, and customer dashboard. Use it when you want FlyWP to provide the storefront and checkout experience. Its setup covers your brand, your address, optional site addresses, payments, and your first plan.
Your own billing system lets you sell through WHMCS, WooCommerce, or another system that can call an API. Billing and payments remain in that system; FlyWP provisions and hosts. Its setup includes your brand, address, optional site addresses, a plan, and an API key. The ready-made WHMCS provisioning module is marked Soon; use the available API for integrations.
Step 2: Set up your brand
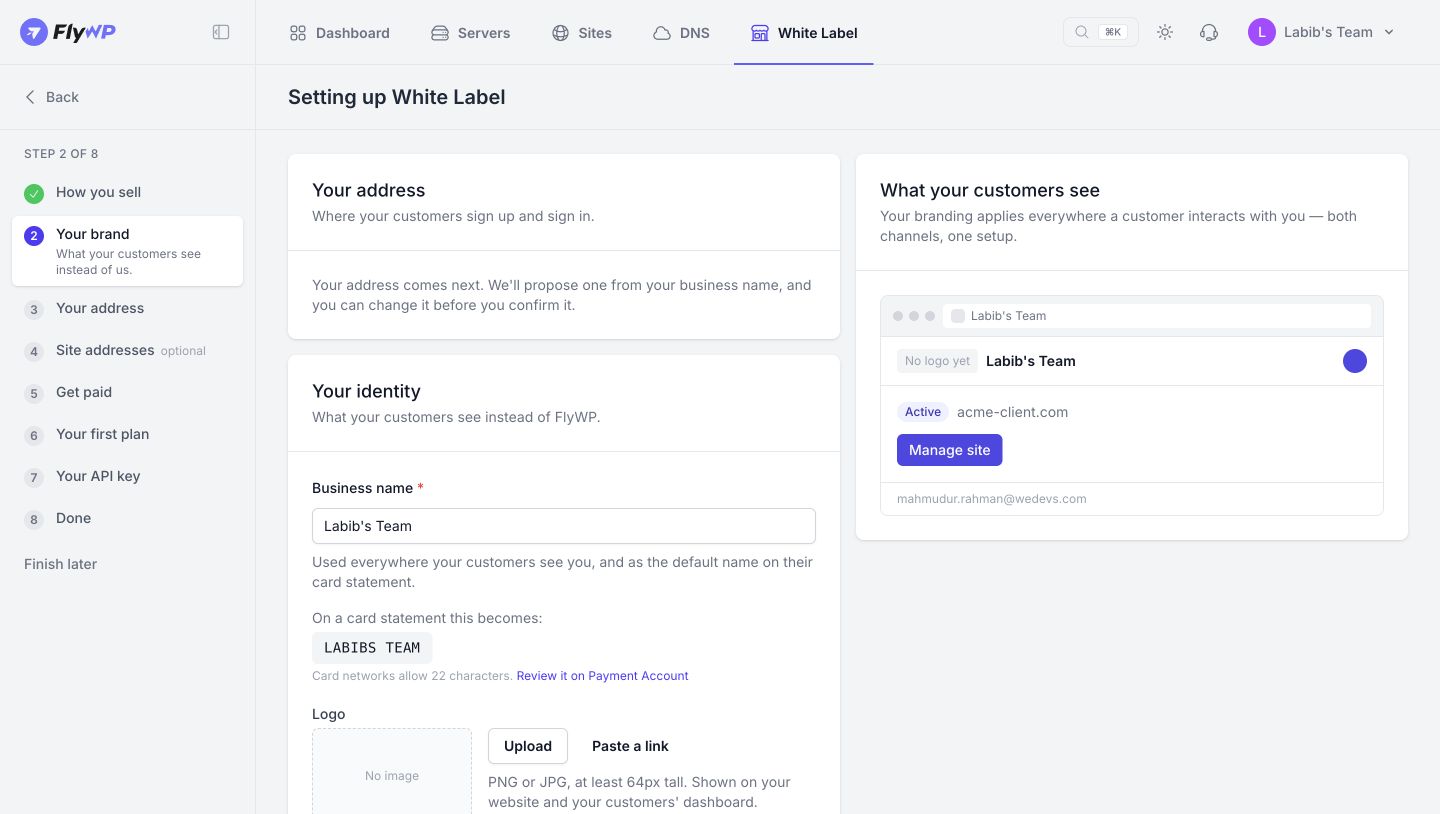
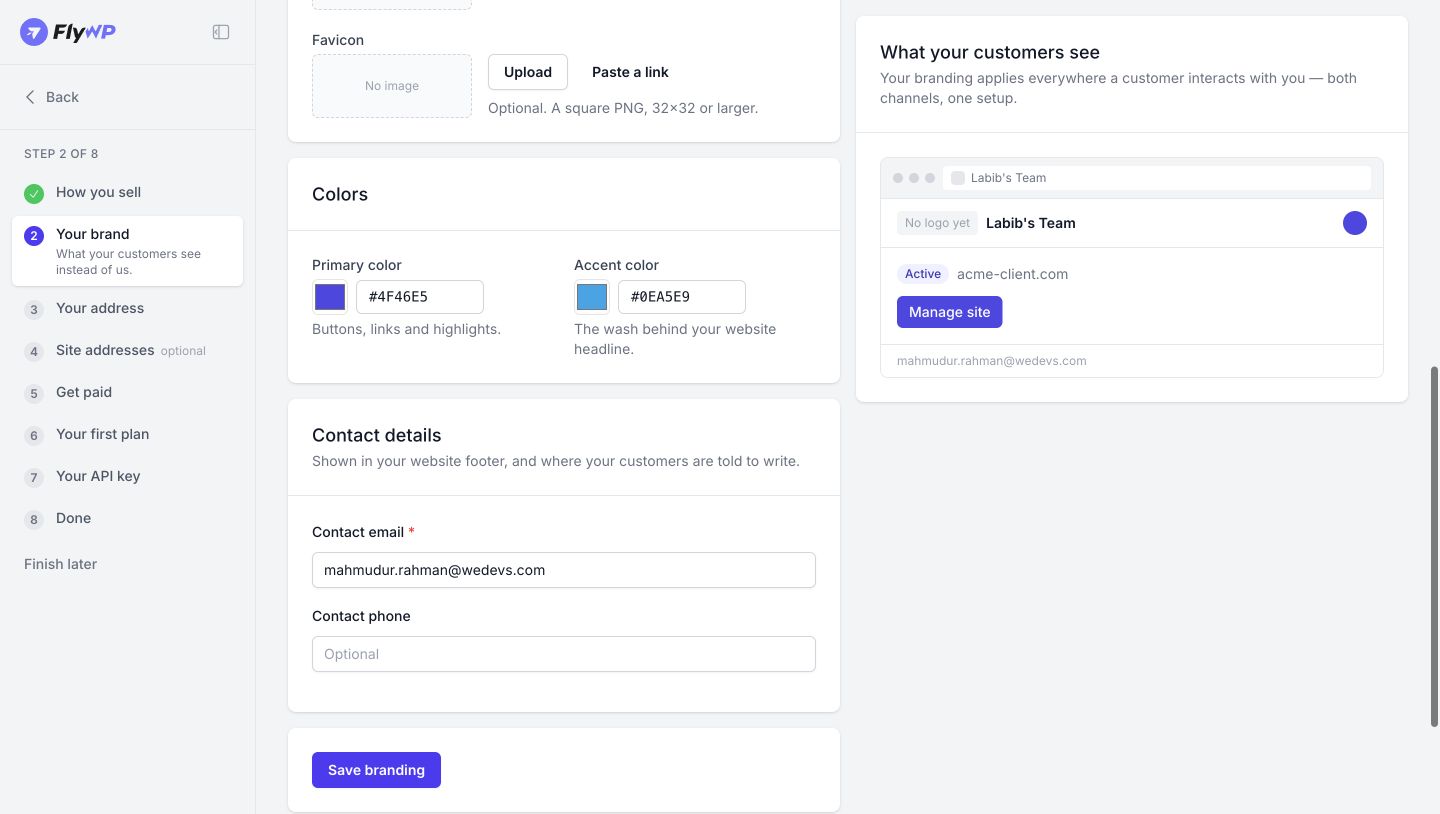
Section titled “Step 2: Set up your brand”Open Your brand. Enter your business name and contact email, which are required. The business name is used throughout the customer experience and supplies the default card statement name. Review the statement preview; card networks allow 22 characters.
Add your logo using Upload or Paste a link. Use PNG or JPG at least 64 pixels tall. The logo appears on your website and customer dashboard. You may also add an optional square PNG favicon of at least 32 by 32 pixels.
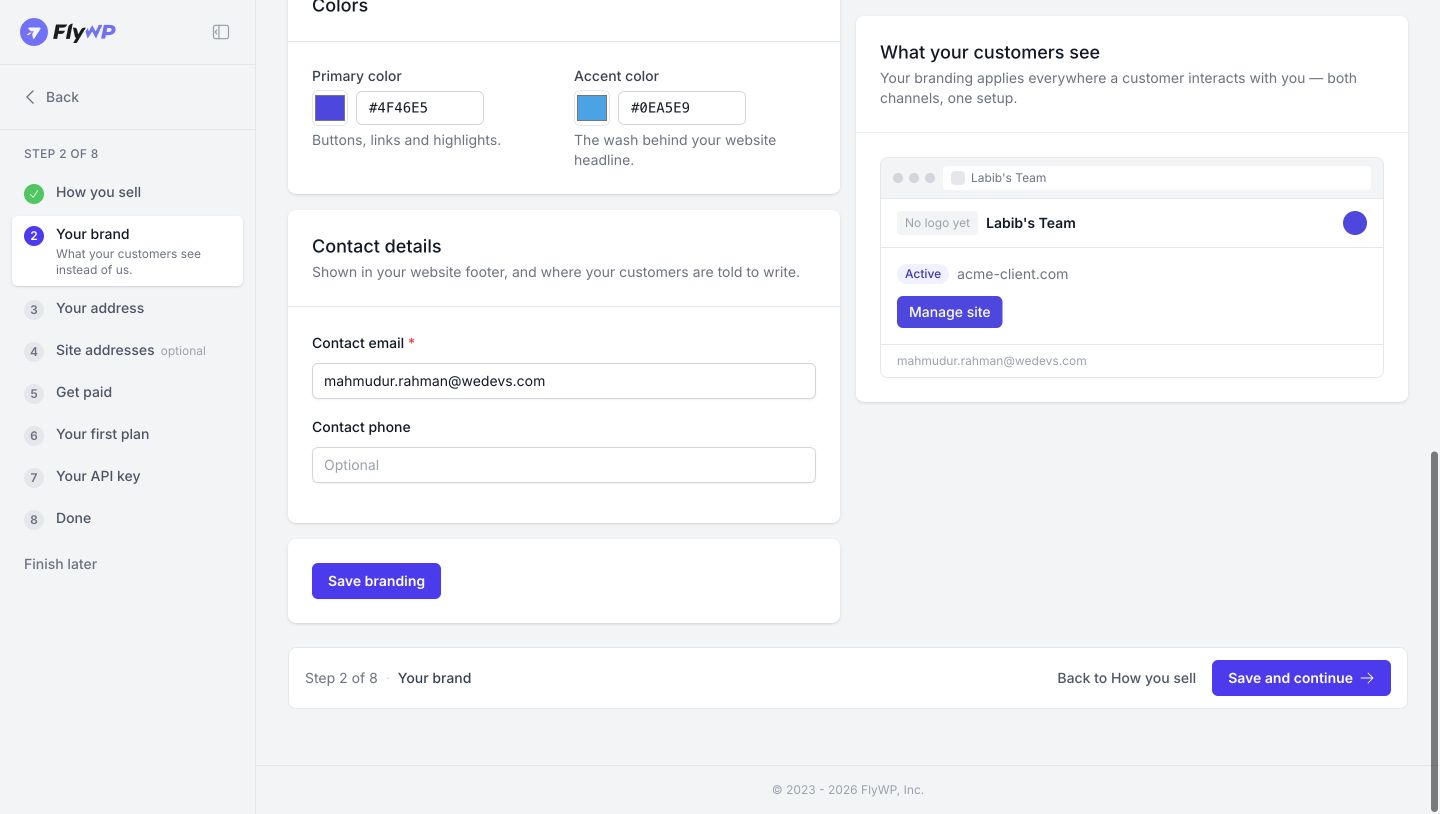
Choose a Primary color for buttons, links, and highlights. Choose an Accent color for the background wash behind the website headline. Enter the customer contact email and optional phone number shown in the website footer. Review What your customers see, then use Save branding or Save and continue.
Step 3: Confirm your customer address
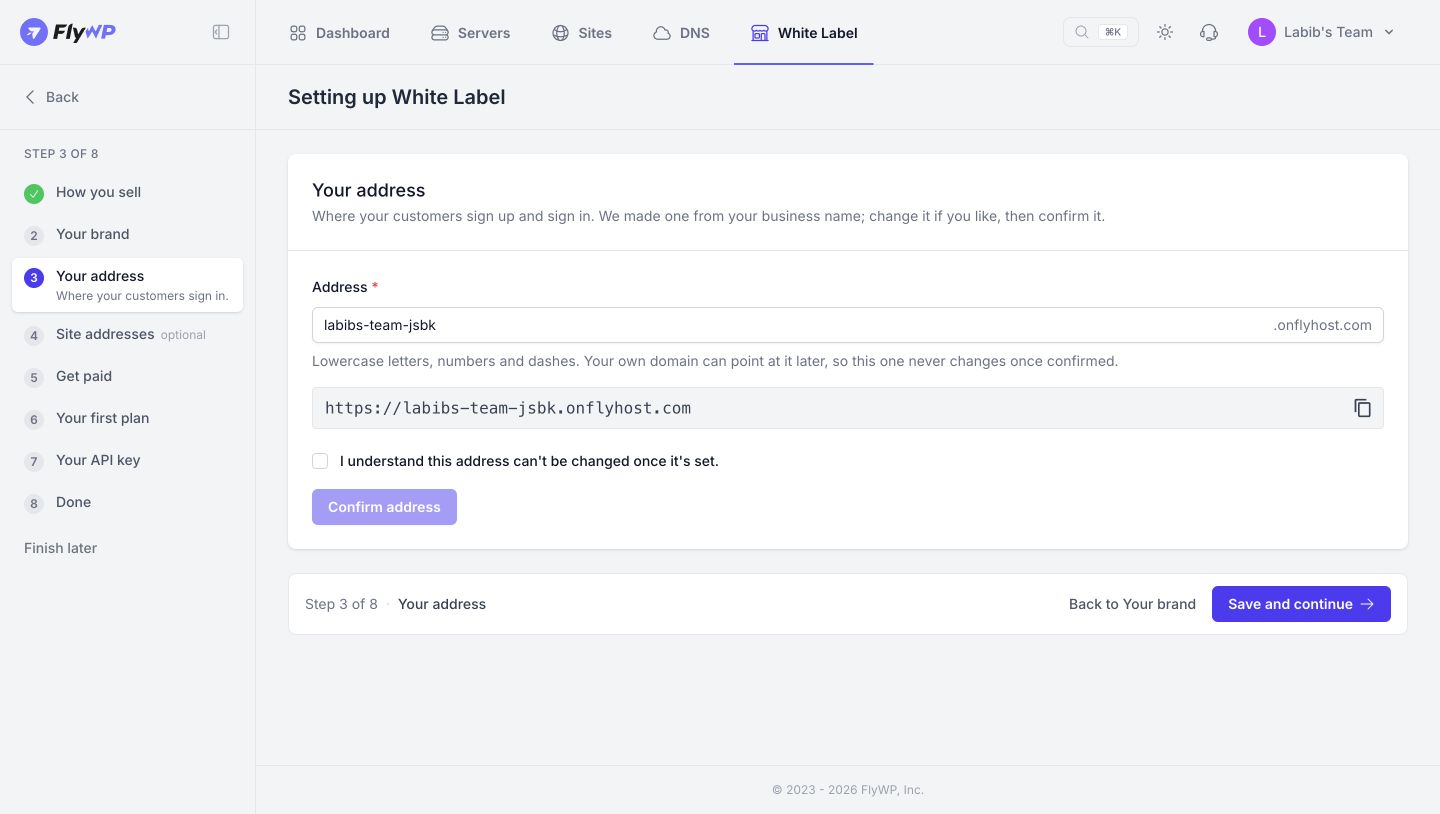
Section titled “Step 3: Confirm your customer address”Open Your address. FlyWP proposes an address based on your business name. You may edit the address before confirming it. Use lowercase letters, numbers, and dashes. The hosted address uses the form https://your-business.onflyhost.com.
Check the full address carefully, select the acknowledgement that it cannot be changed, and choose Confirm address. Once confirmed, the hosted address cannot be changed. Your own domain can point to it later.
Your FlyWP account at app.flywp.com and your branded customer address serve different purposes. Use app.flywp.com to manage your business. Give customers your branded address for their signup and login.
Step 4: Configure optional site addresses
Section titled “Step 4: Configure optional site addresses”Site addresses let a customer create a site without supplying a domain, using an address under a domain you control. Confirm Your address before configuring Site addresses. This setup step is optional and has a Skip for now action.
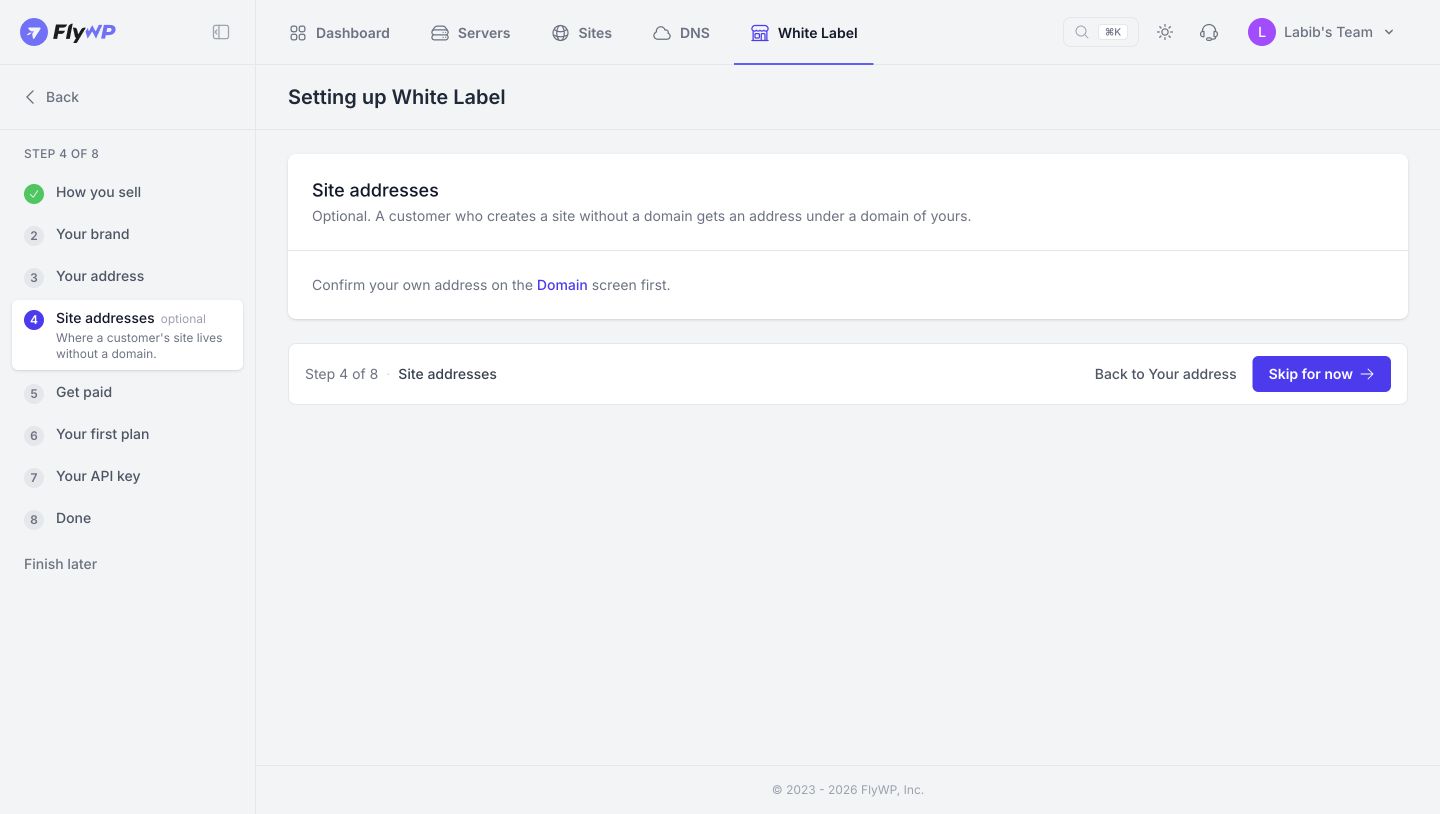
For a custom domain or optional site domain, follow the instructions shown after your hosted address is confirmed. Use the exact DNS record values displayed for your account. The screenshot shows this step locked until Your address is confirmed.
Step 5: Connect payments
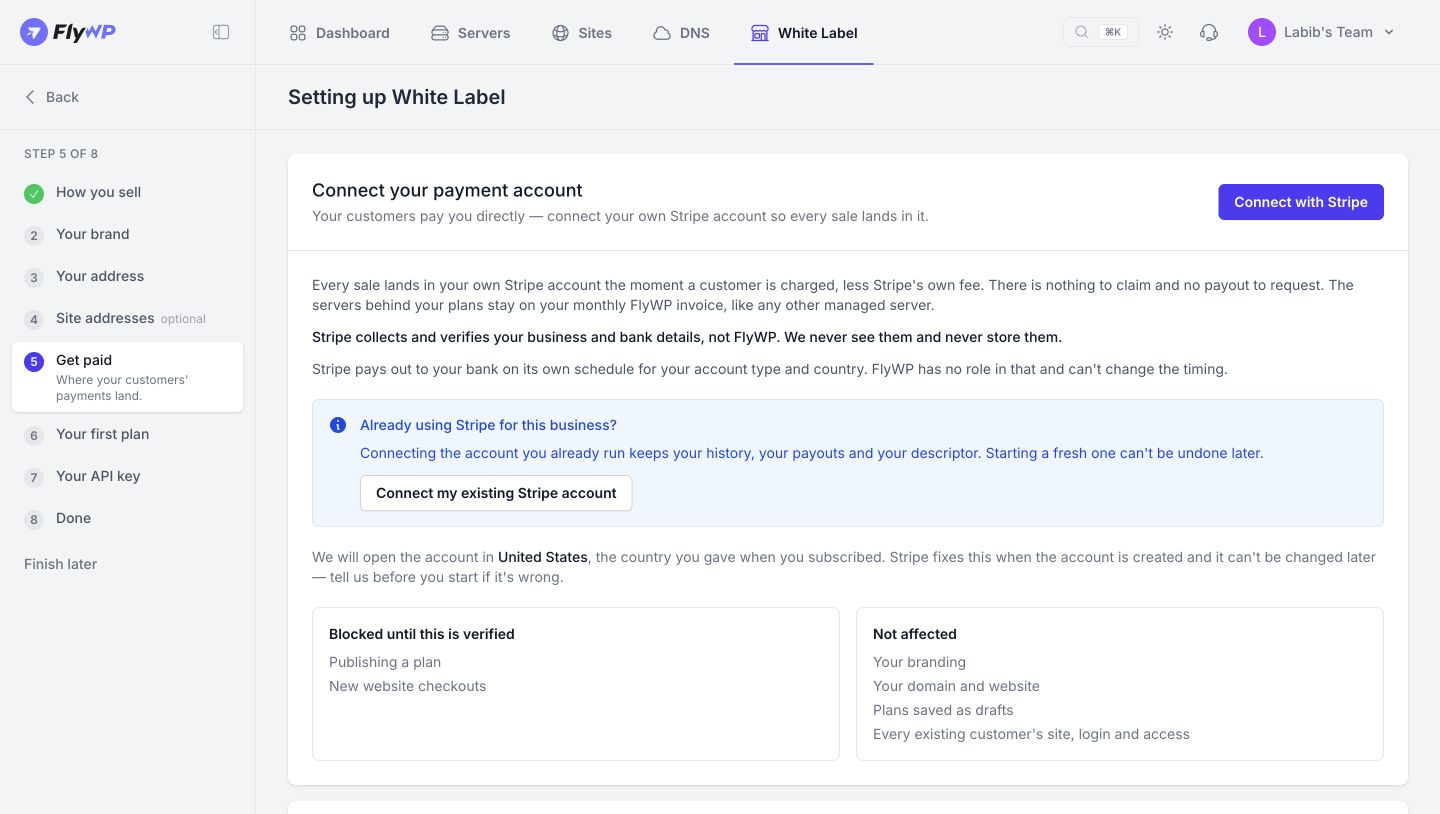
Section titled “Step 5: Connect payments”Open Get paid or Payment Account. Connect your own Stripe account so customer charges go to it. If you already use Stripe for the same business, choose Connect my existing Stripe account. Check the country displayed on this page before starting; Stripe fixes the country when the account is created. Contact FlyWP before proceeding if it is wrong.
Complete the connection and business verification requested by Stripe. Stripe collects the business and bank details. Customer charges go to your Stripe account less Stripe fees; bank payouts follow Stripe's schedule for your account type and country. The servers used by your plans remain on your monthly FlyWP invoice.
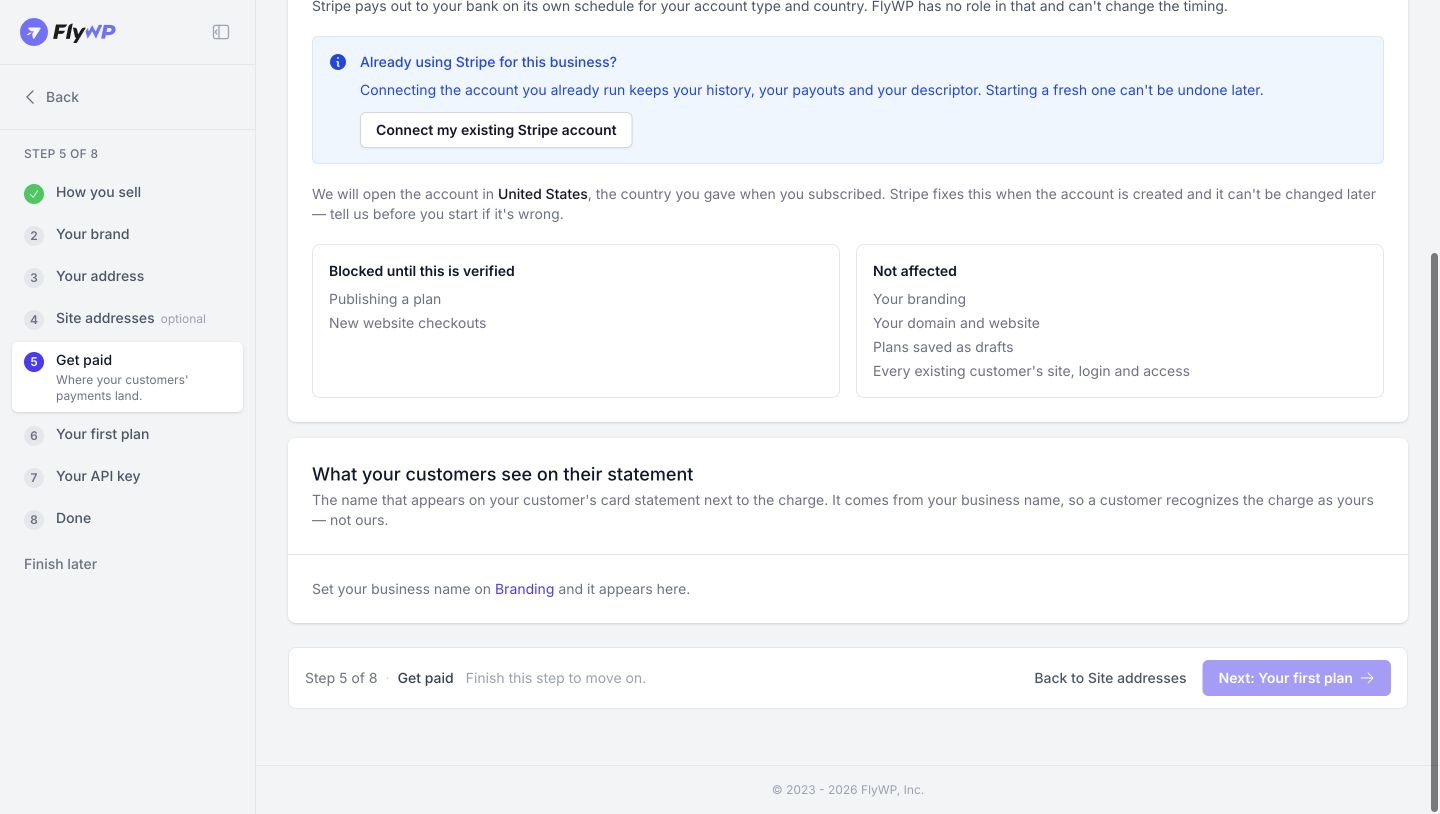
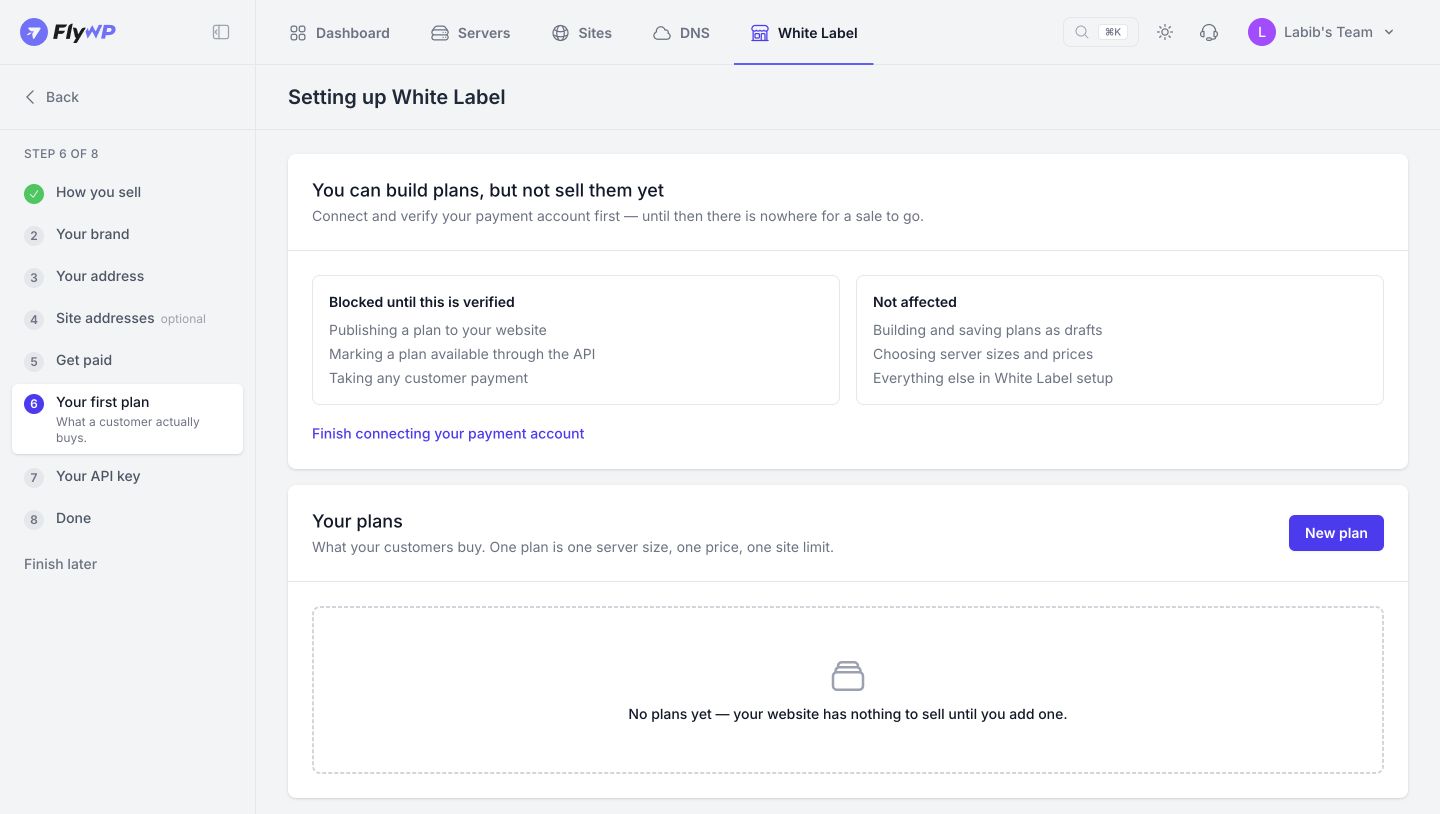
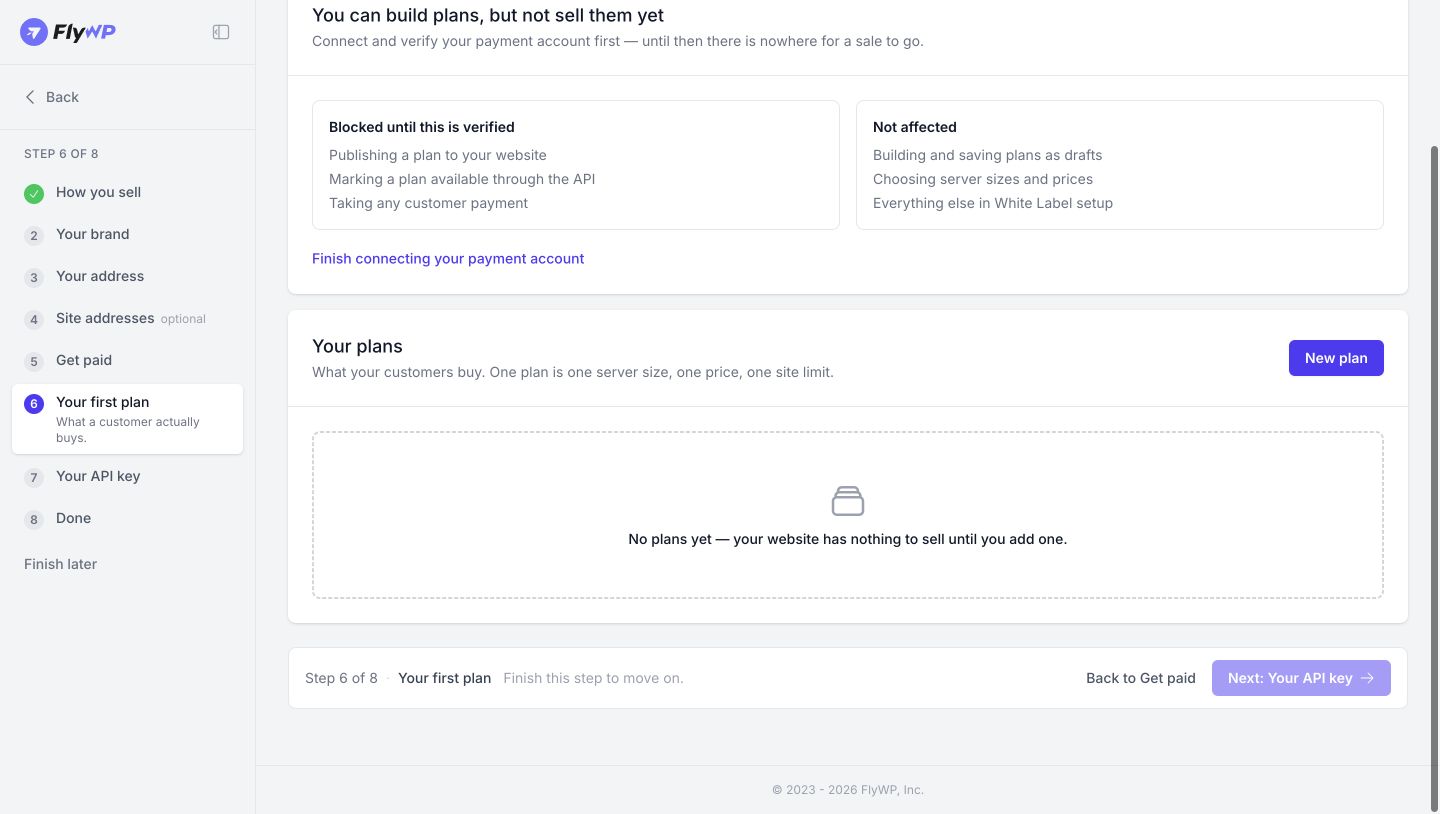
Until payment verification is complete, the interface blocks publishing plans, making plans available through the API, and taking customer payments. You can still prepare draft plans, choose server sizes and prices, and configure your brand and domain. Existing customer sites, logins, and access are not affected by this setup block.
Review the card statement name under What your customers see on their statement. It comes from the business name in Branding.
Step 6: Create a hosting plan
Section titled “Step 6: Create a hosting plan”Open Your first plan or Your plans and choose New plan. A plan defines the server size, price, and customer site limit. Plans use pools of servers that expand as customers add sites.
Select the hosting infrastructure
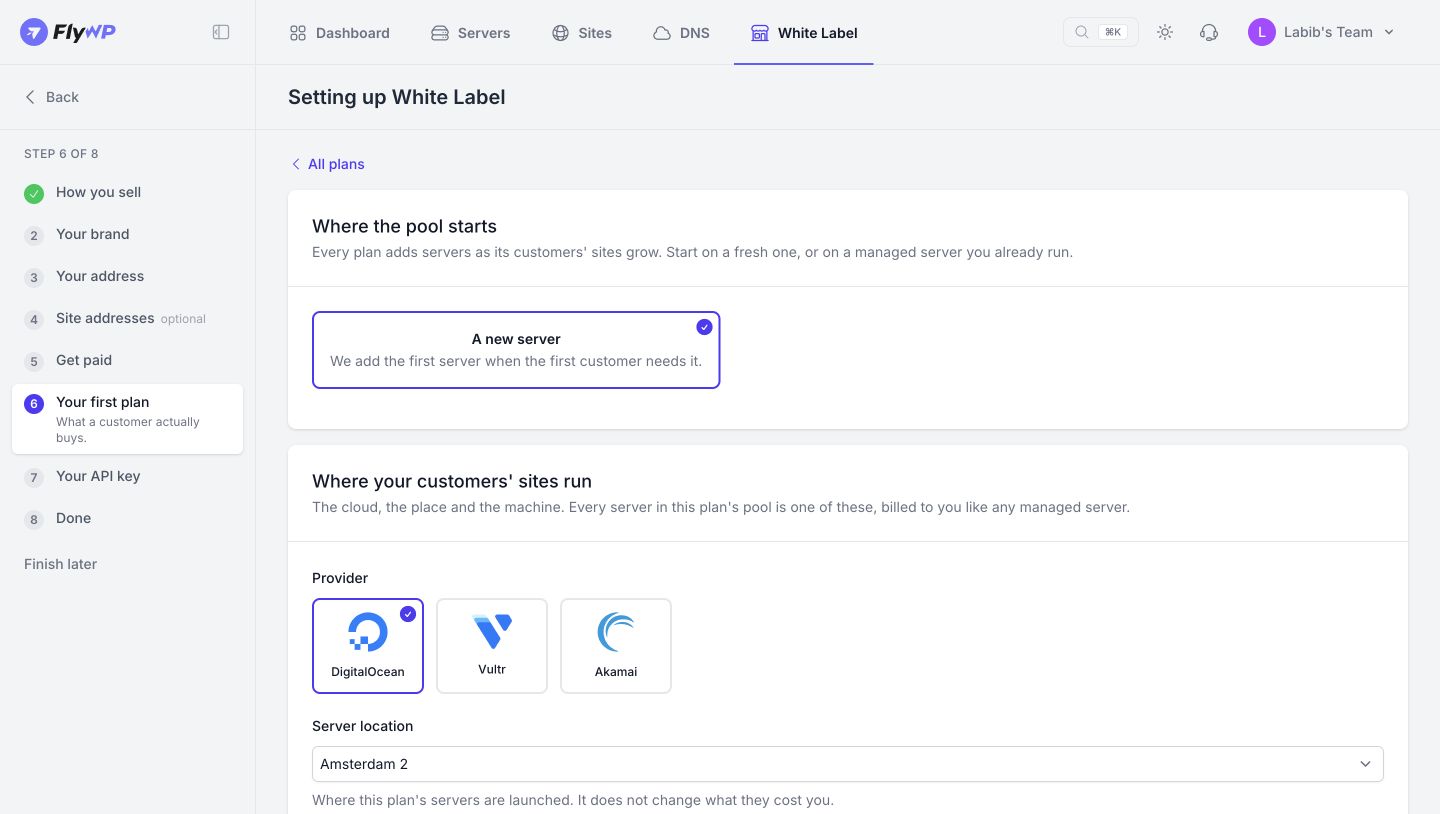
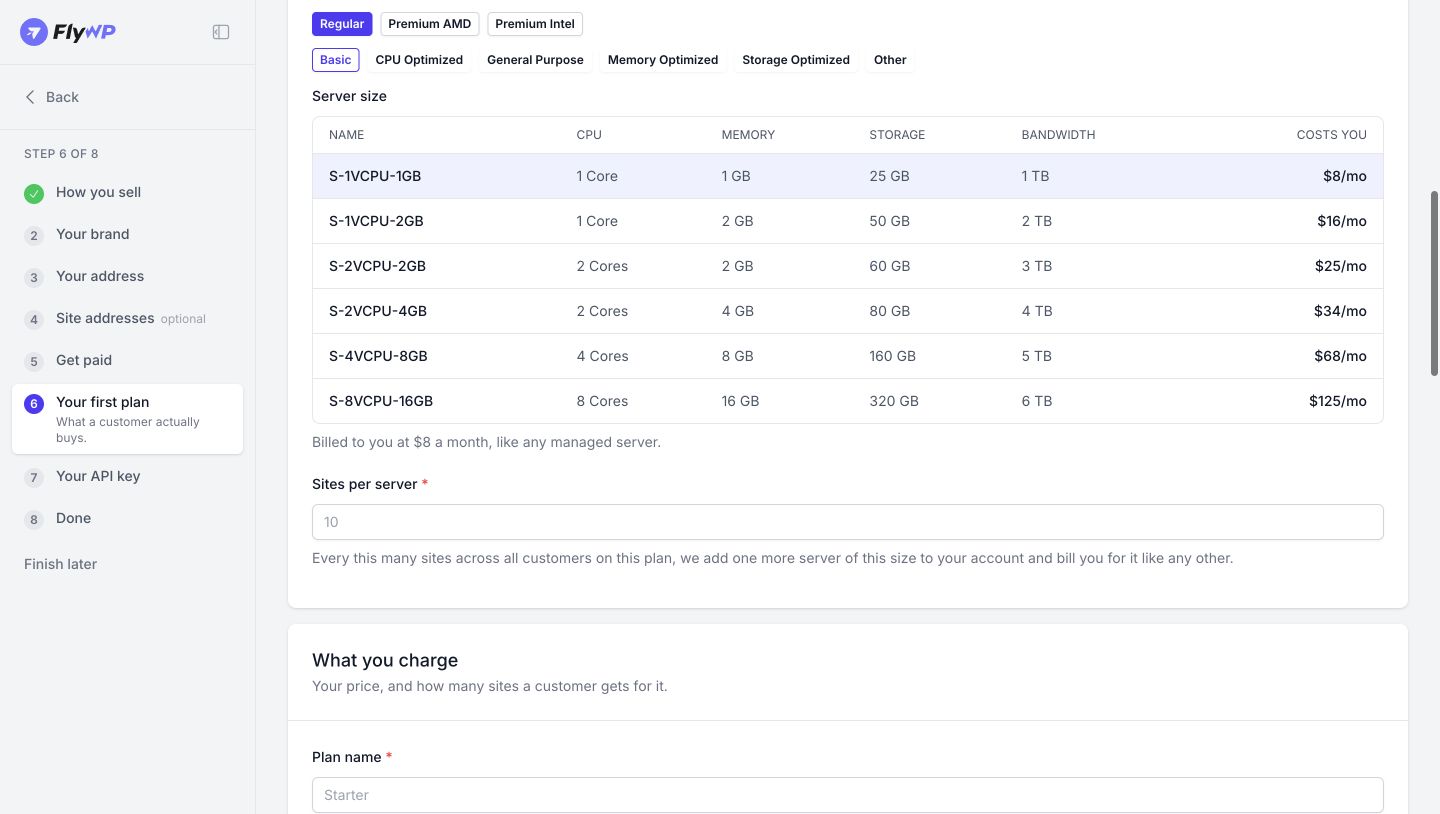
Section titled “Select the hosting infrastructure”Review Where the pool starts. The form describes starting with a fresh server or an eligible managed server you already run; use the choices available to your team. With a new server, the first server is added when the first customer needs it.
Choose a provider, location, and server size. The example screen shows DigitalOcean, Vultr, and Akamai. Read the current CPU, memory, storage, bandwidth, and Costs you values in the size table. Provider choices and prices should be checked in the live form when creating the plan.
Set Sites per server. This is the capacity threshold across all customers on the plan. Each additional server added to the pool is billed to your account like any other managed server. The threshold is separate from each customer's Site limit.
Set the customer price and allowance
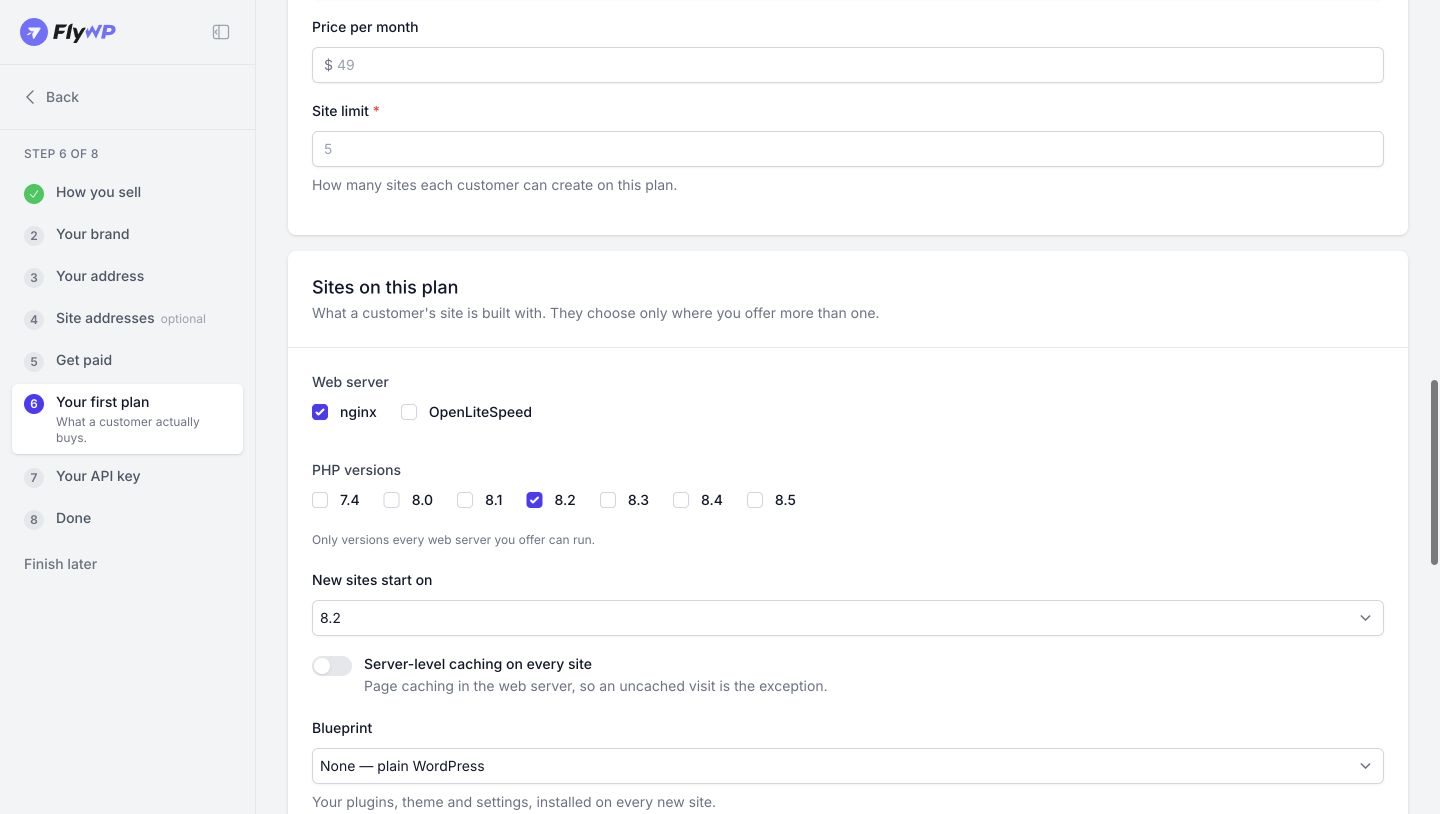
Section titled “Set the customer price and allowance”Enter Plan name, Price per month, and Site limit. Site limit controls how many sites each customer can create on the plan. Sites per server controls when the pool adds infrastructure. For example, a customer site limit of 5 and a server threshold of 10 describe different limits; neither field replaces the other.
Choose how new sites are built
Section titled “Choose how new sites are built”Offer nginx, OpenLiteSpeed, or the available combination. Select the PHP versions customers may use, then select the default in New sites start on. The form limits choices to versions supported by every web server you offer. Enable Server-level caching on every site if that is part of the plan.
Choose a Blueprint to install your selected plugins, theme, and settings on new sites, or choose None — plain WordPress. These settings apply to new sites; existing sites keep their current configuration. When offering runtime versions, choose versions appropriate for the customer's software and ongoing maintenance needs.
Prepare the storefront card and identifiers
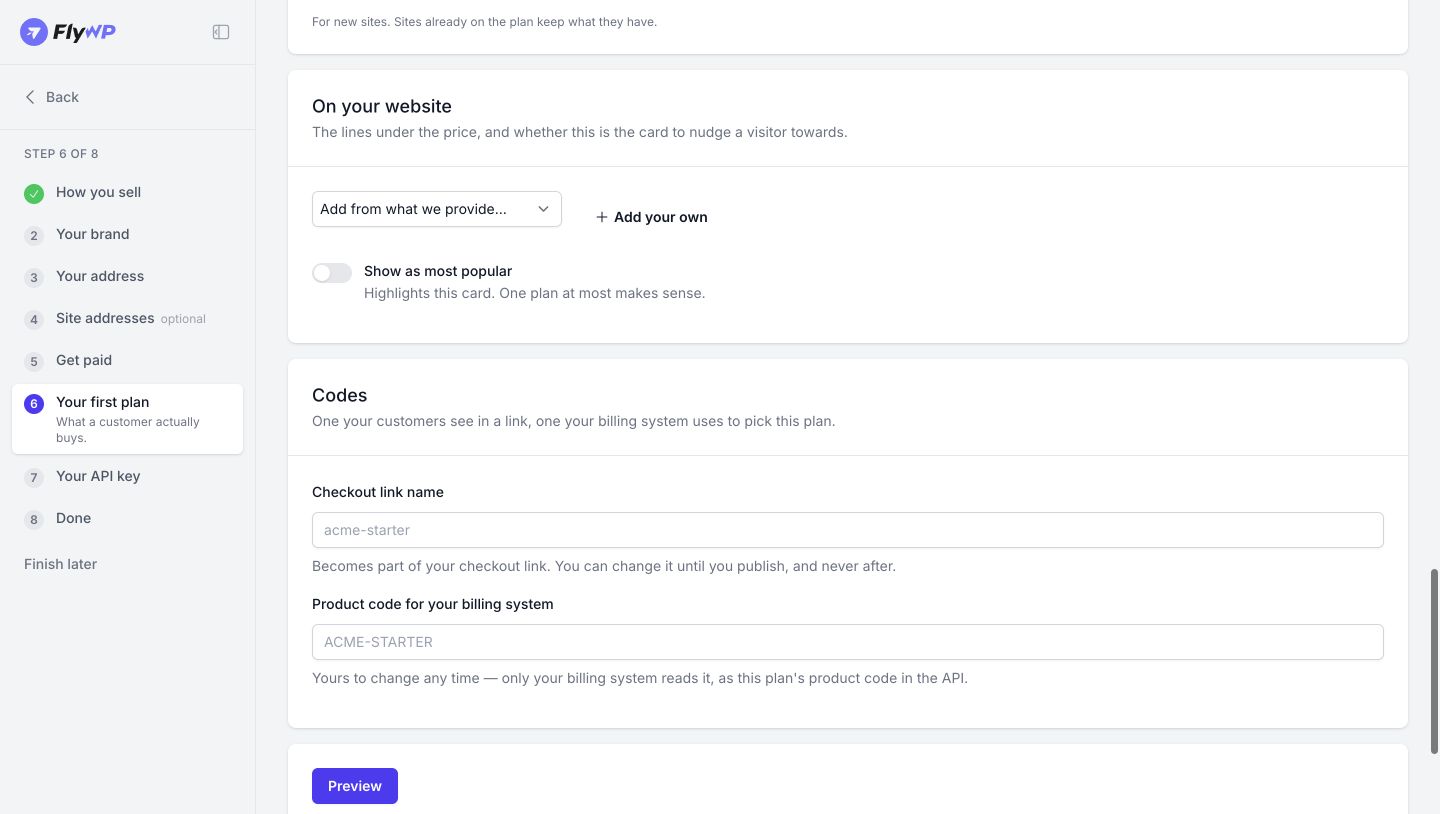
Section titled “Prepare the storefront card and identifiers”Under On your website, add the features displayed below the price. The form offers preset descriptions and Add your own. Select descriptions that match the service you provide. Show as most popular highlights a plan card.
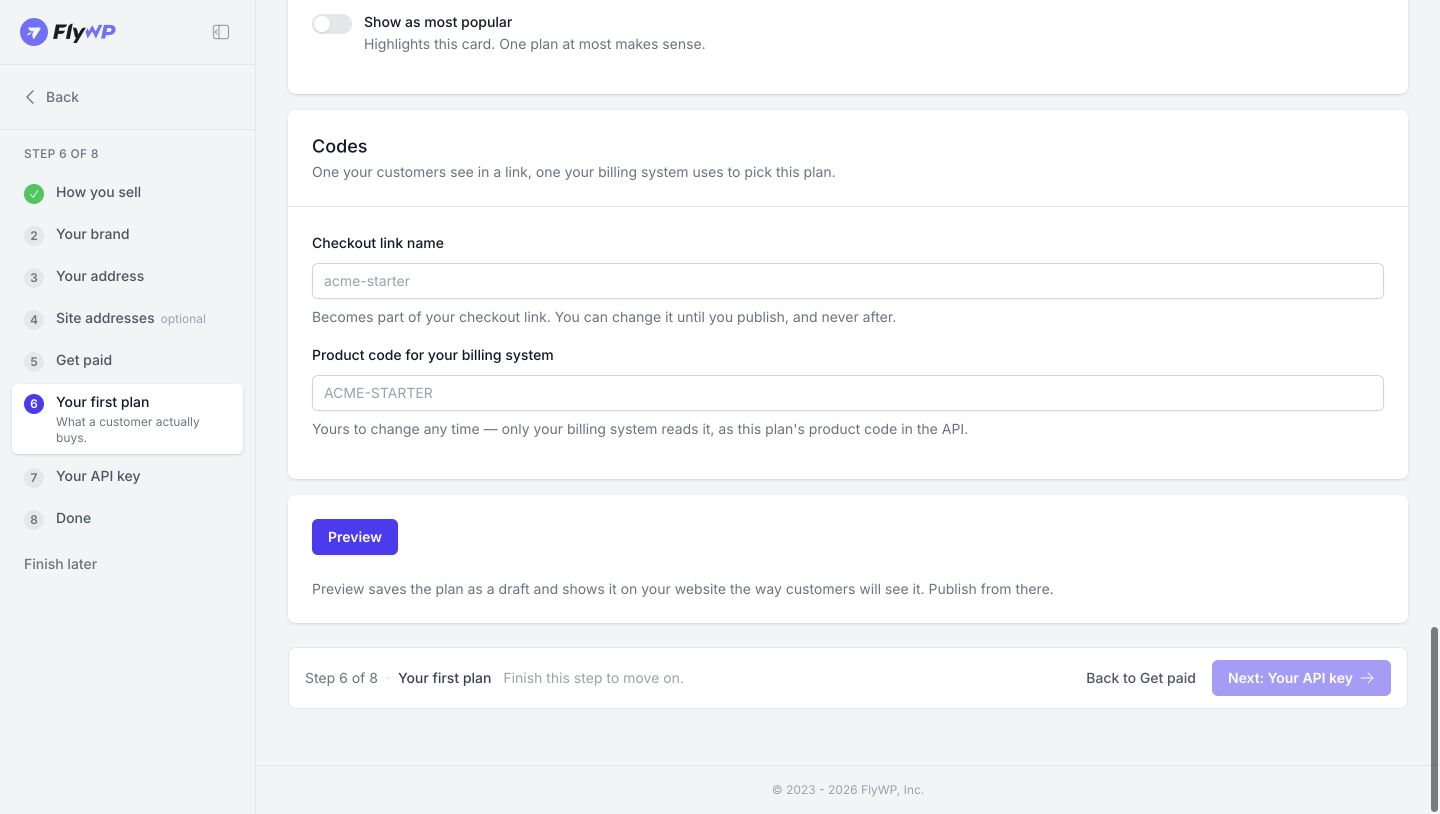
Checkout link name becomes part of the checkout URL. You can change it before publication, but never after publishing. Product code for your billing system identifies the plan in the API and can be changed later; coordinate any change with the integration using that code.
Choose Preview to save the plan as a draft and inspect its appearance on your website. Preview is a save action. Publish from the preview when the plan and its prerequisites are ready.
Check plan readiness
Section titled “Check plan readiness”Draft plans can be prepared before payment verification is complete. Finish the payment requirements before publishing a plan or making it available through the API.
Step 7: Connect your billing system through the API
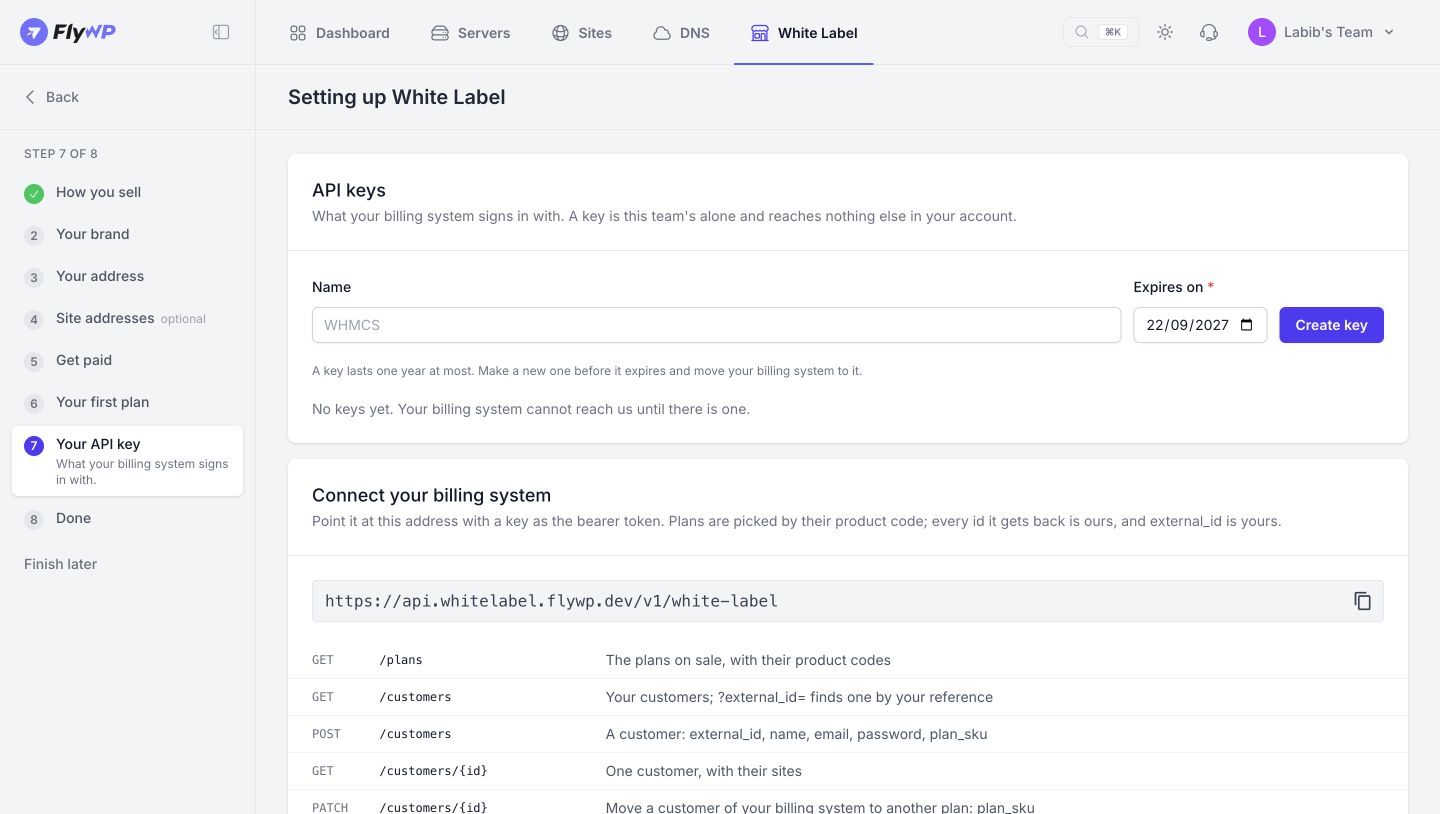
Section titled “Step 7: Connect your billing system through the API”Open Your API key or API keys. Enter a descriptive Name and Expires on date, then choose Create key. Keys belong to the selected team and do not reach other teams in the account. A key lasts at most one year. Create a replacement before expiry and move your integration to it.
Use the API base address displayed in the live API keys screen with the key as a bearer token. Copy the address from that screen rather than deriving it from app.flywp.com. Keep the key in your server-side billing integration, not in customer-facing browser code.
Plans are selected by their product code, passed as plan_sku. FlyWP returns its own resource IDs; external_id is your billing system's customer reference. Store both references so you can find the correct customer later.
Customer and plan operations
Section titled “Customer and plan operations”GET /plansreturns plans on sale with their product codes.GET /customerslists customers. Add?external_id=to find a customer by your own reference.POST /customerscreates a customer using external_id, name, email, password, and plan_sku.GET /customers/{id}retrieves one customer with their sites.PATCH /customers/{id}moves a customer managed by your billing system to another plan using plan_sku.POST /customers/{id}/suspendsuspends their sites and prevents additional sites.POST /customers/{id}/unsuspendresumes their sites.DELETE /customers/{id}ends the customer immediately. For a website subscription, it cancels without a refund and deletes every site.
Site operations
Section titled “Site operations”GET /customers/{id}/siteslists the customer's sites.POST /customers/{id}/sitescreates a site using site_title, domain, admin_username, and admin_password. Include stack and php_version where the plan offers a choice.DELETE /customers/{id}/sites/{site}deletes a site, including its files and database. The screen documents a 409 response while deletion is already in progress.
Treat customer and site deletion as destructive operations. For a temporary service interruption, use suspension when appropriate instead of deleting the customer. Confirm the correct customer or site identifier before issuing a deletion request.
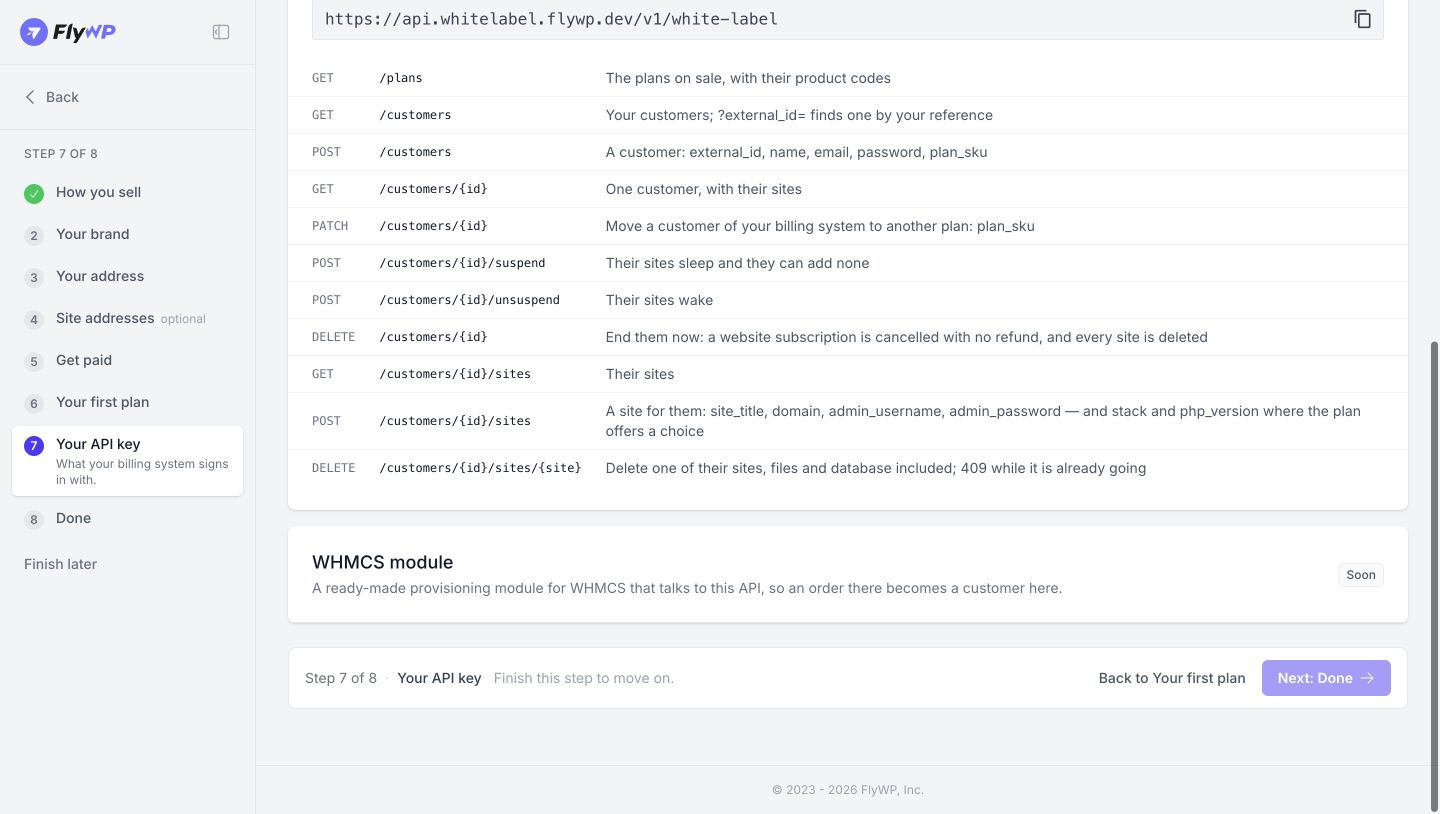
The API screenshot shows a development environment address. Copy the API base URL from your own live account; do not use the example address in the screenshot. The ready-made WHMCS module is marked Soon in the captured interface.
Step 8: Review setup before launch
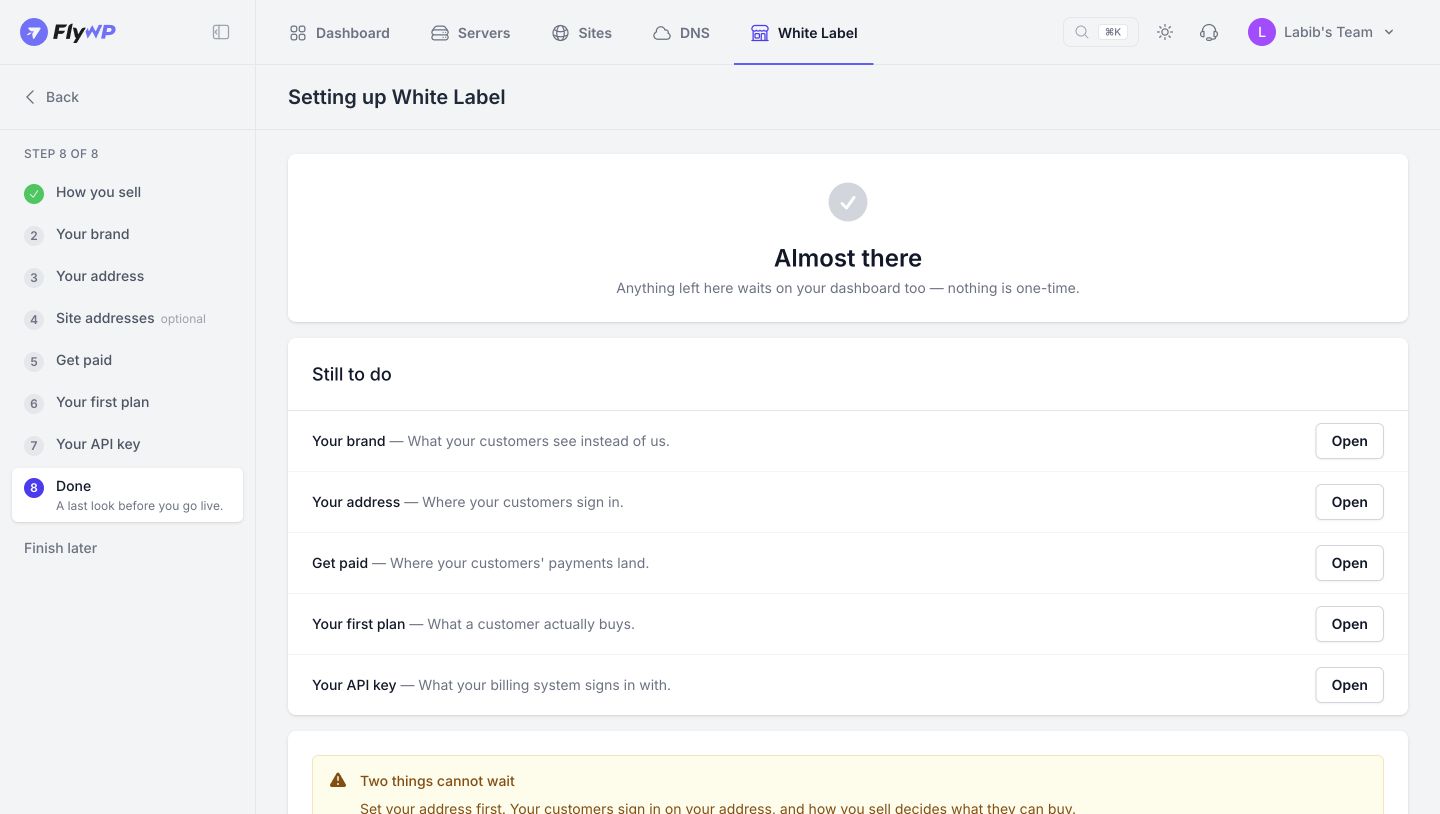
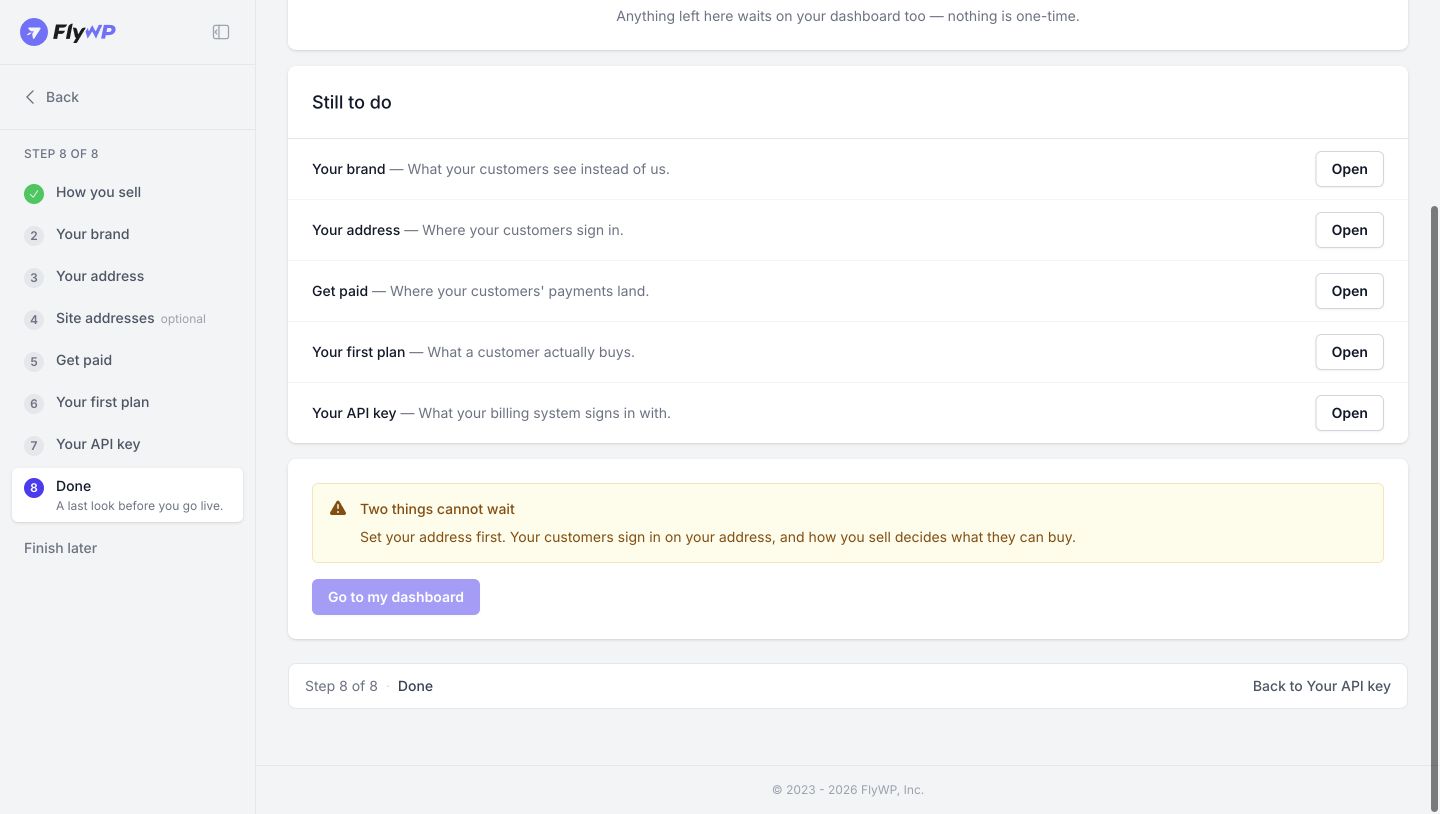
Section titled “Step 8: Review setup before launch”Open Done and review Still to do. Use Open beside an item to return to that section. Your address and your sales channel selection must be set before the dashboard can be opened. Complete the remaining requirements shown for your selected channels, then use Go to my dashboard when enabled.
Before sharing your website, check the displayed business name, logo, colors, support details, customer address, plan price, site allowance, checkout link name, and statement descriptor. Confirm payment readiness and the publishing state of the plans you intend to sell. For API sales, confirm the base URL, key expiry, and plan product codes in your integration.
Troubleshooting
Section titled “Troubleshooting”If the dashboard returns you to setup, open Done and finish the required items, particularly your address and sales channel selection.
If Site addresses only asks you to confirm a domain, complete Your address first.
If you can save drafts but cannot publish a plan or make it available through the API, check the payment account connection and verification status.
If a setup Next button is disabled, complete the current step's requirement. Use the step navigation to review other sections and Finish later to leave setup.
If a PHP version is unavailable, check whether all web servers selected for the plan support it.
If a new plan configuration does not change an existing site's stack or blueprint, this is expected: these plan settings apply to new sites.
If API access stops around the key expiry date, create a replacement key and update your billing system. Check that the key and customer IDs belong to the intended team.
If an API plan lookup or assignment fails after a product code was changed, compare the integration's plan_sku with the current product code.
If a bank payout has not arrived, check your Stripe account's payout status and schedule. FlyWP does not control Stripe's bank payout timing.
Frequently asked questions
Section titled “Frequently asked questions”What is FlyWP White Label?
Section titled “What is FlyWP White Label?”FlyWP White Label lets you configure your business identity, hosting plans, and customer pricing, then offer managed WordPress hosting to your customers.
How can I sell hosting?
Section titled “How can I sell hosting?”You can use either or both of these sales channels:
- Your own website: Offer a branded signup page, checkout, and customer dashboard.
- Your own billing system: Keep billing in WHMCS, WooCommerce, or another system and connect it to FlyWP through the API.
Both channels use the same customer and earnings view in FlyWP.
How do I get started?
Section titled “How do I get started?”Sign in at app.flywp.com, select your team, and open White Label. The setup wizard guides you through sales channels, branding, your address, payments, hosting plans, and API access when needed.
What branding can I customize?
Section titled “What branding can I customize?”You can configure your business name, logo, favicon, primary color, accent color, contact email, and optional phone number.
Use a PNG or JPG logo at least 64 pixels tall. A favicon is optional and should be a square PNG at least 32 × 32 pixels. Your business name is also used as the card descriptor, so keep it within the limit shown in the setup screen.
What address will my customers use?
Section titled “What address will my customers use?”During setup, you choose a branded address in the format yourbrand.onflyhost.com. Use lowercase letters, numbers, and dashes.
Choose carefully: this address cannot be changed after confirmation.
Can I use a custom domain?
Section titled “Can I use a custom domain?”Yes. You can point a custom domain to your White Label service later by following the domain instructions in your account.
Do I need to configure site addresses immediately?
Section titled “Do I need to configure site addresses immediately?”No. You can skip the site-address step during initial setup. To configure it later, first confirm your White Label address.
How do I receive customer payments?
Section titled “How do I receive customer payments?”For the hosted checkout, connect your own Stripe account. Stripe handles account verification and payouts to your bank account.
Check the country carefully when creating a Stripe account because it cannot be changed afterward. You can also connect an existing Stripe account.
How are hosting server costs paid?
Section titled “How are hosting server costs paid?”Hosting server charges appear on your monthly FlyWP invoice. These costs are separate from the prices you charge your customers.
What can I configure in a hosting plan?
Section titled “What can I configure in a hosting plan?”A plan includes its name, monthly price, customer site limit, server capacity, and website settings. You can also add storefront feature descriptions and mark a plan as Most popular.
Can I use an existing server?
Section titled “Can I use an existing server?”Yes, if it is eligible for the plan's server pool. You can also configure a new pool by choosing an available provider, location, and server size.
For a new pool, the first server is created when the first customer needs it.
What is the difference between “Site limit” and “Sites per server”?
Section titled “What is the difference between “Site limit” and “Sites per server”?”Site limit controls how many sites an individual customer can create under a plan.
Sites per server controls how many sites a server hosts across customers. When more capacity is needed, additional servers are created and billed.
Can I choose the web server and PHP versions?
Section titled “Can I choose the web server and PHP versions?”Yes. Plan settings include NGINX or OpenLiteSpeed and compatible PHP versions. You can choose which options customers receive and set the defaults for new sites.
Can new sites start from a template?
Section titled “Can new sites start from a template?”Yes. You can select a blueprint or start with a plain WordPress installation.
Do website-default changes update existing sites?
Section titled “Do website-default changes update existing sites?”No. Website defaults apply to newly created sites. Existing sites keep their current configuration.
How do I publish a hosting plan?
Section titled “How do I publish a hosting plan?”Configure the plan, select Preview to save it as a draft, review it, and publish it from the preview. Required setup checks, including payment verification, must be complete before publishing.
Can I change a plan's checkout link?
Section titled “Can I change a plan's checkout link?”The checkout-link slug cannot be changed after the plan is published. Review it carefully before publishing.
What is a product code?
Section titled “What is a product code?”The product code identifies a plan in an integration. API requests refer to it as plan_sku.
You can change the product code, but update any integrations that use the previous value.
Can I connect my own billing system?
Section titled “Can I connect my own billing system?”Yes. The White Label API supports listing plans, creating and updating customers, changing eligible customers' plans, suspending and restoring access, and creating or deleting sites.
Your billing integration must connect the relevant billing events to these actions.
Where do I get API credentials?
Section titled “Where do I get API credentials?”Open the API-key step, give the key a descriptive name, and choose an expiry date. Keys are scoped to your team and can be valid for up to one year.
Keep the key private and copy the API base URL shown in your account rather than guessing it.
Is a ready-made WHMCS module available?
Section titled “Is a ready-made WHMCS module available?”The setup screen currently labels the ready-made WHMCS module as Soon. The API is available for building an integration.
Why can't I publish a plan or use it through the API?
Section titled “Why can't I publish a plan or use it through the API?”Check your payment-verification status. The setup flow requires payment verification before plans can be published or made available through the API.
Why is “Go to my dashboard” disabled?
Section titled “Why is “Go to my dashboard” disabled?”Review the Still to do section on the final setup screen. Your White Label address and sales-channel requirements must be completed before the dashboard becomes available.
What happens if I delete a customer through the API?
Section titled “What happens if I delete a customer through the API?”Deleting a customer deletes all their sites. For a customer with a website subscription, it also cancels that subscription immediately without issuing a refund.
This action is destructive. Use suspension when you only need to temporarily restrict access.
What happens if I delete an individual site through the API?
Section titled “What happens if I delete an individual site through the API?”The site's files and database are deleted. Make sure you have any required backups before proceeding.
Get help
Section titled “Get help”Use Support and Resources in FlyWP for help with setup. Include the affected step and the message shown on screen. Keep API keys and account or customer passwords out of support messages.
Still stuck? How can we help?