Deploy an Astro Site on FlyWP Through Git
Deploy an Astro repository using FlyWP's JavaScript site wizard. Use Static runtime for generated pages, or configure Astro's Node adapter and use Server runtime for request-time rendering.
For Git provider access, DNS, and release management, see the shared Git deployment guide.
Before you begin
Section titled “Before you begin”You need an active FlyWP-managed server, a connected Git provider, and an Astro app with package.json at the repository root. The current wizard excludes monorepos. Commit source, astro.config and other necessary configuration, dependencies, and the lockfile.
Choose a Node major satisfying your installed Astro version and integrations. If they support Node.js 22, declare "engines": { "node": "22.x" } to make the intended major explicit. Check the framework's minimum minor version too; a supported major alone may not be sufficient.
Choose Static or Server
Section titled “Choose Static or Server”Astro normally builds a static site. Use Static when the generated pages and assets are enough for your site. Use Server when the application needs request-time pages, server endpoints, or server-side session behavior. Framework configuration and FlyWP runtime must agree. Astro deployment guide.
Interactive React, Vue, or other hydrated components can still exist on a static site. Their browser-side code does not by itself require an Astro server. Backend operations still need a backend service.
Option A: Prepare a Static site
Section titled “Option A: Prepare a Static site”For a standard project, merge these settings into astro.config.mjs:
import { defineConfig } from 'astro/config';
export default defineConfig({  site: 'https://example.com',  output: 'static',});
Replace example.com with your public hostname when known, and retain existing integrations and configuration. The site option identifies the final URL for features that need it. Astro's default build output directory is dist; adjust the hosting path if your project changes outDir. Astro configuration reference.
Ensure package.json has a build script:
{ "scripts": { "build": "astro build" }, "engines": { "node": "22.x" }}Test in your development checkout:
npm cinpm run buildPreview dist with a local static server. Check a nested page, assets, and any browser-side API calls. Verify that every expected route was generated before deploying.
Option B: Prepare a Server application
Section titled “Option B: Prepare a Server application”Install Astro's Node adapter in your local project and commit the updated manifest and lockfile:
npx astro add nodeReview the resulting configuration. A standalone server setup uses:
import { defineConfig } from 'astro/config';import node from '@astrojs/node';
export default defineConfig({  output: 'server',  adapter: node({ mode: 'standalone' }),});
Merge this into your existing configuration. With the default output directory, the standalone entrypoint is dist/server/entry.mjs; the adapter also produces client assets. Do not configure middleware mode with the standalone start command. Astro Node adapter.
Build and test locally:
npm cinpm run buildHOST=0.0.0.0 PORT=4321 node dist/server/entry.mjsPort 4321 is a local test example. Open the reported address, verify request-time functionality, and stop the process. Production networking must match FlyWP's upstream; this example does not establish its production port.
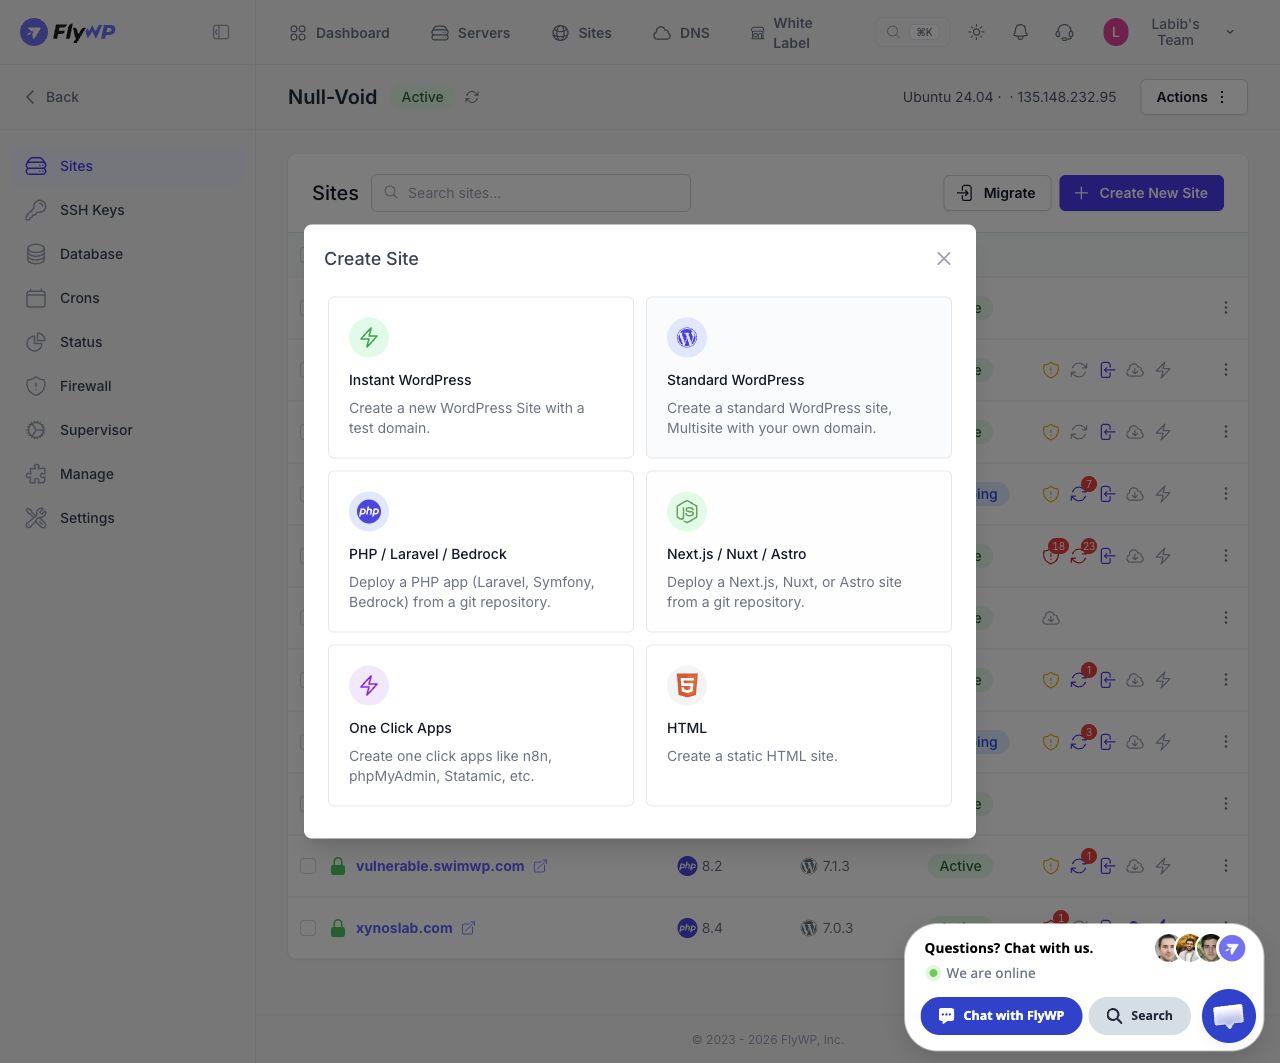
Open the JavaScript site wizard from the application selector. Select the image to view the full screen.
Create the site in FlyWP
Section titled “Create the site in FlyWP”- Sign in to FlyWP.
- Open Dashboard → New Site → Select Server → Continue → Node.js Next.js / Nuxt / Astro.
- On Domain, select Use flywp.xyz test domain or enter your custom Domain Name. Configure the available DNS/HTTPS options for a custom domain, then click Next.
- On Configure Git, select Astro and enter the settings for your build mode.
| Field | Static | Server |
|---|---|---|
| Application Type | Astro | Astro |
| Runtime | Static | Server |
| Package manager | npm | npm |
| Build command | npm run build | npm run build |
| Start command | Hidden; no Node process | node dist/server/entry.mjs |
| Web directory | /dist — observed wizard value | /dist — observed wizard value; confirm client asset handling on deployment |
These values were observed in the live wizard for an Astro selection. If your project uses a custom outDir, update both paths as necessary. A Server build's dist contains server and client output; verify Nginx and adapter asset handling instead of treating all output as publicly served HTML.
Choose the matching package manager. For example, use pnpm run build with pnpm. Dependency installation happens before the build command.
- Select your Git provider, Repository, and release Branch.
- Enable Push to deploy if pushes to that branch should trigger releases.
- Click Next and complete Installation. In the inspected test-domain flow, Site Title determines the test hostname.
- Review Summary, including the runtime, commands, web directory, branch, and domain. Click Create Site when correct.
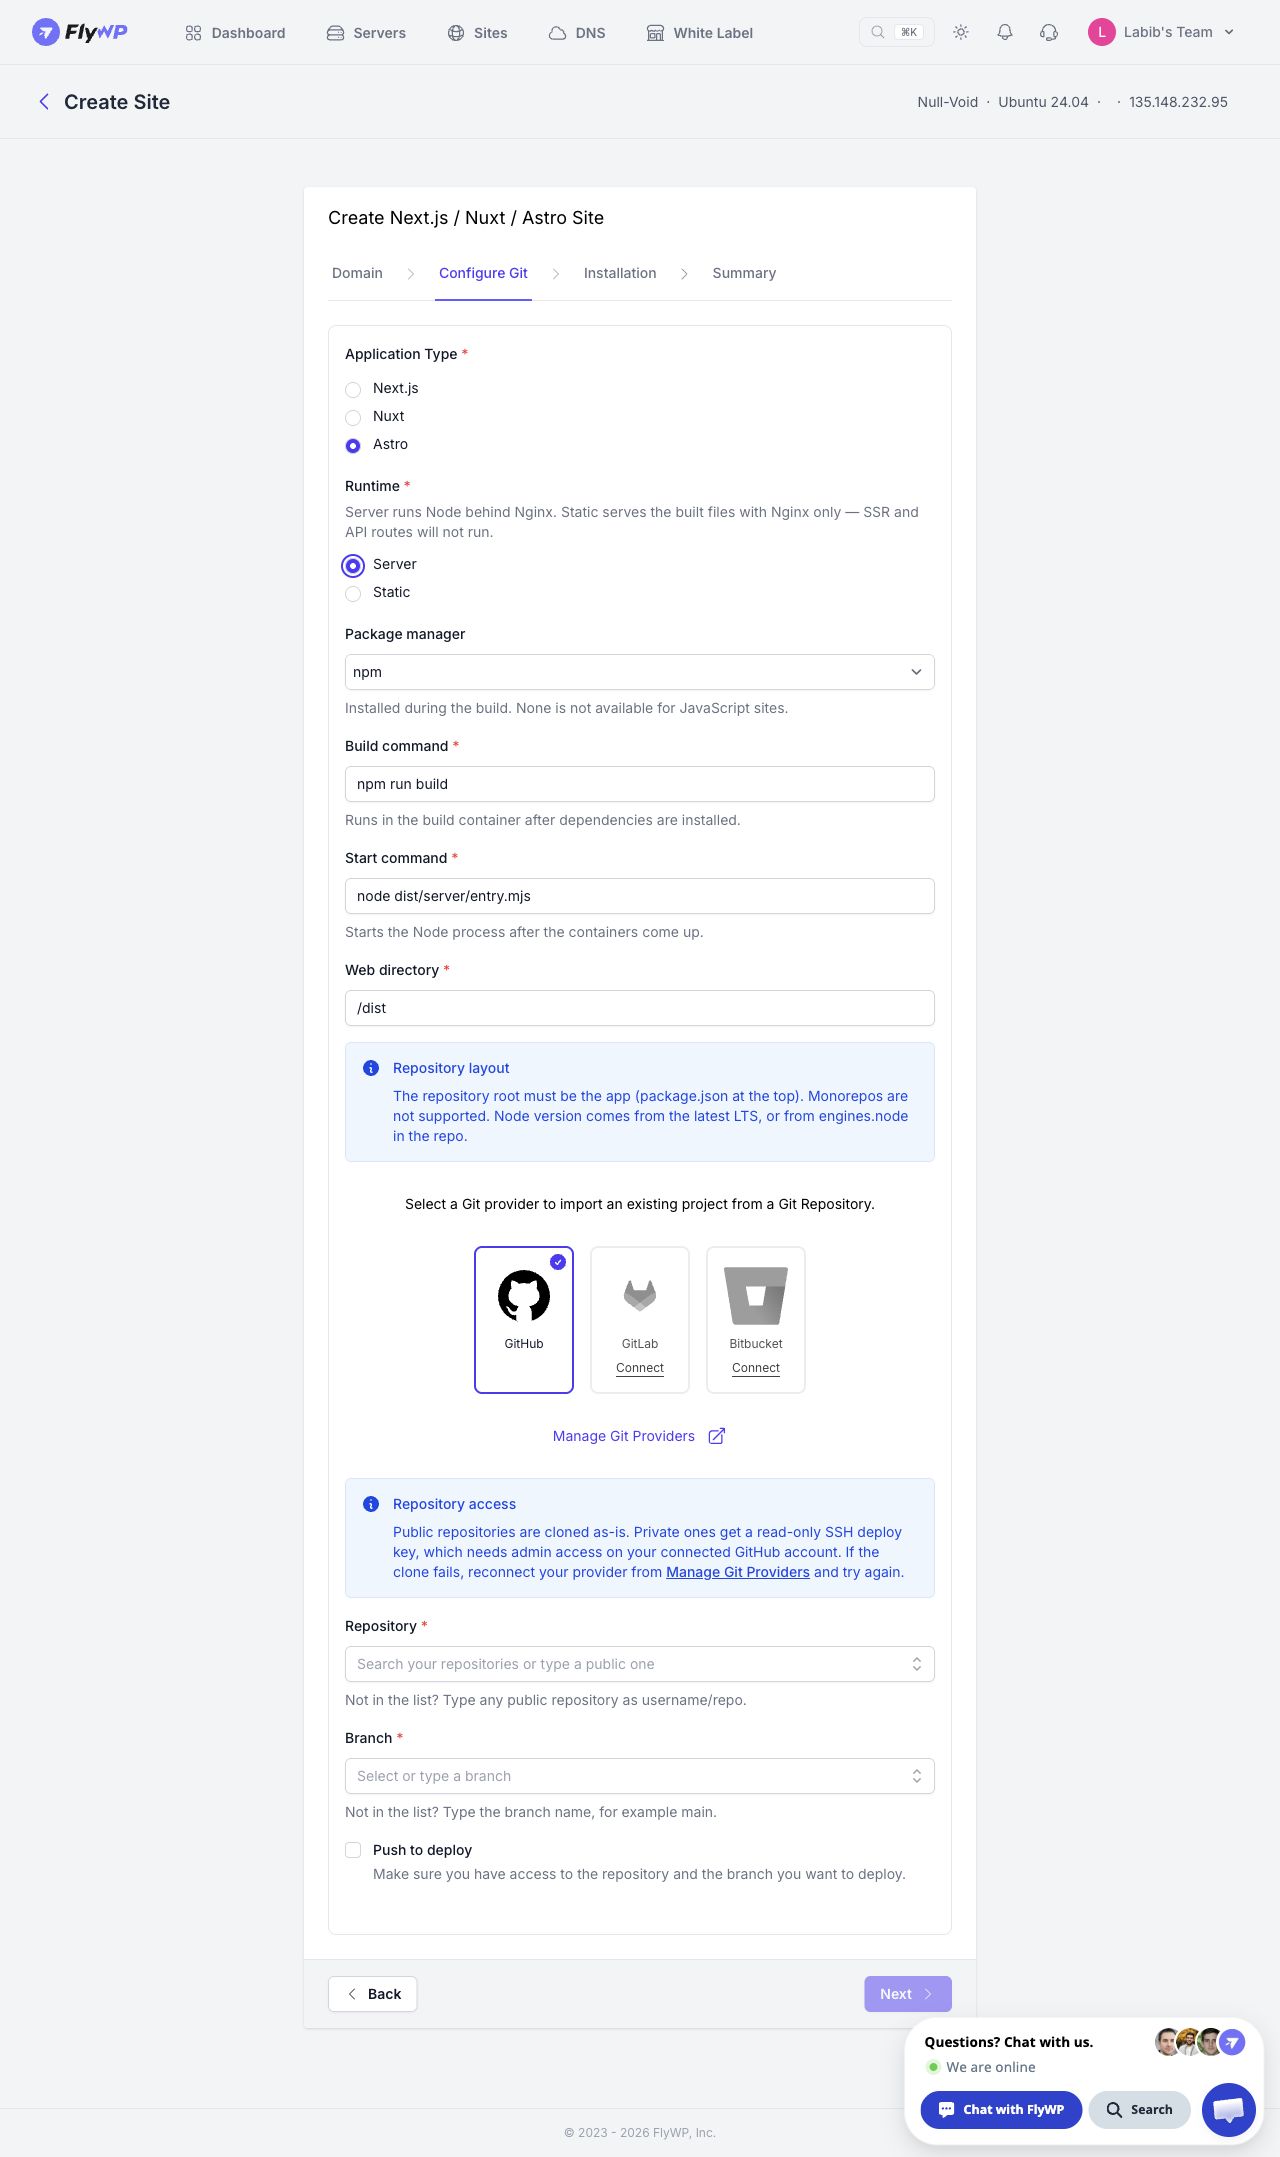
Astro Server setup in the actual FlyWP app. Repository and branch remain to be selected. Select the image to view the full screen.
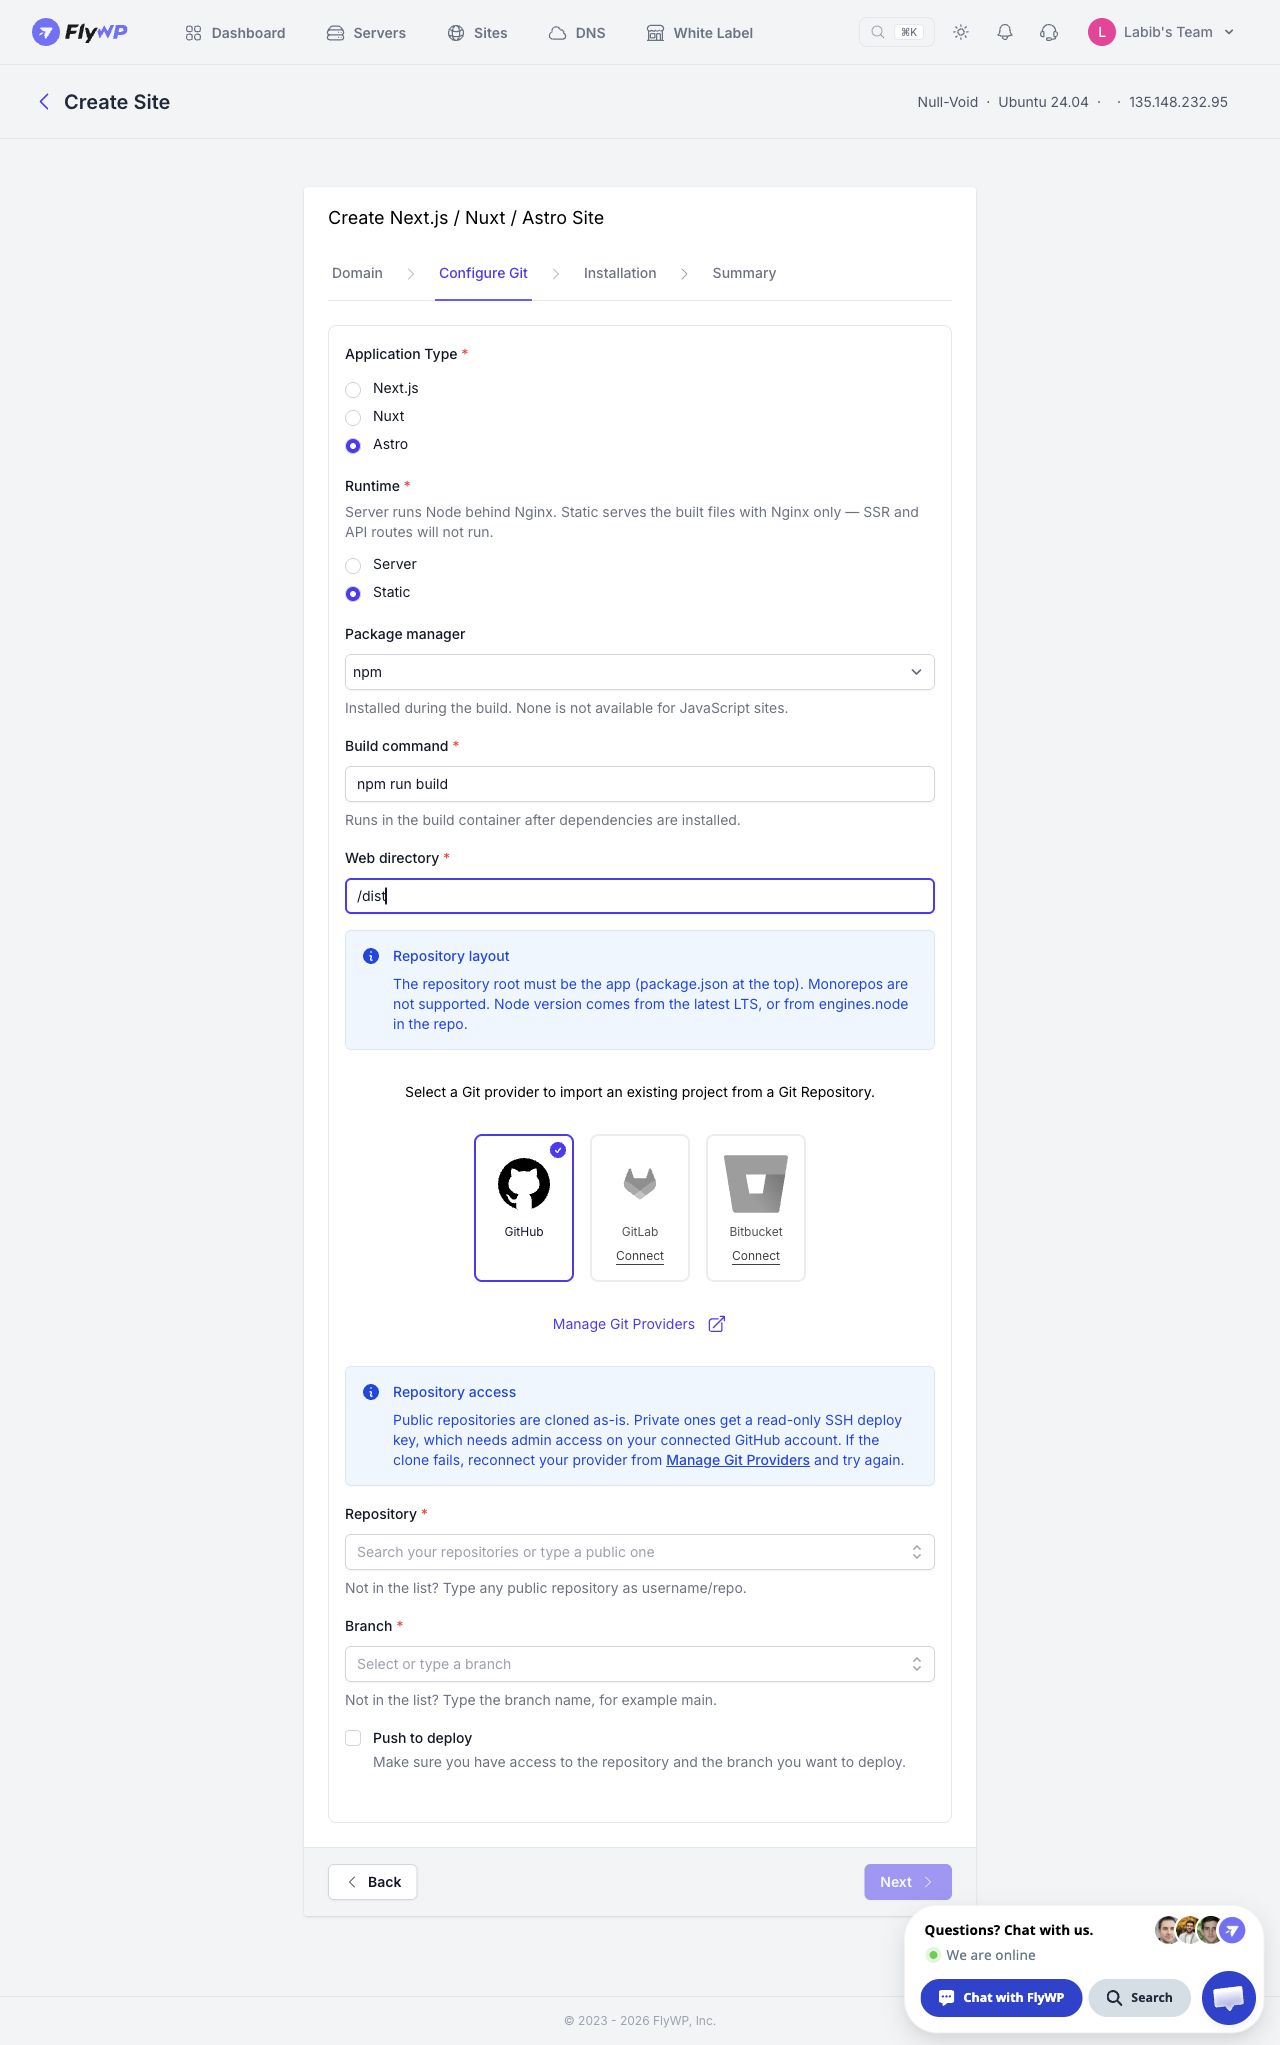
Astro Static configuration example entered in the real wizard. These settings were not deployed. Select the image to view the full screen.
Environment variables
Section titled “Environment variables”Astro's Vite-style variables are read through import.meta.env. Variables prefixed with PUBLIC_ may be exposed to browser code; keep credentials private. Values used during static generation need to be available at build time, and a static site has no application process that can read new runtime values. Astro environment variables.
For example:
PUBLIC_API_BASE_URL=https://api.example.comCMS_TOKEN=<private-build-or-server-token>Provide these through your site's environment configuration, not a committed credentials file. If your Server app needs runtime values, use the approach supported by your Astro version and Node adapter, such as server-side process.env or the appropriate astro:env configuration. Do not assume a build-time substitution changes when a process restarts.
The inspected FlyWP creation wizard has no environment editor. Confirm build/runtime injection on the created site, along with the application's bind address and expected proxy port.
Verify and update
Section titled “Verify and update”Read the deployment's build and startup logs, then open the public hostname in a signed-out browser. Test a direct nested URL, navigation, CSS, JavaScript, and images. Check any base path or public API URL against the final domain.
For Static runtime, confirm that pages exist under the configured output directory and do not depend on Astro server endpoints. For Server runtime, exercise a request-time route and check that client assets load as well as server responses.
Push subsequent updates to the configured branch and inspect the resulting release. Changing generated content or public build variables requires a new build. To recover a source change, push a revert commit and redeploy; persistent data needs separate recovery.
Troubleshooting
Section titled “Troubleshooting”| Symptom | Action |
|---|---|
astro command not found | Verify dependencies were installed and the manifest contains Astro |
| Missing server entrypoint | Check output: 'server', Node adapter, standalone mode, and build success |
| 403/404 on Static homepage | Check generated dist/index.html and Web directory |
| CSS/JS missing on Server | Check client output, asset URLs, and adapter/proxy serving behavior |
| Server-only route fails on Static | Use Server runtime or redesign it for build-time/external API use |
| Old public URL or content | Rebuild using the updated build-time values |
| 502 | Check process errors and match bind address/port with FlyWP's proxy |
Related guides
Section titled “Related guides”Still stuck? How can we help?