Deploy a Next.js Site on FlyWP Through Git
Use FlyWP's JavaScript site wizard to deploy a Next.js repository. Choose Server runtime for a running Next.js application, or Static runtime for a project configured to export HTML.
For provider access, domains, and release management, see the shared Git deployment guide.
Before you begin
Section titled “Before you begin”Prepare a FlyWP-managed server and a Git provider connection. Your repository must contain the app's package.json at its root. Commit the application source and lockfile. The current FlyWP wizard does not support monorepos.
Use a Node version compatible with your installed Next.js release. You can declare a supported major in engines.node; for example, "node": "22.x" if your app and dependencies support it. Do not change framework dependencies merely to copy these examples.
Choose Server or Static
Section titled “Choose Server or Static”Next.js supports a Node server deployment and a more limited static export. A Node deployment builds the application and starts its production server. Static export writes files for a web server to serve. Next.js deployment documentation.
Choose Server when your project requires request-time rendering, Server Actions, session-dependent responses, or dynamic server endpoints. Choose Static for a site whose required pages and assets can be produced during the build. Features requiring a live server do not become available by selecting Static in FlyWP.
Option A: Prepare a Server application
Section titled “Option A: Prepare a Server application”Merge these scripts into package.json, retaining your existing dependencies and other scripts:
{ "scripts": { "build": "next build", "start": "next start" }, "engines": { "node": "22.x" }}In your local development checkout, install from your committed npm lockfile and test the production build:
npm cinpm run buildnpm startOpen the local address reported by the process, verify a page and a server-dependent route, then stop it. Use your own package manager's commands if you are not using npm.
For the ordinary next start workflow, do not add output: 'export'. A project already using standalone output needs its corresponding server entrypoint and asset packaging; that is a separate deployment configuration from the standard example here.
Option B: Prepare a Static application
Section titled “Option B: Prepare a Static application”Merge a static export configuration into next.config.mjs:
/** @type {import('next').NextConfig} */const nextConfig = {  output: 'export',  trailingSlash: true,};
export default nextConfig;
Keep your existing configuration where needed. next build produces an out directory with the export. Dynamic routes need their build-time parameters. The default server image optimizer is unavailable; configure a suitable custom loader or explicitly use unoptimized images if your project uses next/image. Server Actions and request-time server behavior require Server runtime. Next.js static export documentation.
Build locally and inspect out:
npm cinpm run buildServe that directory using your local static server and test nested URLs by opening them directly. trailingSlash creates directory-style page URLs; still verify FlyWP's actual Nginx behavior on deployment.
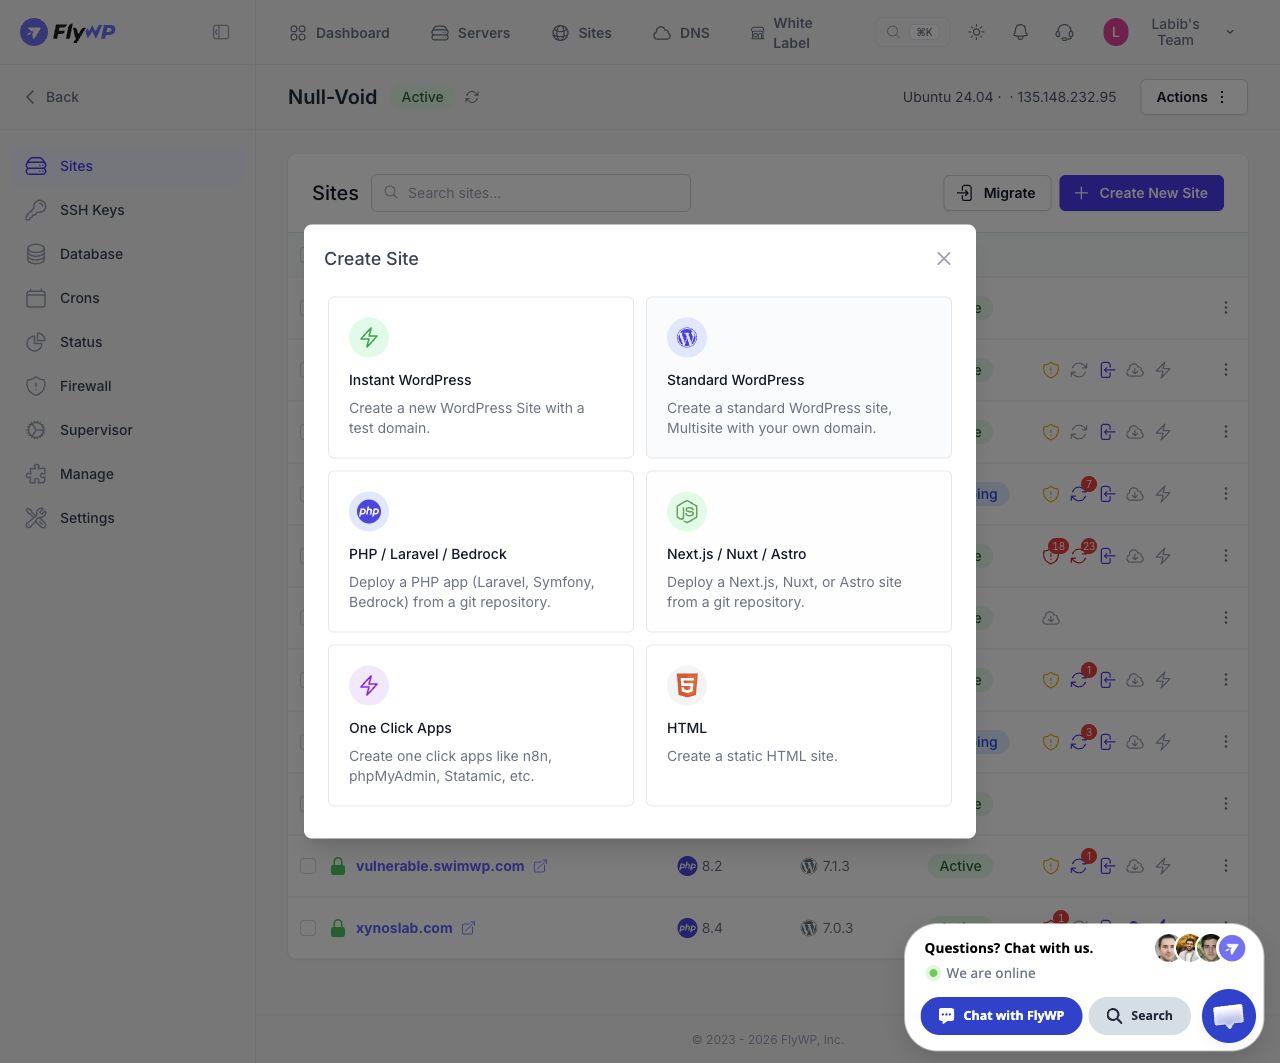
Open the JavaScript site wizard from the application selector. Select the image to view the full screen.
Create the site in FlyWP
Section titled “Create the site in FlyWP”- Open FlyWP.
- Go to Dashboard → New Site → Select Server → Continue.
- Select Node.js Next.js / Nuxt / Astro.
- On Domain, choose Use flywp.xyz test domain or enter a custom Domain Name. Configure the available HTTPS and DNS options for a custom domain, then click Next.
- On Configure Git, select Next.js and enter the settings below.
| Field | Server | Static export |
|---|---|---|
| Application Type | Next.js | Next.js |
| Runtime | Server | Static |
| Package manager | npm | npm |
| Build command | npm run build | npm run build |
| Start command | npm start | Hidden; no Node process |
| Web directory | / — observed Server default | /out — proposed mapping to the framework's generated output |
The Static directory above follows Next.js's output structure; confirm it against the generated files during the first deployment. Do not serve .next as a static export. If you select yarn or pnpm, change the commands to match, such as pnpm run build and pnpm start.
- Select the connected Git provider, Repository, and release Branch.
- Enable Push to deploy if you want automatic releases from that branch.
- Click Next, complete Installation, then review Summary. The inspected test-domain Installation step asks for Site Title.
- Check the commands, runtime, directory, branch, and domain, then click Create Site.
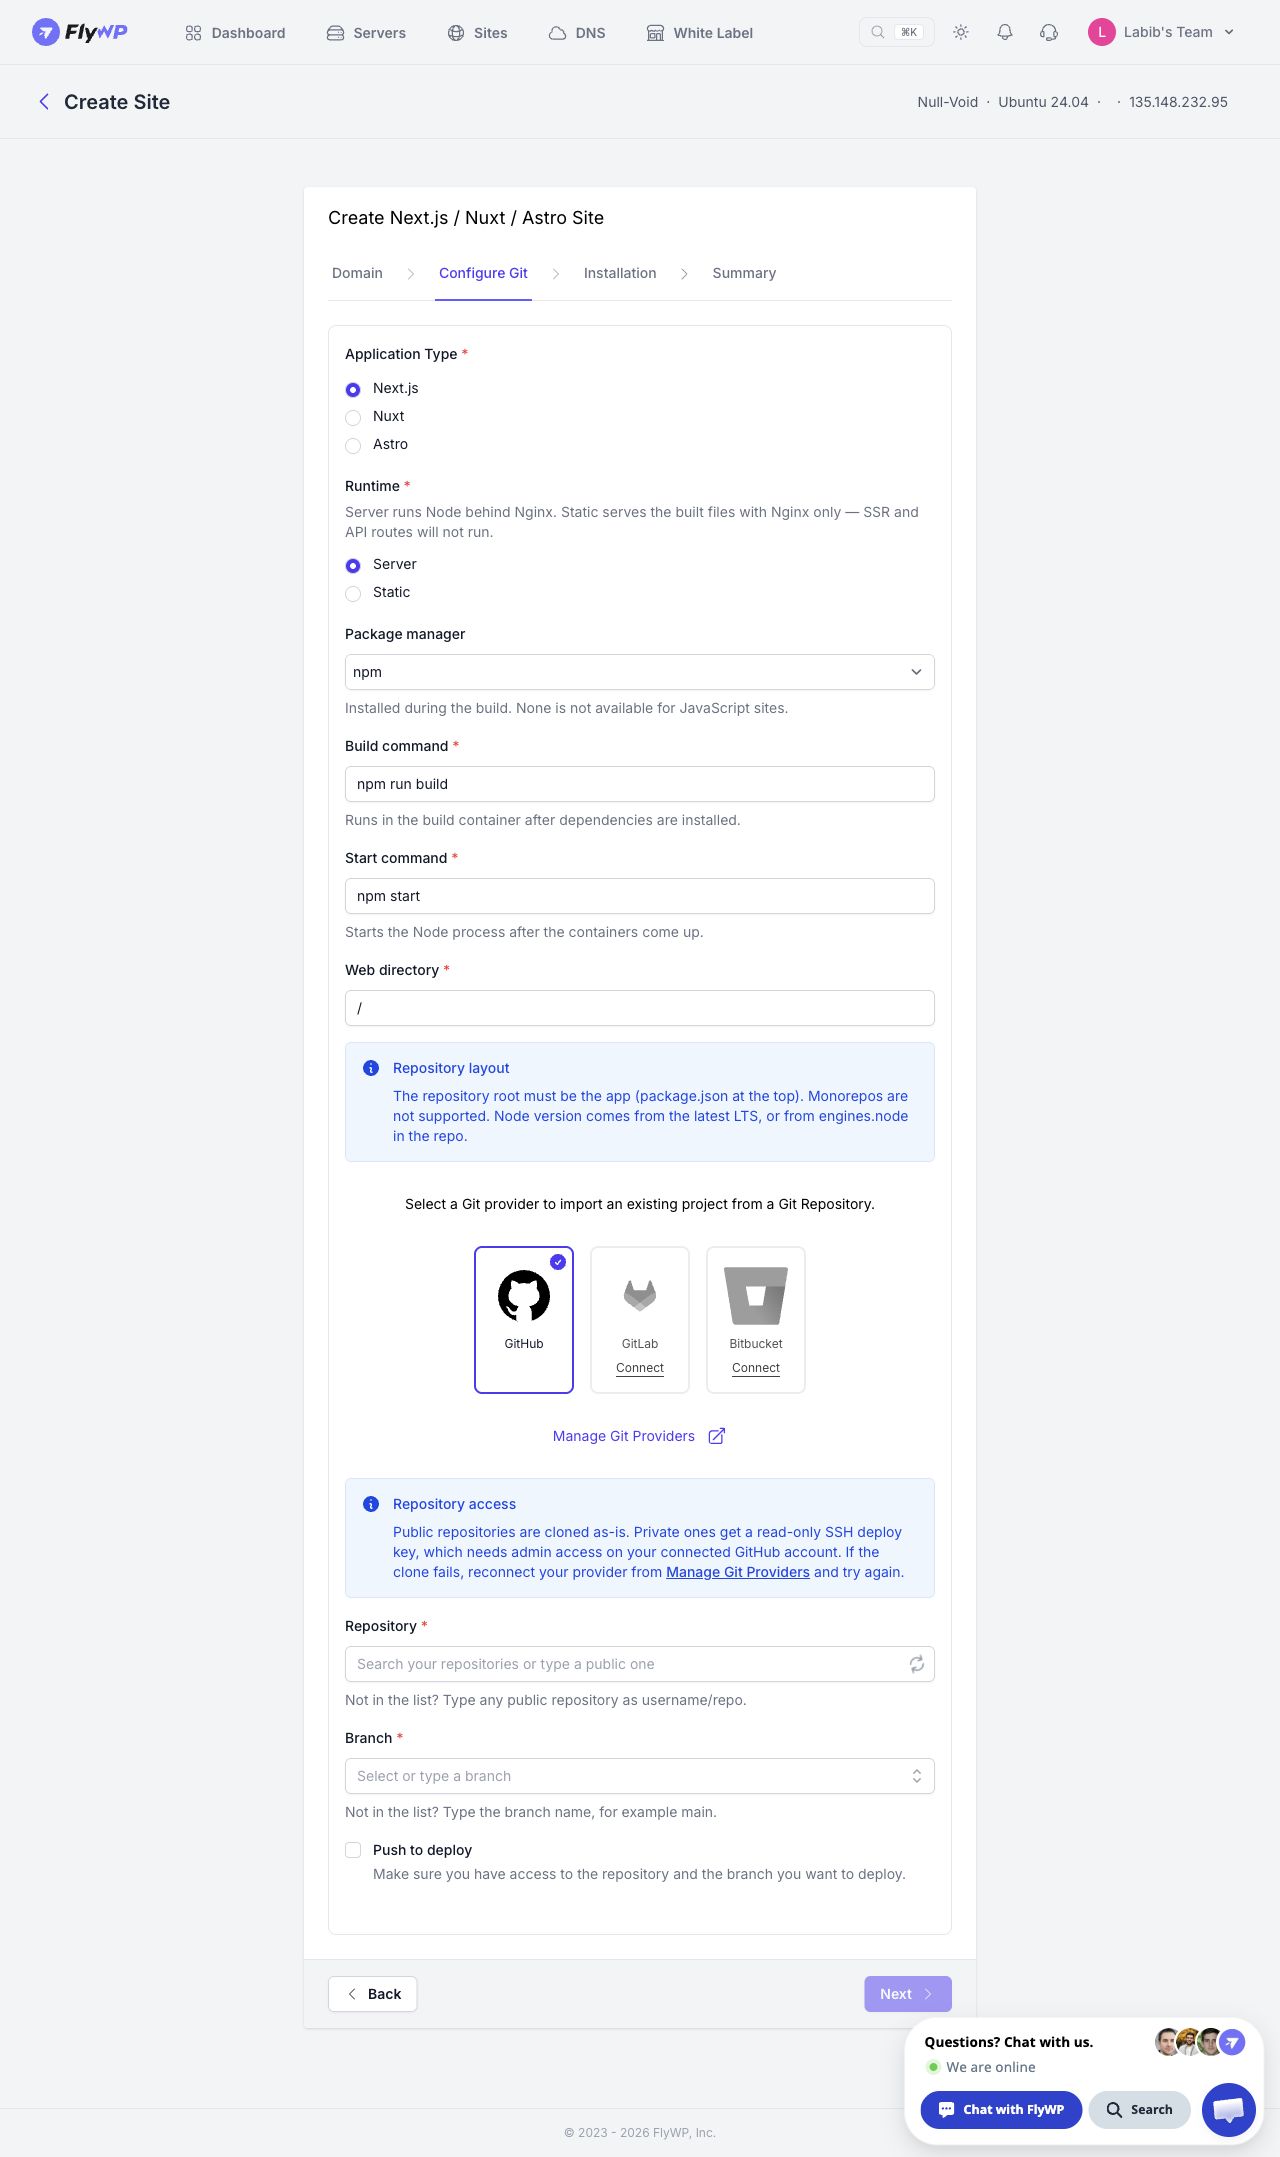
Next.js Server setup in the actual FlyWP app. Repository and branch remain to be selected. Select the image to view the full screen.
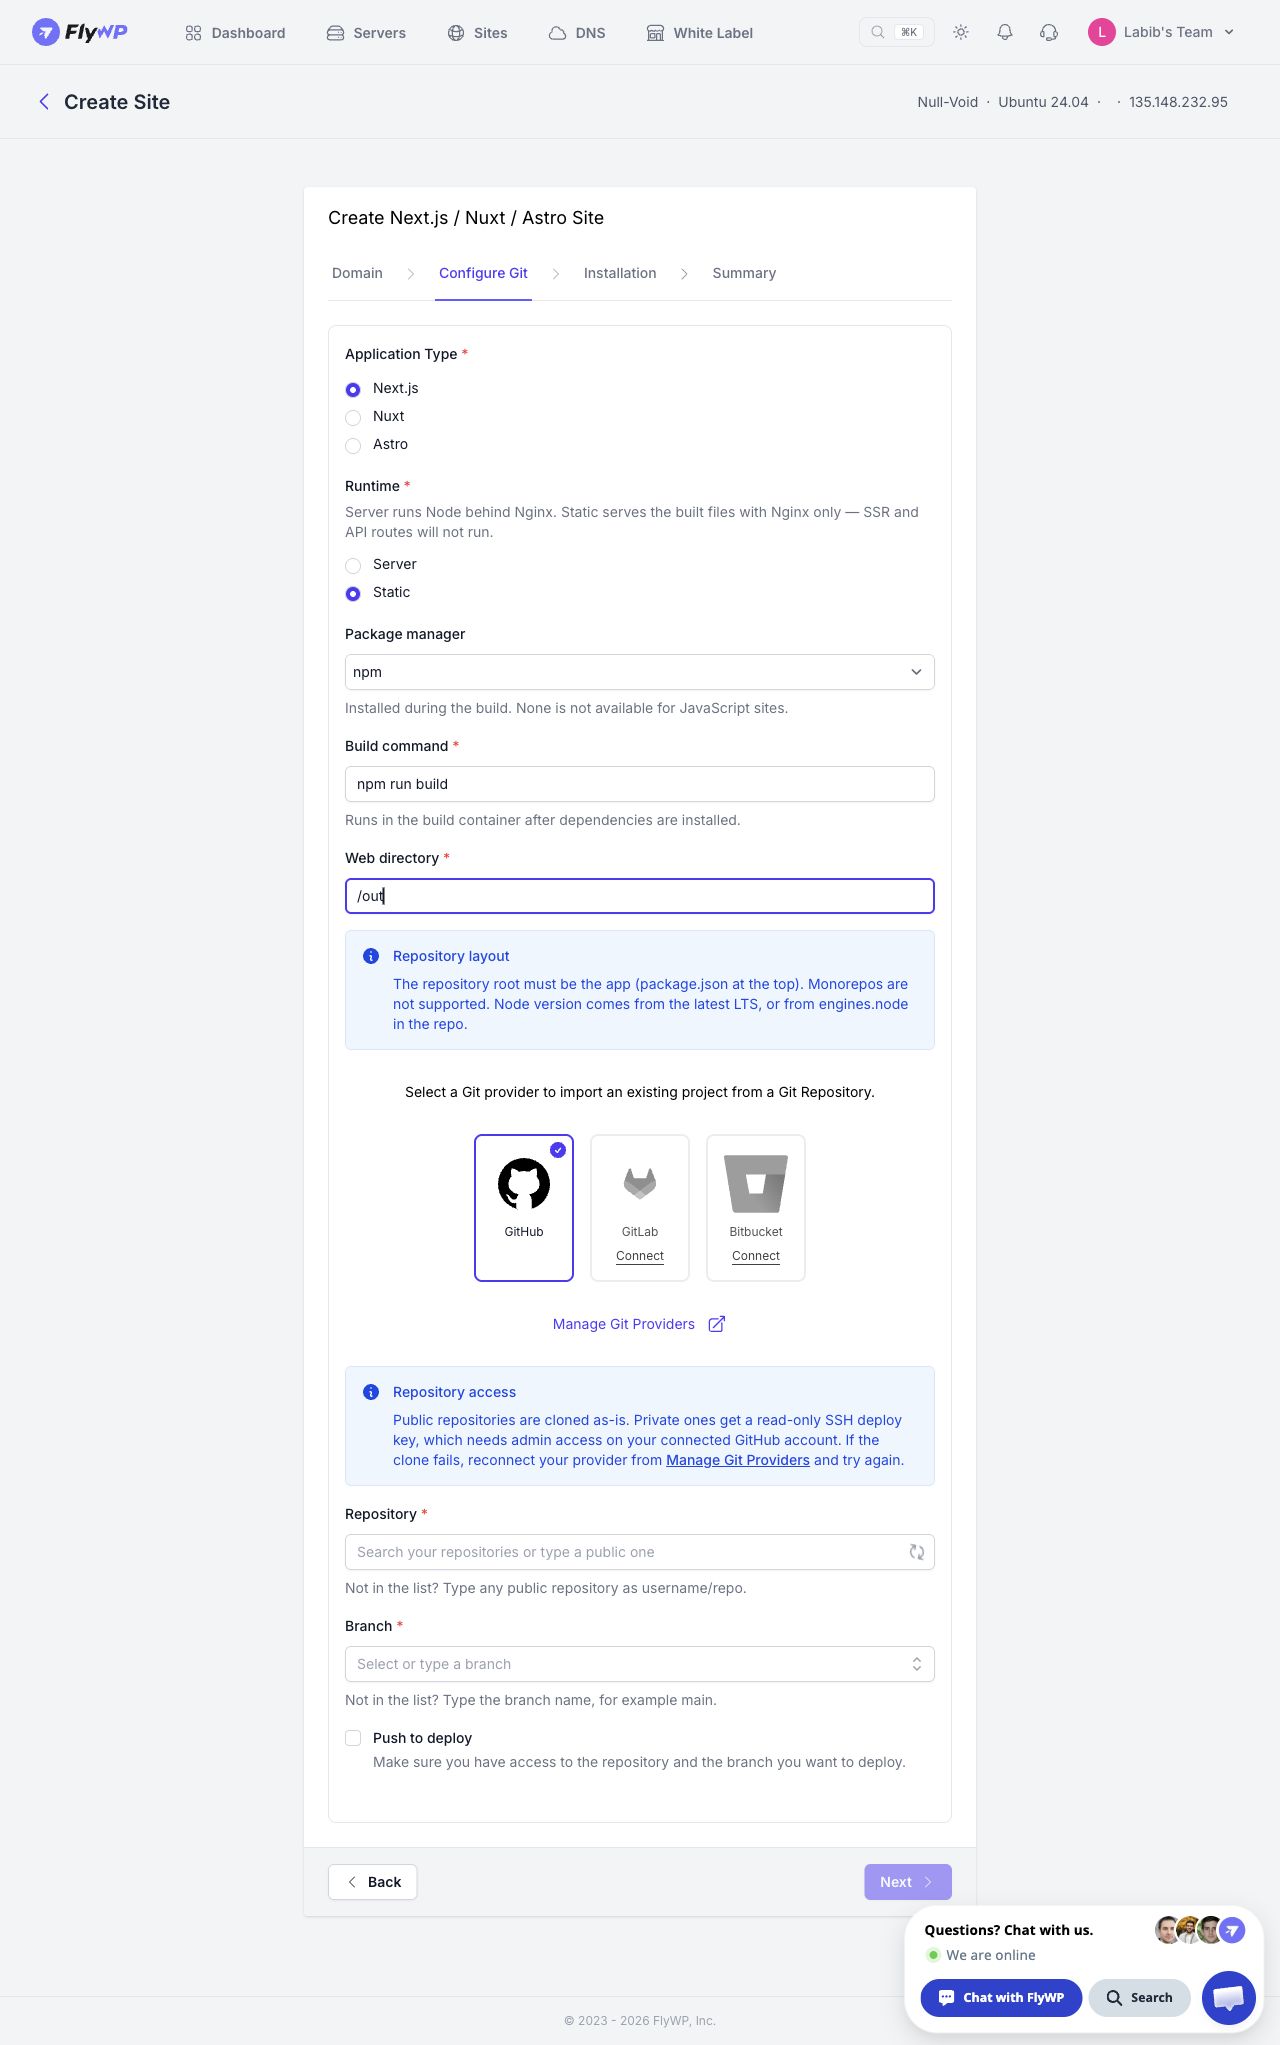
Next.js Static configuration example entered in the real wizard. These settings were not deployed. Select the image to view the full screen.
Environment variables and networking
Section titled “Environment variables and networking”Use server-only environment variables for credentials. Variables prefixed with NEXT_PUBLIC_ are exposed to browser code and normally embedded during the build, so changing those values requires a rebuild. A static export has no application server to receive private runtime variables. Next.js environment variables.
Example variable names:
NEXT_PUBLIC_API_BASE_URL=https://api.example.comDATABASE_URL=<private-database-connection>These are examples for your environment configuration, not values to commit. The inspected FlyWP wizard does not provide an environment editor; confirm how the deployed site receives build and runtime values.
For Server runtime, ensure the application listens on the interface and port expected by FlyWP's proxy. The Next.js CLI supports --hostname and --port, and uses port 3000 by default. Do not choose a new production port without matching the proxy configuration. Next.js CLI reference.
Verify and update
Section titled “Verify and update”Check the first deployment's build and process logs. Open the domain in a signed-out browser and test navigation, a direct nested URL, assets, and application functionality. For Server runtime, test an authenticated or API workflow your app uses. For Static runtime, verify the expected HTML exists in out and no page depends on a local server endpoint.
Push subsequent changes to the configured release branch. If Push to deploy is enabled, verify the resulting deployment. For recovery, push a revert commit rather than force-pushing an older branch state; data and migration recovery need their own process.
Troubleshooting
Section titled “Troubleshooting”| Symptom | Action |
|---|---|
Missing script: build or start | Check the deployed branch's package.json |
| No production build found | Confirm the build succeeded before starting the process |
| Export fails on a dynamic page | Provide build-time paths or deploy the application with Server runtime |
| Images fail on Static | Review the image loader or unoptimized image configuration |
| Old public API URL remains | Rebuild after changing NEXT_PUBLIC_ variables |
| 502 on Server | Inspect process errors and compare host/port with the proxy |
| 404 when refreshing a Static route | Check generated page layout and Nginx directory/index handling |
Related guides
Section titled “Related guides”Still stuck? How can we help?