Bulk Actions for Sites
Select multiple sites and apply the same action across them in one run. Bulk actions support Docker image updates, installing Cloudflare Origin Certificates, applying backup policies, enabling or disabling uptime monitoring, and configuring email (SMTP). You can cancel an in-progress run and retry sites that failed.
The Sites page and each server’s Sites page use a unified table with selection checkboxes and a shared action toolbar. Bulk actions are also available through the Public API.
Select the sites
Section titled “Select the sites”-
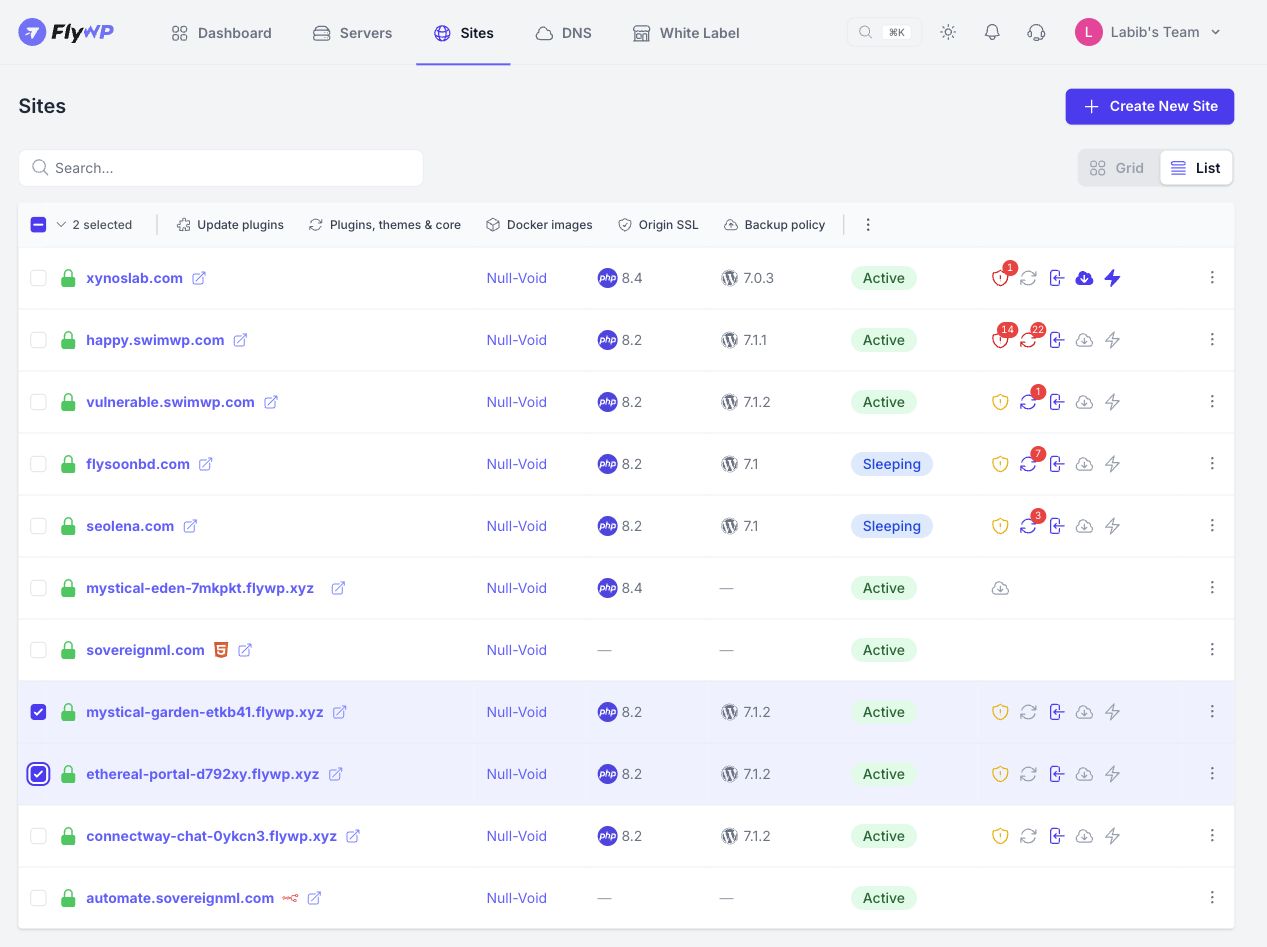
Sign in at app.flywp.com and open Sites. Switch to List if the site cards are shown.
-
Tick the checkbox beside each site you want to include. The selected count and bulk action toolbar appear above the rows.
-
Open the selected-count menu to choose All, None, Active only or WordPress only. Review the selected count before choosing an action.
Use bulk actions from a server
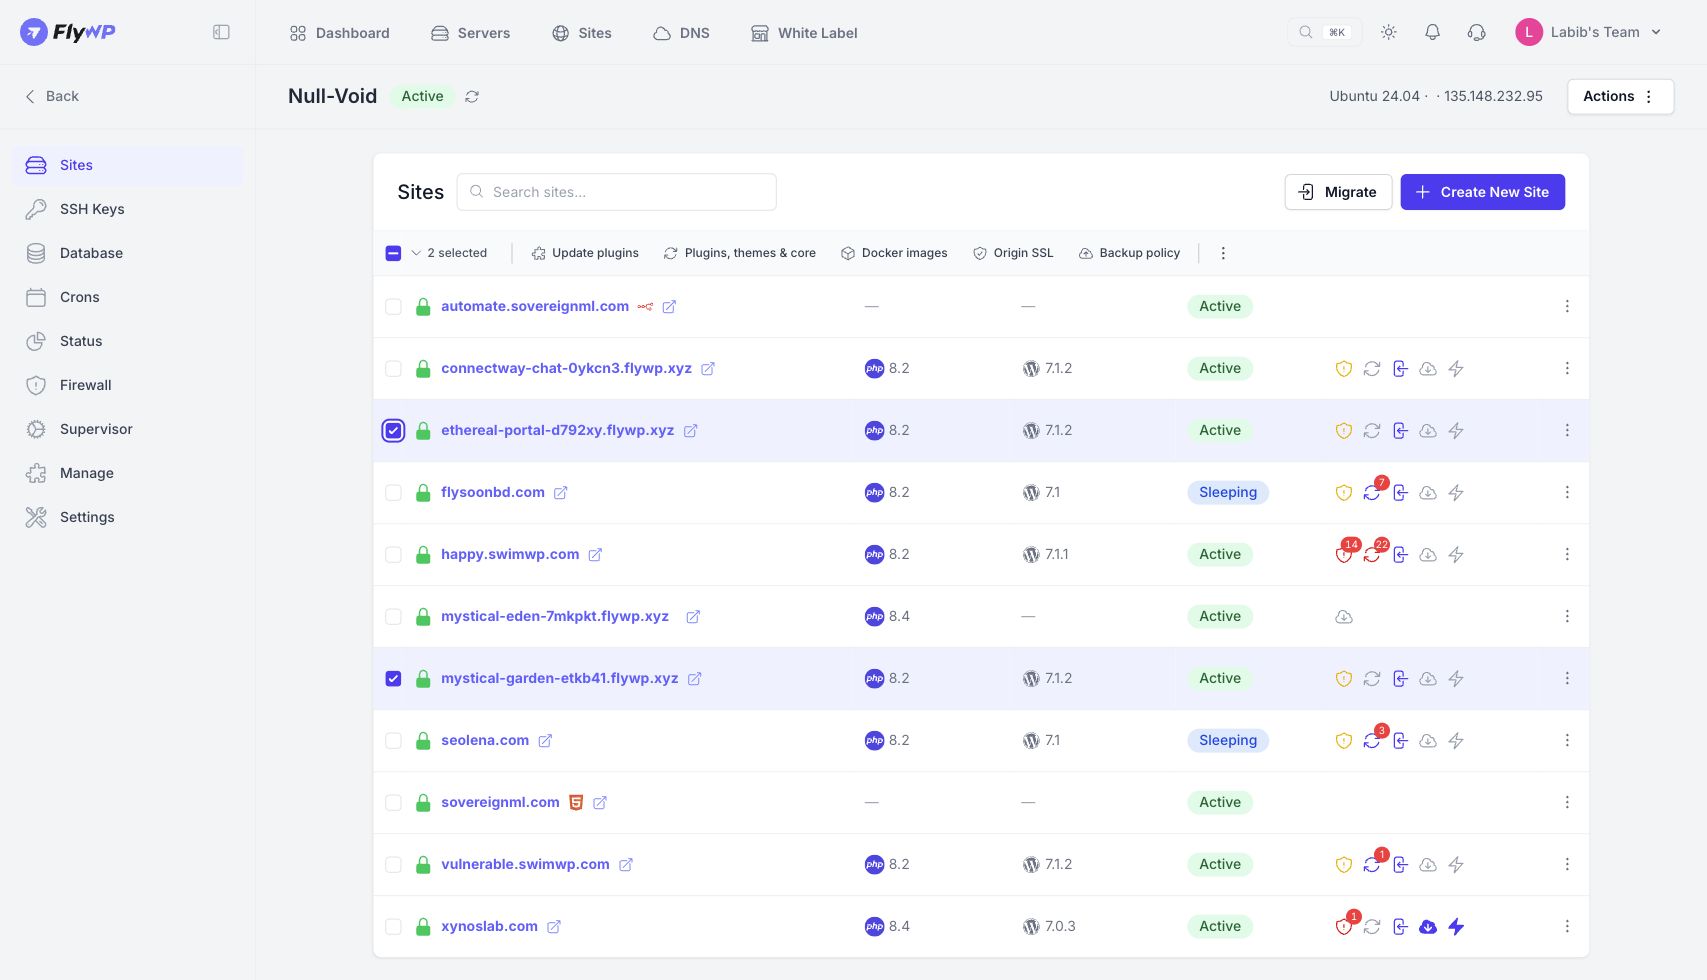
Section titled “Use bulk actions from a server”Access path: Dashboard → Servers → choose a server → Sites.
Use this view when the task should apply to sites on one server. The same selection toolbar appears here. The team-wide Sites table also shows a Server column, while this view is already scoped to the chosen server.
Choose an action
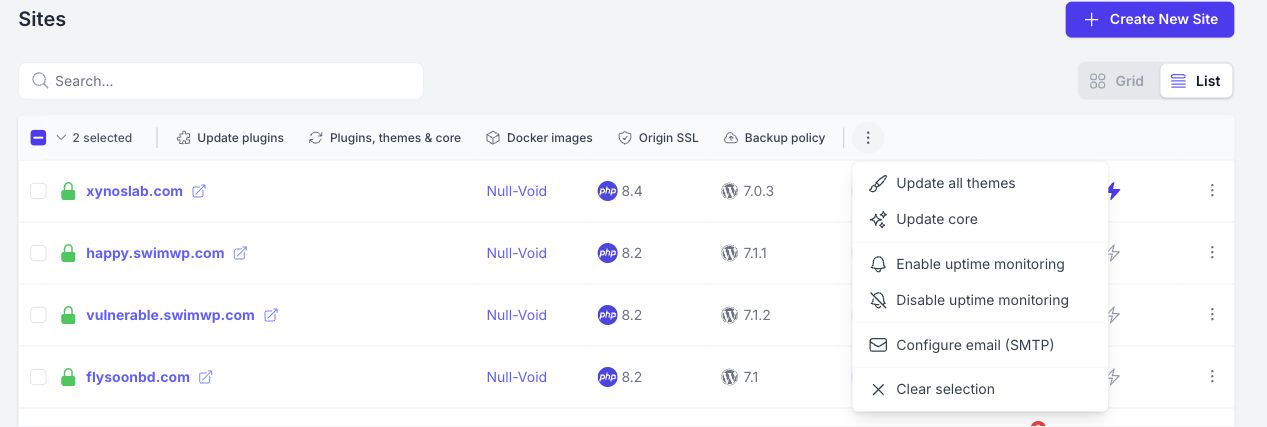
Section titled “Choose an action”Docker images, Origin SSL and Backup policy are available directly on the toolbar. Open More bulk actions for Enable uptime monitoring, Disable uptime monitoring and Configure email (SMTP). The toolbar also includes WordPress update actions.
Review the eligible sites
Section titled “Review the eligible sites”Each action opens a review or configuration dialog. Allow eligibility checks to finish, then read the number of sites that will run and any skipped-site reasons. The eligible count can be smaller than the selected count. A disabled Run on 0 sites button means there are no runnable sites with the current selection and settings.
Update Docker images
Section titled “Update Docker images”Access path: Sites or Server → Sites → select sites → Docker images.
-
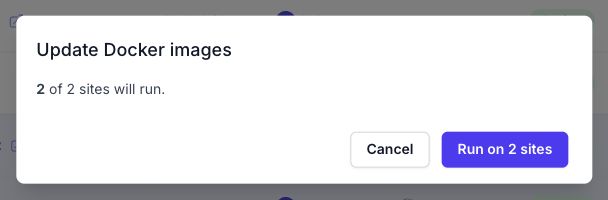
Choose Docker images to open Update Docker images.
-
Review the eligible count. The example below shows that both selected sites will run.
-
Choose Run on N sites to start, or Cancel to close the dialog without starting the action.
After the run
Section titled “After the run”Review each site’s result. Open the updated sites to confirm that their pages and application functions work as expected. If a site fails, address its reported error before using the failed-site retry control.
Install Cloudflare Origin Certificates
Section titled “Install Cloudflare Origin Certificates”Access path: Sites or Server → Sites → select sites → Origin SSL.
-
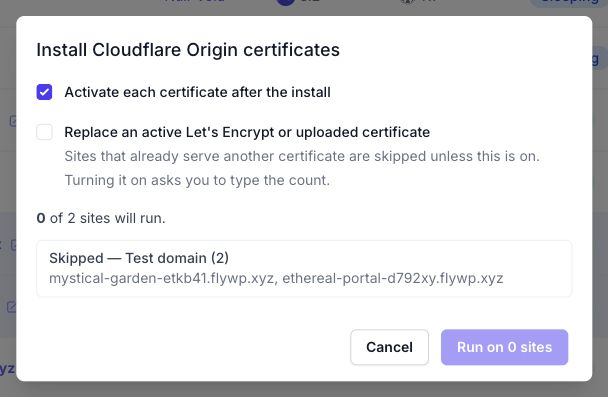
Open Install Cloudflare Origin certificates and choose whether to activate each certificate after installation. Activation is selected by default.
-
Decide whether to replace an active Let’s Encrypt or uploaded certificate. This option is off by default, so sites already serving another certificate are skipped. Enabling it asks you to type the count.
-
Review eligible sites and skipped reasons, then choose Run on N sites when the selection is ready.
Prepare Cloudflare first
Section titled “Prepare Cloudflare first”For an Origin Certificate, ensure the domain is proxied through Cloudflare and its SSL mode is Full (strict). The Cloudflare API token needs SSL and Certificates: Edit permission. Origin Certificates are trusted by Cloudflare, so visitors should reach the site through the proxy. The individual SSL page displays this warning before generation.
Apply a backup policy
Section titled “Apply a backup policy”Access path: Sites or Server → Sites → select sites → Backup policy.
-
Choose a connected backup Destination. Complete any destination-specific fields that appear, such as Root folder id for Google Drive.
-
Choose Daily or Hourly, set Start time (UTC), and enter the retention period. Keep for (days, 0 = forever) controls how long backups are retained.
-
Choose Database only, Database + wp-content or Database + everything. Enable Spread start times on each server if you want sites on the same server to start one after another.
-
For sites with existing backups, choose Leave them as they are or Overwrite with this policy. Review eligibility, then start the run.
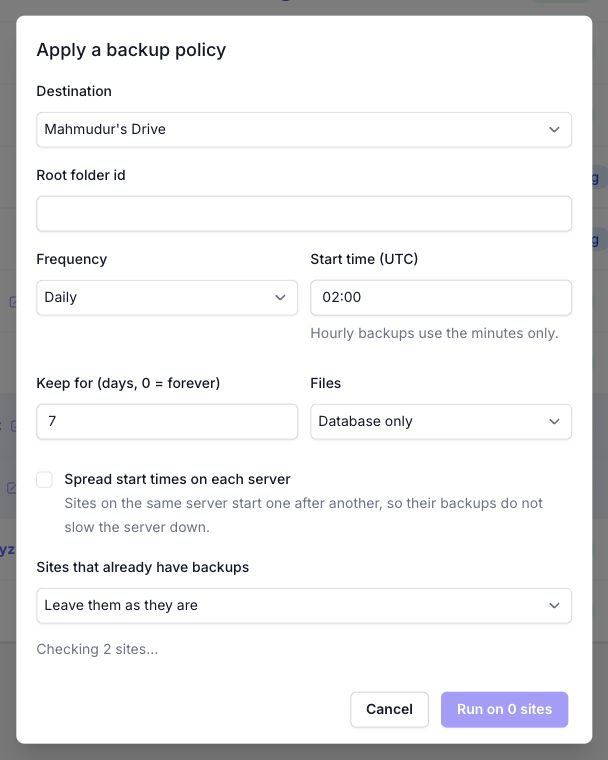
The schedule field uses UTC. For example, 02:00 UTC is 08:00 in Bangladesh. After applying the policy, open each site’s Backups page to confirm the schedule and destination.
Enable or disable uptime monitoring
Section titled “Enable or disable uptime monitoring”Access path: Sites or Server → Sites → select sites → More bulk actions.
-
Choose Enable uptime monitoring.
-
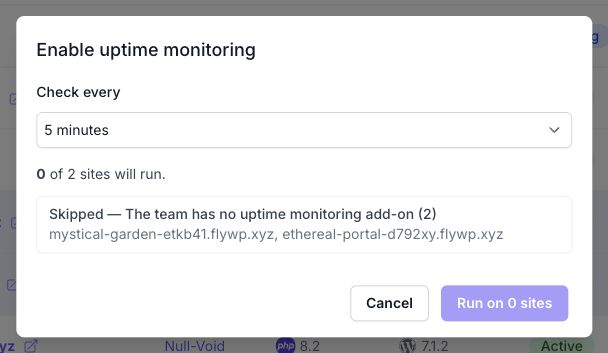
Set Check every to 1, 5, 10 or 15 minutes. The default shown is 5 minutes.
-
Wait for checks, review the eligible count and skipped reasons, then choose Run on N sites.
Disable monitoring
Section titled “Disable monitoring”Select the sites, open More bulk actions and choose Disable uptime monitoring. Review the dialog before starting. After the run, confirm the monitoring state for each site.
If no sites are eligible
Section titled “If no sites are eligible”Read the reason in the dialog. In the example, enabling the team’s uptime monitoring add-on is required before the selected sites can be monitored. Changing the check interval does not resolve a missing add-on.
Configure email with SMTP
Section titled “Configure email with SMTP”Access path: Sites or Server → Sites → select sites → More bulk actions → Configure email (SMTP).
-
Pick a Provider. The menu offers postmark, mailgun, sendgrid, sparkpost and Custom SMTP.
-
Complete the sender and authentication fields. Custom SMTP also shows Host, Port and Encryption; the defaults shown are port 587 and TLS. Use the settings provided by your email service.
-
Choose whether to leave sites that already send email as they are or overwrite them with these settings. Review eligibility before choosing Run on N sites.
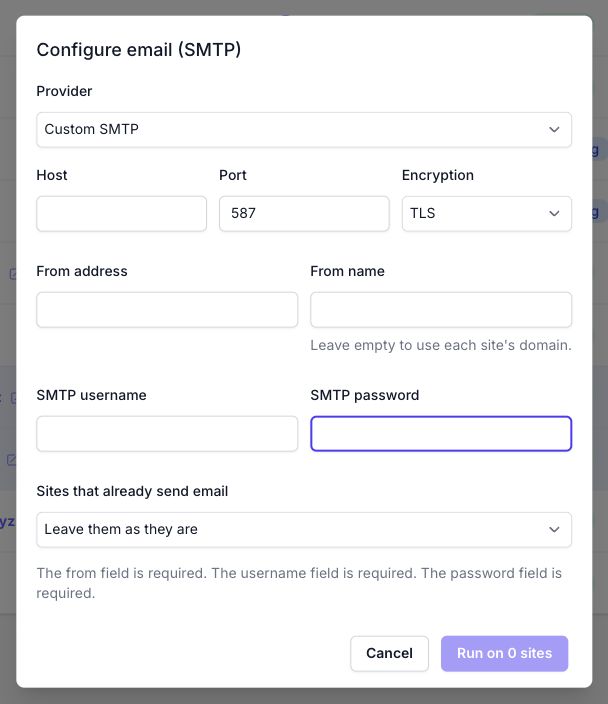
From name is optional; the form says an empty value uses each site’s domain. After the run, open each affected site’s Email page and verify email delivery with the configured service.
Manage a run and use the Public API
Section titled “Manage a run and use the Public API”Cancel a run in progress
Section titled “Cancel a run in progress”Open the active run’s progress view and use its cancellation control when you need to stop the run. Review the per-site results afterwards to understand which sites completed, failed or did not finish. Do not assume cancelling reverses an action that has already completed.
Retry sites that failed
Section titled “Retry sites that failed”Review the error for each failed site, correct the underlying issue, and use the run’s failed-site retry control. Check the results again after the retry. A site skipped during eligibility checks needs its prerequisite resolved before it can be included in a runnable selection.
Public API access
Section titled “Public API access”Bulk actions are also available through the Public API for automated workflows. Consult the current API reference for integration details. Keep tokens in your server-side integration.
The published reference requires a bearer token and an X-Team-Id header on authenticated requests. Confirm that the token has permission for the operation and belongs to the intended team. Use the latest documented bulk-action contract when implementing automation.
The published API reference does not yet list bulk-action endpoints. Confirm the current contract before implementing automation; this guide does not prescribe endpoint paths or request payloads.
Frequently asked questions
Section titled “Frequently asked questions”Can I run actions from both site lists? Yes. The team-wide Sites page and the server Sites page share the bulk action controls.
Why is the runnable count lower than the selected count? Eligibility checks may skip sites, for example test domains for Origin SSL or sites without access to the uptime monitoring add-on.
Will existing settings be overwritten? Backup and SMTP dialogs offer explicit choices to retain or overwrite existing settings. Origin SSL separately controls replacement of an active Let’s Encrypt or uploaded certificate.
Does Cancel in a setup dialog cancel a running job? The setup dialog’s Cancel button closes that dialog before a run starts. Use the active run’s cancellation control for a job already in progress.
Related guides
Section titled “Related guides”Still stuck? How can we help?