

Docker sits at the top of the list for local WordPress development for one simple reason: it offers unmatched control, consistency, and portability. Unlike one-click local server apps that hide the technical details, Docker gives you a transparent, modular setup defined entirely in a single text file you can version, share, and reuse across every machine you own.
Yes, Docker has a learning curve. But if you’re juggling multiple client sites, testing different PHP or MySQL versions, or just want real control over your dev stack, it pays off fast.
This guide walks through building a real, working local WordPress environment with Docker on macOS, Windows, and Linux, including the actual configuration files and commands, not placeholders.
Quick Start: Run WordPress with Docker Compose in 5 Minutes
If you’re already familiar with Docker, here’s the fastest way to get WordPress running locally:
- Install Docker Desktop (or Docker Engine on Linux).
- Create a project folder.
- Create a
.envfile and adocker-compose.ymlfile. - Start the containers:
docker compose up -d- Open
http://localhost:8000in your browser. - Complete the WordPress installation wizard.
That’s all it takes. For a complete setup with persistent storage, custom configurations, and troubleshooting tips, follow the detailed guide below.
What Is Docker, and How Does It Work?
Docker is an open-source platform for packaging and running applications in containers isolated processes that bundle an app with everything it needs to run (code, runtime, system libraries) so it behaves the same on your laptop as it does anywhere else. That consistency is what kills the classic “it works on my machine” problem.
A few terms you’ll see throughout this guide:
- Docker Engine — the background service that builds, runs, and manages containers on your machine.
- Docker Image — a read-only template (code + dependencies) used to create a container. Images are pulled from registries like Docker Hub.
- Dockerfile — a script of instructions for building a custom image, starting from an existing one.
- Docker Compose — a tool for defining and running a multi-container application (e.g., WordPress + a database) from one YAML file, instead of starting each container by hand.
One important, easy-to-miss detail: the standalone docker-compose command (with a hyphen) is the old, deprecated v1 tool. It reached end-of-life in 2023 and isn’t maintained anymore.
Current Docker installs use Compose v2, built directly into the Docker CLI and invoked as docker compose two words, no hyphen. The compose file is still commonly named docker-compose.yml (the newer canonical name is compose.yaml, and both work identically), but the command you type should be docker compose. This guide uses the current syntax throughout.
Why Use Docker for WordPress Development
- Environment parity — your local stack can mirror your staging/production PHP and MySQL versions closely, so “it worked locally” actually means something.
- One-file setup — a single
docker-compose.ymldescribes your entire stack; spinning up a new project or onboarding a teammate is agit cloneand one command. - Isolation — each project’s PHP version, plugins, and database live in their own containers, so projects never collide with each other or with anything installed on your host machine.
- Portability — the same compose file runs on macOS, Windows, and Linux without changes.
- Easy teardown — delete a project’s containers and volumes and your machine is exactly as clean as before you started.
What You Need Before Running WordPress with Docker
macOS: Docker Desktop officially supports the current macOS release plus the two previous major versions, and drops the oldest as new ones ship at the time of writing; that’s macOS 13 (Ventura) through macOS 15 (Sequoia). Both Apple Silicon (M1–M4) and Intel Macs are supported; check Docker’s install page for the exact current minimum, since the supported window shifts as Apple ships new macOS versions.
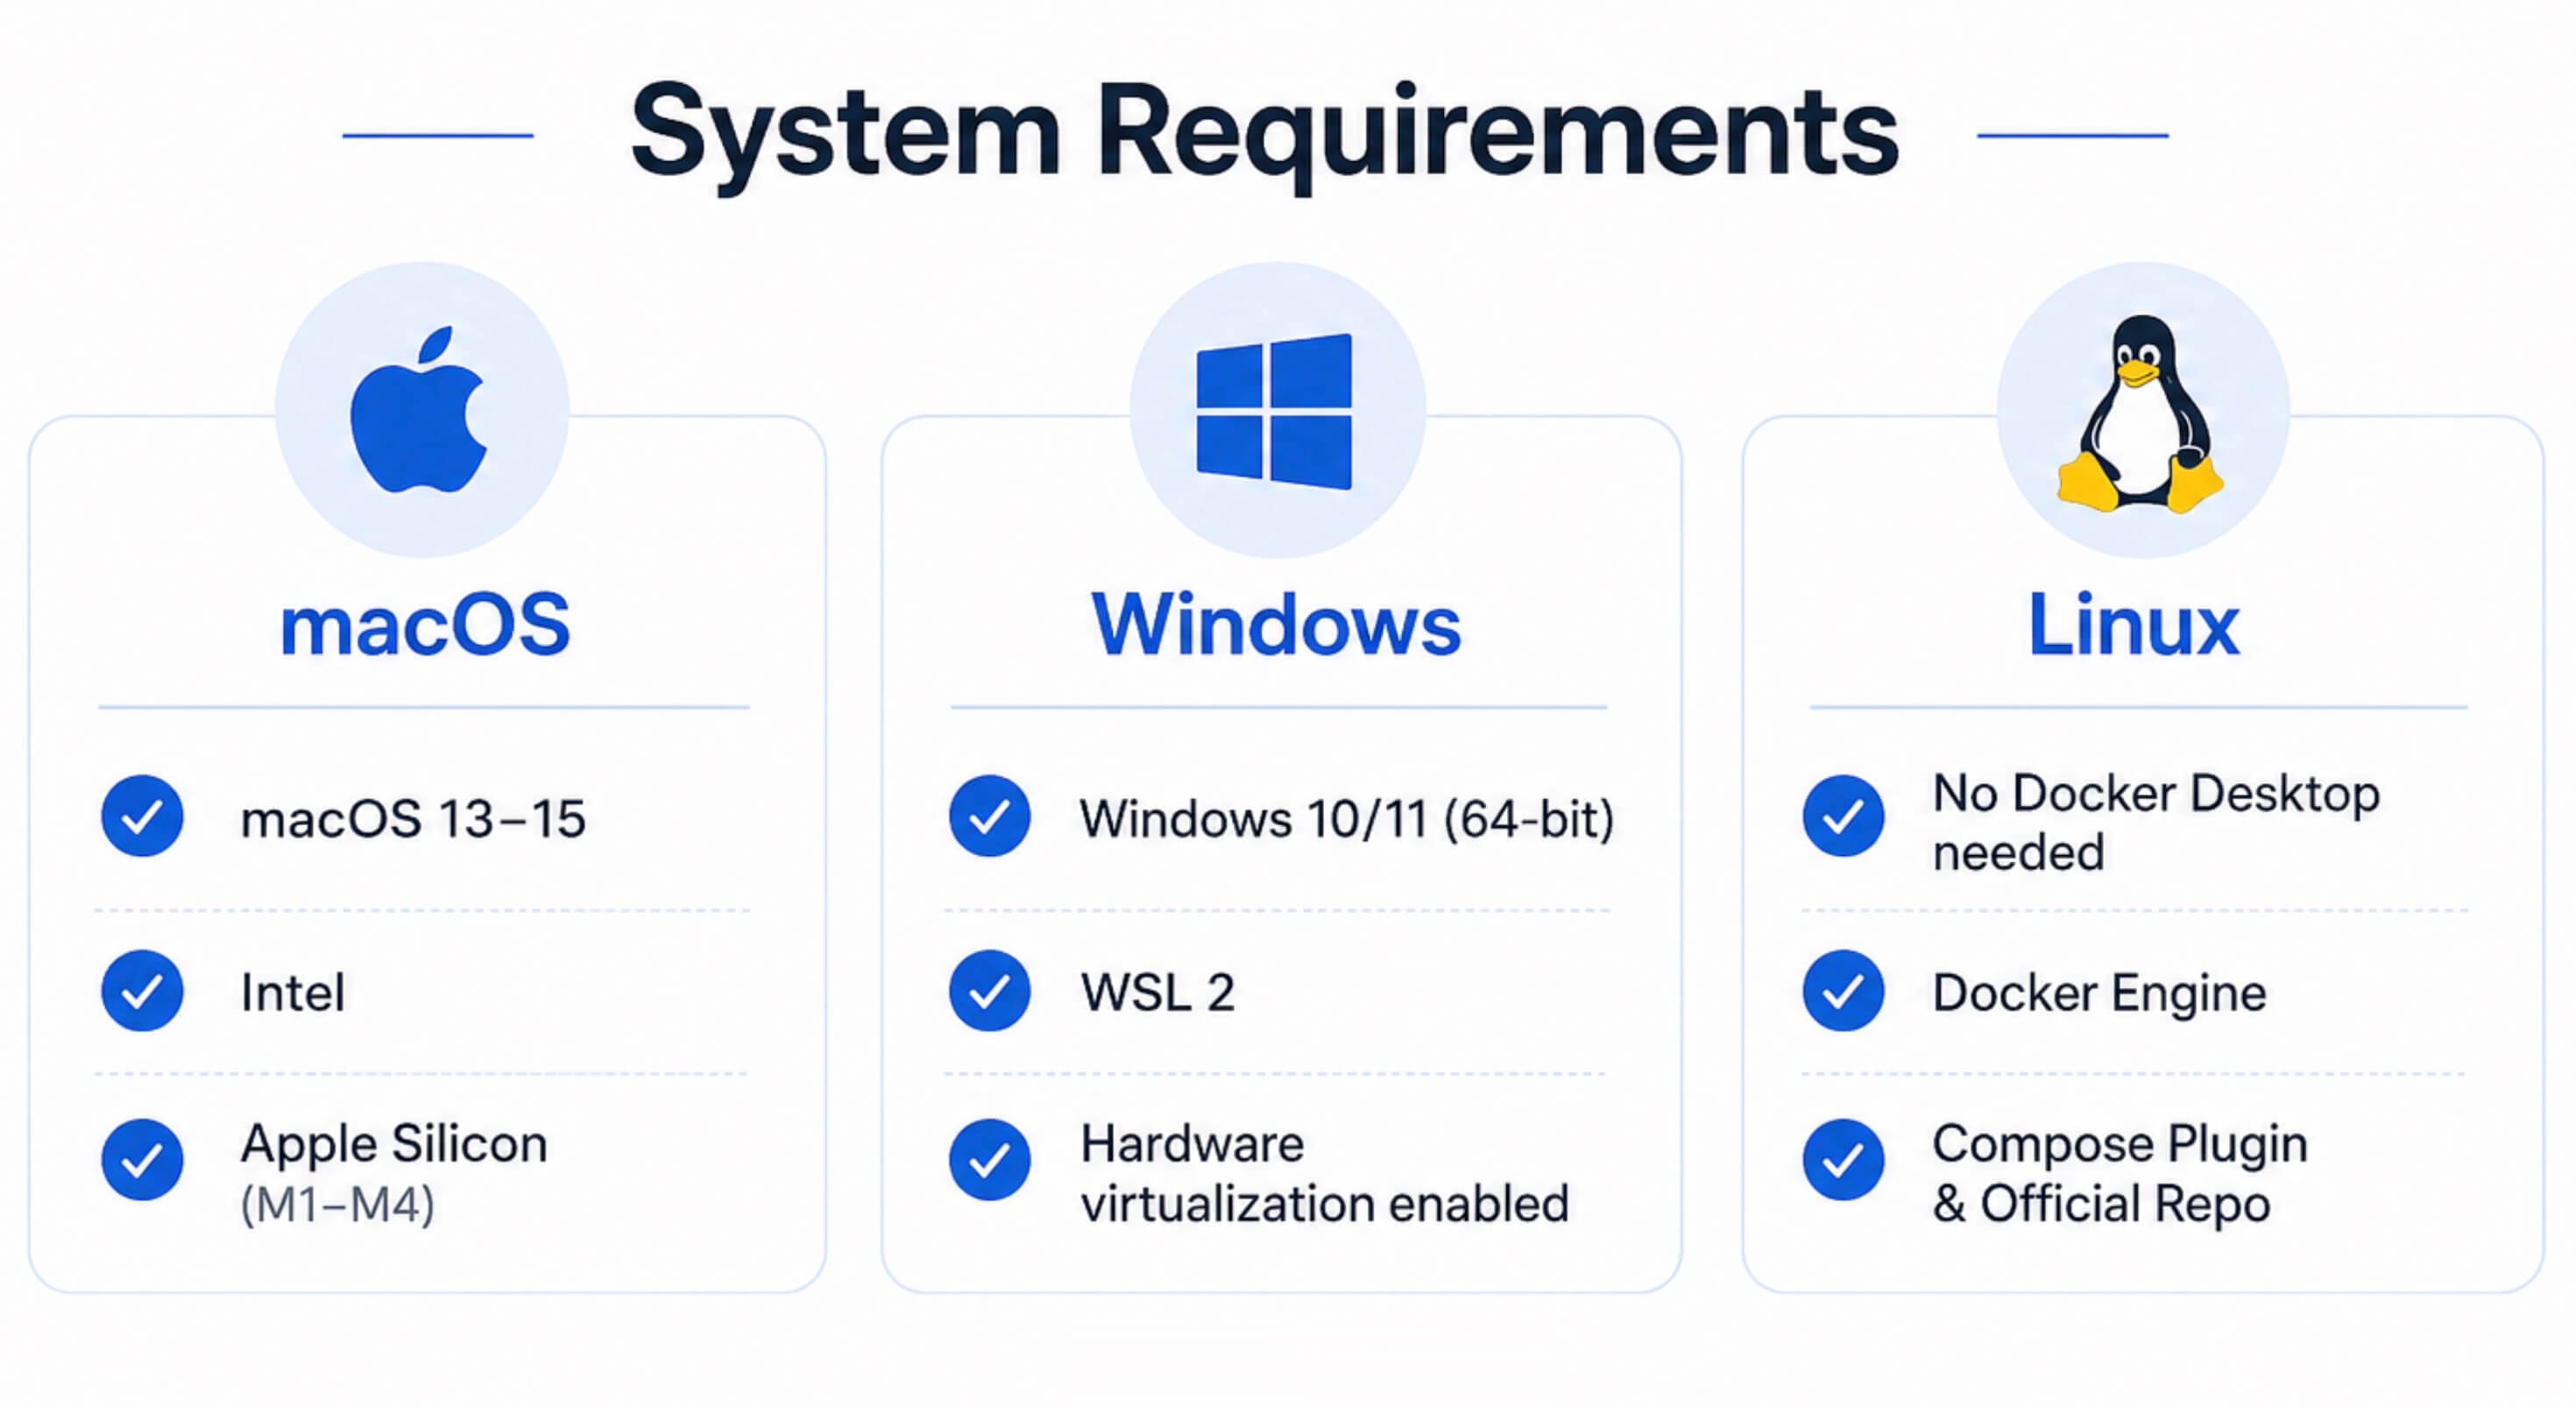
Windows: Windows 10 or 11, 64-bit, Home or Pro/Enterprise/Education. Docker Desktop runs on the WSL 2 backend (required on Home edition; optional vs. Hyper-V on Pro/Enterprise/Education) and needs hardware virtualization enabled in your BIOS/UEFI.
Linux: No Docker Desktop needed; install Docker Engine and the Compose plugin directly. Use Docker’s own apt/dnf repository rather than your distro’s default package, which is often an older version.
You’ll also want basic comfort with a terminal; you won’t need to be a command-line expert, but you will be typing commands.
Set Up WordPress with Docker Compose in Minutes
If you want to run WordPress in a fast, portable, and consistent environment, Docker Compose is a great choice. In this guide, you’ll learn how to set up WordPress with Docker Compose in just a few minutes, even if you’re new to Docker.
Step 1: Install Docker
macOS: Download Docker Desktop from docker.com, open the .dmg, and drag Docker to Applications. Launch it once to finish setup (it’ll ask for your password to install a privileged helper for networking and file sharing).
Windows: Download the Docker Desktop installer, run it, and make sure “Use WSL 2 instead of Hyper-V” is selected if prompted. Restart Windows after install, then launch Docker Desktop.
Linux (Ubuntu/Debian example):
curl -fsSL https://get.docker.com -o get-docker.shsudo sh get-docker.shsudo usermod -aG docker $USERLog out and back in for the group change to take effect, so you don’t need sudo for every Docker command.
Verify the install on any platform:
docker --versiondocker compose versionBoth should print a version number. If docker compose version errors out, the Compose plugin isn’t installed on Linux; sudo apt-get install docker-compose-plugin fixes that.
Step 2: Create Your Project and Compose File
mkdir my-wordpress-site && cd my-wordpress-siteCreate a .env file to hold your credentials, so they’re not hardcoded into a file you might commit to git:
# .envDB_NAME=wordpressDB_USER=wordpressDB_PASSWORD=change-this-passwordDB_ROOT_PASSWORD=change-this-root-passwordAdd .env to a .gitignore file if this project will live in version control.
Now create docker-compose.yml:
services:  db:    image: mysql:8.4    container_name: wp_db    restart: unless-stopped    environment:      MYSQL_ROOT_PASSWORD: ${DB_ROOT_PASSWORD}      MYSQL_DATABASE: ${DB_NAME}      MYSQL_USER: ${DB_USER}      MYSQL_PASSWORD: ${DB_PASSWORD}    volumes:      - db_data:/var/lib/mysql    healthcheck:      test: ["CMD", "mysqladmin", "ping", "-h", "localhost", "-u", "root", "-p${DB_ROOT_PASSWORD}"]      interval: 10s      timeout: 5s      retries: 5
  wordpress:    image: wordpress:php8.3-apache    container_name: wp_app    restart: unless-stopped    depends_on:      db:        condition: service_healthy    ports:      - "8000:80"    environment:      WORDPRESS_DB_HOST: db:3306      WORDPRESS_DB_USER: ${DB_USER}      WORDPRESS_DB_PASSWORD: ${DB_PASSWORD}      WORDPRESS_DB_NAME: ${DB_NAME}    volumes:      - wp_data:/var/www/html
volumes:  db_data:  wp_data:
A quick rundown of what’s actually happening: the db service runs MySQL and stores its data in a named volume (db_data) so it survives container restarts. The wordpress service won’t start until the healthcheck confirms MySQL is actually accepting connections (condition: service_healthy) this avoids the classic race condition where WordPress tries to connect before the database has finished initializing. WordPress’s own files (core, themes, plugins, uploads) live in the wp_data volume, mapped to port 8000 on your host.
Step 3: Start the Environment
docker compose up -d-d runs everything in the background (detached) so your terminal stays free. Check that both containers are up and the database is healthy:
docker compose psYou should see wp_db and wp_app listed as running, with wp_db showing (healthy).
Step 4: Access WordPress
Open http://localhost:8000 in your browser. You should land on the WordPress installation screen.
Step 5: Run the WordPress Setup Wizard
Choose your language, then fill in your site title, admin username, password, and email address, and click Install WordPress. That’s it your local site is live.
Step 6: Day-to-Day Management
A few commands you’ll use constantly:
- Stop without deleting anything:
docker compose stop - Start it back up:
docker compose start - Stop and remove the containers (your data is safe it lives in the named volumes, not the containers):
docker compose down - Full reset, including deleting the database and files:
docker compose down -v(only do this on purpose) - Watch the logs live:
docker compose logs -f - Update to newer image versions:
docker compose pullfollowed bydocker compose up -d, which recreates the containers from the new images while keeping your data volumes intact.
Step 7: Customize Your Environment
Custom PHP Configuration
The official WordPress image is built on the official PHP image, which reads any .ini file dropped into /usr/local/etc/php/conf.d/. Create a file like this on your host:
; custom.iniupload_max_filesize = 64Mpost_max_size = 64Mmemory_limit = 256MThen mount it into the container by adding a line under the wordpress service’s volumes: in your compose file:
volumes: - wp_data:/var/www/html - ./custom.ini:/usr/local/etc/php/conf.d/custom.iniRun docker compose up -d again to apply it.
Custom Dockerfile
If you need to install additional PHP extensions or system packages, build your own image instead of using wordpress:php8.3-apache directly. Create a Dockerfile:
FROM wordpress:php8.3-apacheRUN apt-get update && apt-get install -y --no-install-recommends \ libzip-dev \ && docker-php-ext-install zip \ && rm -rf /var/lib/apt/lists/*COPY custom.ini /usr/local/etc/php/conf.d/Then point the wordpress service at it instead of a pre-built image:
wordpress: build: . # remove the "image:" line when using "build:"After changing the Dockerfile, rebuild with docker compose up -d --build.
Mounting Custom Themes and Plugins
If you’re actively developing a theme or plugin, mount that specific folder rather than the entire wp-content/themes or wp-content/plugins directory mounting the whole parent folder will shadow (hide) the default themes and plugins already inside the wp_data volume.
volumes: - wp_data:/var/www/html - ./my-custom-theme:/var/www/html/wp-content/themes/my-custom-theme - ./my-custom-plugin:/var/www/html/wp-content/plugins/my-custom-pluginEdits you make in ./my-custom-theme on your host show up immediately inside the container.
Adding a Database Management Tool (phpMyAdmin)
Add this service to your docker-compose.yml to get a web GUI for your database:
phpmyadmin: image: phpmyadmin:latest container_name: wp_phpmyadmin restart: unless-stopped depends_on: - db ports: - "8080:80" environment: PMA_HOST: db PMA_USER: root PMA_PASSWORD: ${DB_ROOT_PASSWORD}Run docker compose up -d and visit http://localhost:8080.
Backing Up and Restoring Volumes
To back up the database volume to a .tar.gz file on your host, spin up a throwaway container that mounts the same volume (--volumes-from) plus your current directory:
docker run --rm --volumes-from wp_db -v "$(pwd)":/backup ubuntu \ tar czvf /backup/db_backup.tar.gz /var/lib/mysqlTo restore it later into a fresh, empty volume:
docker run --rm --volumes-from wp_db -v "$(pwd)":/backup ubuntu \ bash -c "cd / && tar xzvf /backup/db_backup.tar.gz"The same pattern works for wp_app and /var/www/html if you want to back up your WordPress files and uploads the same way.
Common Docker Compose Issues and How to Fix Them
Containers not starting: Check docker compose logs wordpress (or db) for the actual error this is almost always the fastest way to find the cause.
Port already in use: If you see an error about a port already being allocated, another process on your machine is using it. Change the host-side number in the ports: mapping (the left side of "8000:80") to something free, like "8081:80", and run docker compose up -d again.
“Error establishing a database connection“: Confirm the DB_* values in .env match between what you typed and what’s in your compose file, and check docker compose ps to make sure wp_db shows (healthy) rather than still starting up or unhealthy.
Permission errors when installing plugins/themes from the WordPress admin: This is usually an ownership mismatch between a host-mounted folder and the container’s web server user (www-data, UID 33 in this image). Fix it with:
docker compose exec wordpress chown -R www-data:www-data /var/www/html/wp-contentViewing and filtering logs:
docker compose logs wordpress # one service's logsdocker compose logs -f wordpress # follow livedocker compose logs wordpress | grep -i error # filterRestarting and rebuilding:
docker compose restart # restart containers, no rebuilddocker compose pull # fetch newer versions of pre-built imagesdocker compose up -d --build # rebuild a service defined with "build:" in your DockerfileNetwork issues between containers: Compose automatically creates a private network for your project, and each service can reach the others by service name (e.g., wordpress reaches the database at host db). To confirm name resolution is working:
docker compose exec wordpress getent hosts dbIf that returns an IP address, the containers can see each other, and the problem is elsewhere (usually credentials).
WordPress with Docker Compose FAQs
Is Docker Compose free?
Yes. Docker Compose is included with modern Docker installations and is free for personal use and many development workflows. Check Docker’s licensing terms for commercial usage requirements.
Can I run multiple WordPress sites with Docker Compose?
Absolutely. Create a separate project folder and Compose file for each site. Assign a different host port to each WordPress container, such as 8000, 8001, or 8080.
Does Docker Compose work on Windows, macOS, and Linux?
Yes. One of Docker Compose’s biggest advantages is portability. The same configuration file can run across all major operating systems with little or no modification.
How do I update my WordPress containers?
Pull the latest images and recreate the containers:
docker compose pulldocker compose up -dYour WordPress files and database remain intact because they are stored in persistent Docker volumes.
Will deleting a container remove my WordPress site?
No. Containers are temporary, but your data lives in Docker volumes. Your site remains safe unless you intentionally remove those volumes using:
docker compose down -vCan I use Docker Compose for production WordPress sites?
Yes, but production environments require additional considerations such as security hardening, backups, monitoring, SSL certificates, and server management. Many managed platforms automate these tasks for you.
Wrapping Up
Running WordPress with Docker Compose locally gives you a flexible, reproducible development environment that works the same way across machines and team members. Once you’re comfortable managing containers locally, the next challenge is deploying and maintaining containerized WordPress sites in production. That’s where managed solutions can save significant time and effort.
A Docker-based setup like this gives you a fast, disposable, and fully reproducible local WordPress environment the same compose file works whether you’re on a MacBook, a Windows desktop, or a Linux box, and tearing a project down to start fresh is one command away.
Once a site is ready to leave your laptop, the same container-based mindset carries over to production. That’s exactly what FlyWP’s Docker-powered hosting is built around. If you want to take the local environment you just built and turn it into a live, managed WordPress site without re-architecting anything, that’s where FlyWP comes in.