
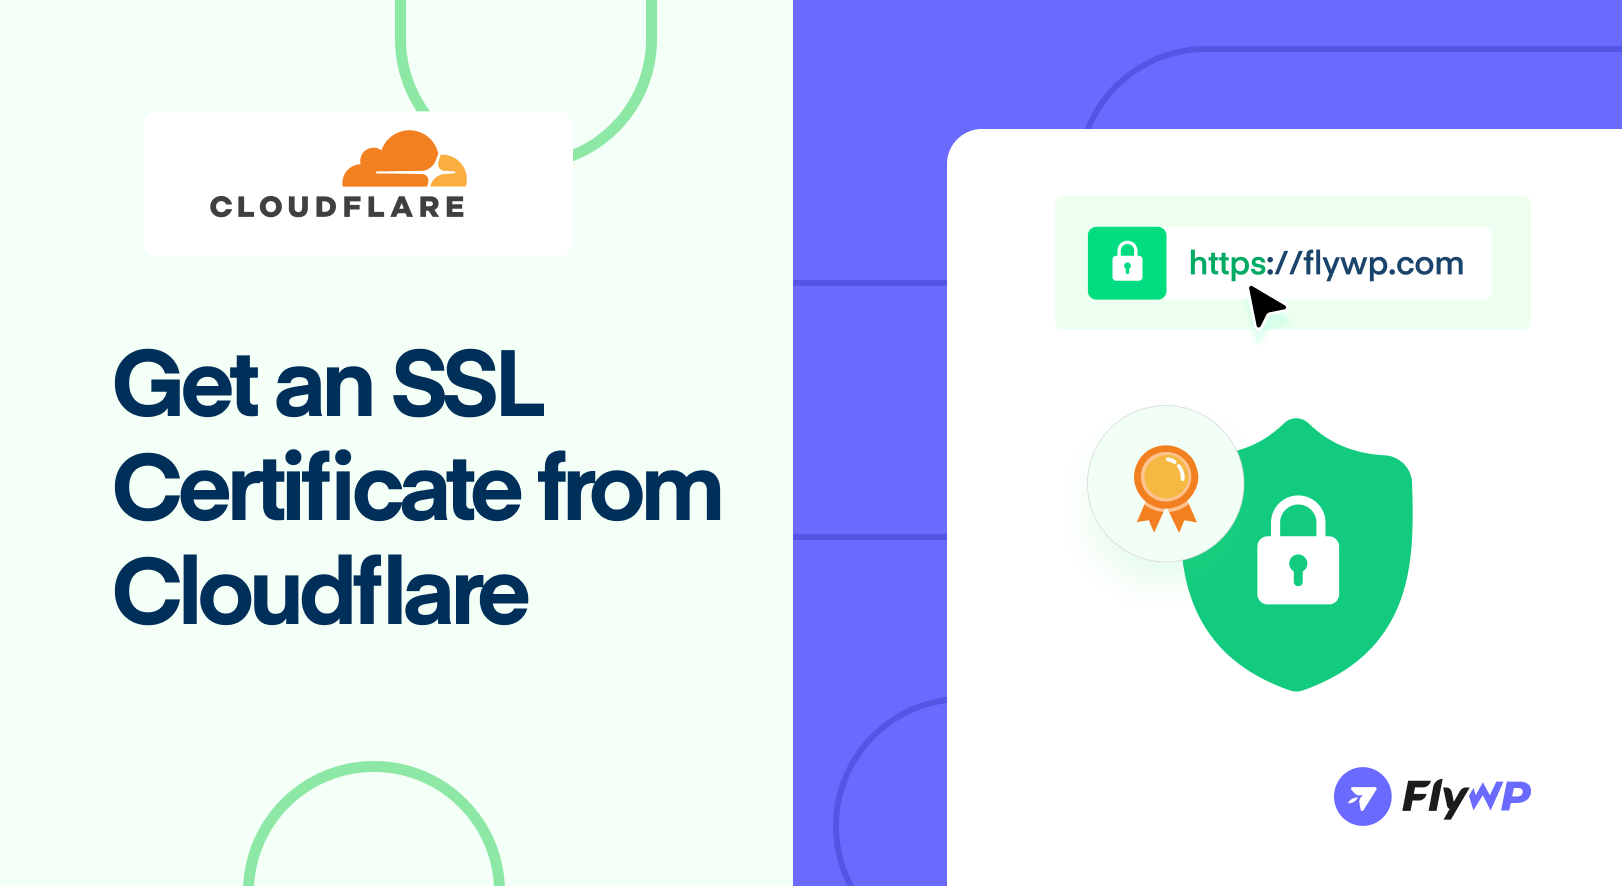
Online privacy is now a top priority, and having a secure website is no longer optional – it’s a necessity. An SSL certificate encrypts data transmitted between your website and its visitors, protecting sensitive information such as passwords and payment details. Not only does this safeguard your users, but it also boosts your site’s credibility and improves search engine rankings.
Cloudflare makes securing your website easier and more affordable by offering free and paid SSL certificates. No matter if you’re a beginner or an advanced user, Cloudflare’s streamlined process allows you to obtain and install SSL quickly. This guide will walk you through everything from generating an SSL certificate on Cloudflare to installing it on your web server – ensuring your site is protected and fully encrypted.
TL;DR:
Follow these simple steps to set up an SSL certificate using Cloudflare:
- Create or log in to your Cloudflare account
- Add your website domain to Cloudflare
- Choose the appropriate Cloudflare plan (Free plan works for most sites)
- Update your domain nameservers to the ones provided by Cloudflare
- Go to SSL/TLS settings in the Cloudflare dashboard
- Enable Full (Strict) SSL mode for secure end-to-end encryption
- Configure Edge Certificates and enable HTTPS features
- Verify that SSL is working correctly on your website
- (Optional) Generate a Cloudflare Origin Certificate if your server doesn’t have one
- Install the SSL certificate on your web server
Your website will now load securely over HTTPS with Cloudflare SSL enabled.
What Is an SSL Certificate and Why Your Website Needs It
An SSL certificate (Secure Sockets Layer) is a digital security certificate that encrypts the connection between a website and its visitors. It protects sensitive information such as passwords, payment details, login credentials, and personal data from being intercepted by hackers.
When a website installs an SSL certificate, its address changes from HTTP to HTTPS (Hypertext Transfer Protocol Secure). HTTPS ensures that all data exchanged between the user’s browser and the web server is encrypted and secure.
This encryption converts readable data into coded information that can only be decrypted by the intended server. As a result, attackers cannot easily intercept or modify the data while it is being transmitted over the internet.
SSL certificates are issued by trusted organizations known as Certificate Authorities (CAs). These authorities verify a website’s identity before issuing a certificate, helping establish trust between the website and its visitors.
When SSL is active, users will see a padlock icon in the browser address bar, indicating that the website connection is secure and protected.
Read more: Guide to Securing Your WordPress Site
Why SSL Certificates Are Important for Websites?
- Protects Sensitive Data – SSL locks your information so hackers can’t steal it.
- Boosts Google Ranking – Google favors secure (HTTPS) websites, helping them rank higher in search results.
- Builds Trust – The padlock symbol in the address bar shows visitors your site is safe.
- Meets Security Rules – Many online regulations require SSL to protect user data.
- Avoids “Not Secure” Warnings – Without SSL, browsers warn users that your site isn’t safe, which can scare them away.
- Aligns with Compliance: Meets industry standards like PCI-DSS for online transactions.
Simply put, an SSL certificate keeps your website secure, improves trust, and helps with SEO, making it a must-have for any website today.
Cloudflare SSL Modes Explained
Cloudflare offers multiple SSL modes that determine how traffic is encrypted.
| SSL Mode | Security Level | Recommended |
|---|---|---|
| Off | No encryption | ❌ |
| Flexible | Browser → Cloudflare encrypted | ⚠️ |
| Full | End-to-end encrypted | ✔️ |
| Full (Strict) | Fully verified encryption | ⭐ Best |
- Flexible SSL: Traffic between visitors and Cloudflare is encrypted, but Cloudflare connects to the server using HTTP. This means your origin server is not fully protected.
- Full SSL: Traffic is encrypted between the visitor and Cloudflare and also between Cloudflare and the origin server. However, the origin certificate is not validated.
- Full (Strict) SSL: This is the most secure option. Cloudflare verifies that your origin server has a valid SSL certificate before connecting.
Recommendation:
Always use Full (Strict) when possible.
Step-by-Step: How to Get an SSL Certificate from Cloudflare
Follow these steps to secure your website with a free SSL certificate using Cloudflare.
Step 1: Sign Up or Log In to Cloudflare
Go to Cloudflare.com and log in or create a free account. You can use your Google or Apple account or any other email address while signing up. Upon successful login, you’ll see the Cloudflare dashboard with all available configuration menus in the left side panel.
Step 2: Add Your Website to Cloudflare
Once inside the dashboard, you will be redirected to the Account Home page.
- Enter your domain name in the field provided.
- Click Continue.
- Cloudflare will automatically scan your existing DNS records.
Carefully review the detected records and confirm that everything looks correct before continuing.

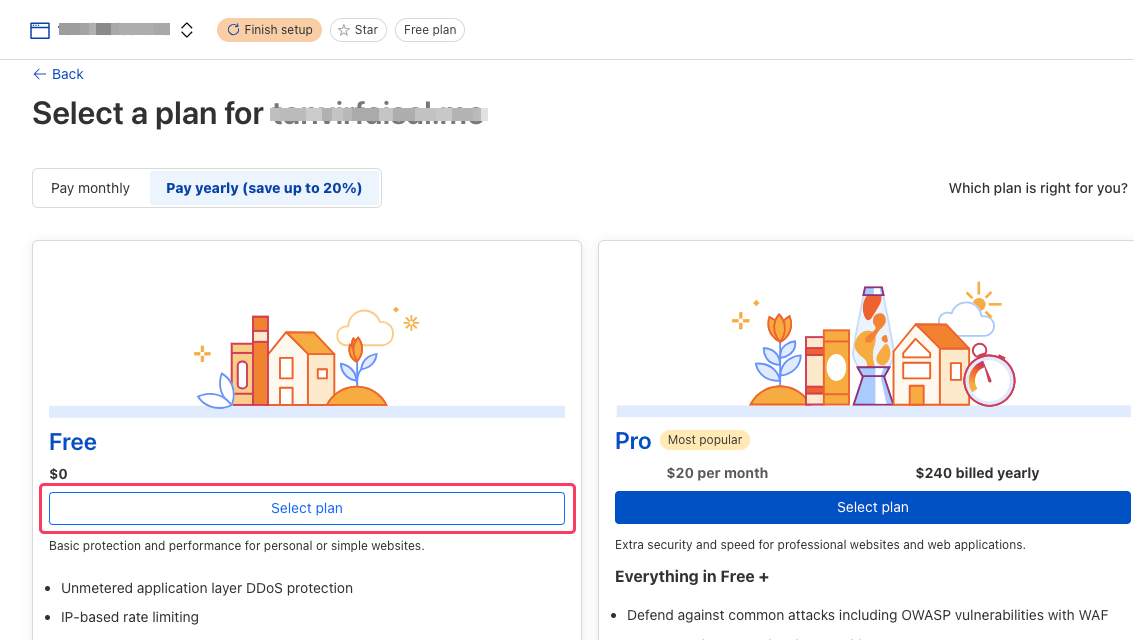
Step 3: Select the Right Plan for Your Needs
After adding your domain, Cloudflare will ask you to select a plan.
Available options include:
- Free Plan – Suitable for most personal websites and blogs
- Pro Plan – Includes advanced security and performance features
For most users, the Free plan is enough to enable SSL encryption.
Step 4: Update Your Domain Nameservers
This is one of the most important steps. Cloudflare will provide two nameservers, for example:
adam.ns.cloudflare.com
emma.ns.cloudflare.com
You can find these nameservers in:
Cloudflare Dashboard → Overview
or
DNS → Records → Scroll to Nameservers
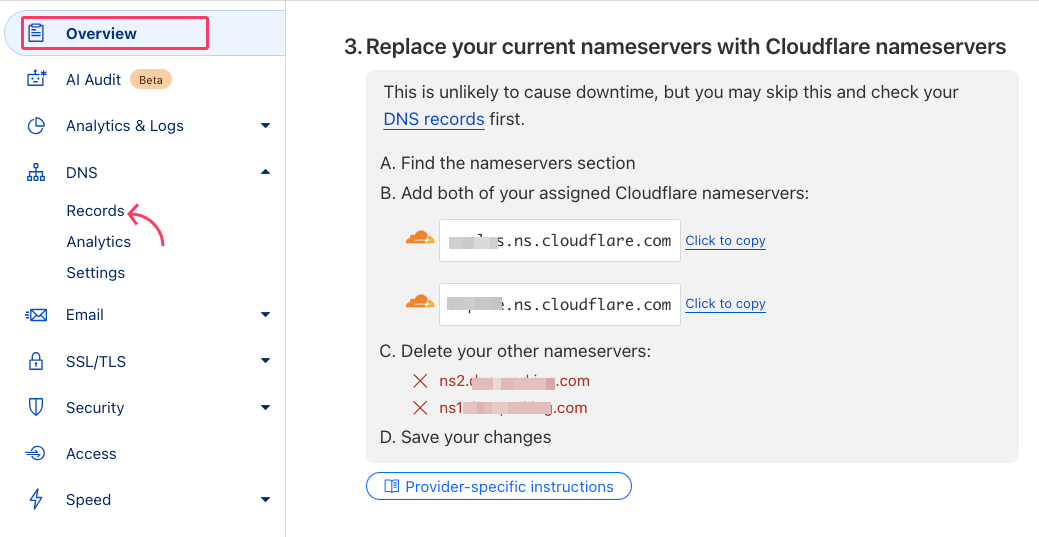
Next, go to your domain registrar (such as GoDaddy, Namecheap, or Hostinger) and replace your existing nameservers with the ones provided by Cloudflare.
DNS propagation may take up to 24 hours, but in many cases it completes much faster.
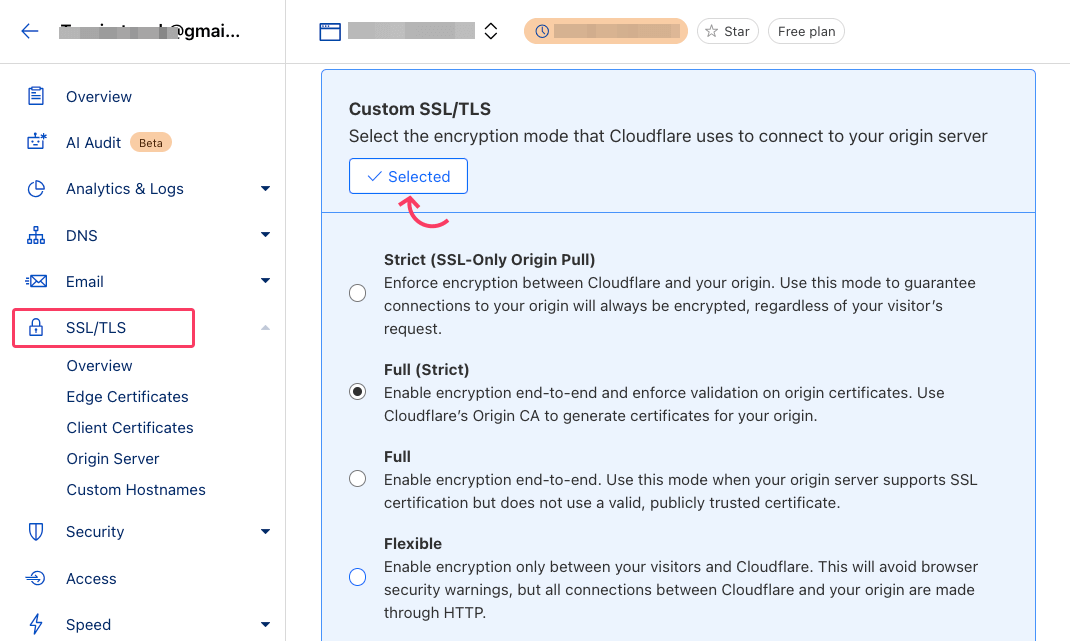
Step 5: Enable SSL/TLS Encryption
While people still use the term “SSL,” most modern encryption actually uses TLS for security. Cloudflare and other providers issue TLS certificates, even if they are commonly referred to as SSL. So don’t get confused seeing TLS here.
Go to SSL/TLS > Overview in the dashboard. And choose from:
- Automatic SSL/TLS (default): Cloudflare analyzes your traffic to determine if enhanced encryption is needed and automatically adjusts your settings accordingly.
- Custom SSL/TLS: Choose the encryption mode that Cloudflare will use to establish a connection with your origin server.
You can choose the custom encryption mode, and we recommend selecting the Full (Strict) option. This ensures full encryption with a valid SSL certificate on your origin server.
Step 6: Configure Edge Certificates
Enable Always Use HTTPS and Automatic HTTPS Rewrites under SSL/TLS > Edge Certificates to force secure connections.
- Always Use HTTPS: Redirects all HTTP requests to HTTPS, preventing insecure connections.
- Automatic HTTPS Rewrites: This fixes mixed content issues by rewriting HTTP links to HTTPS when possible, ensuring a fully secure browsing experience.
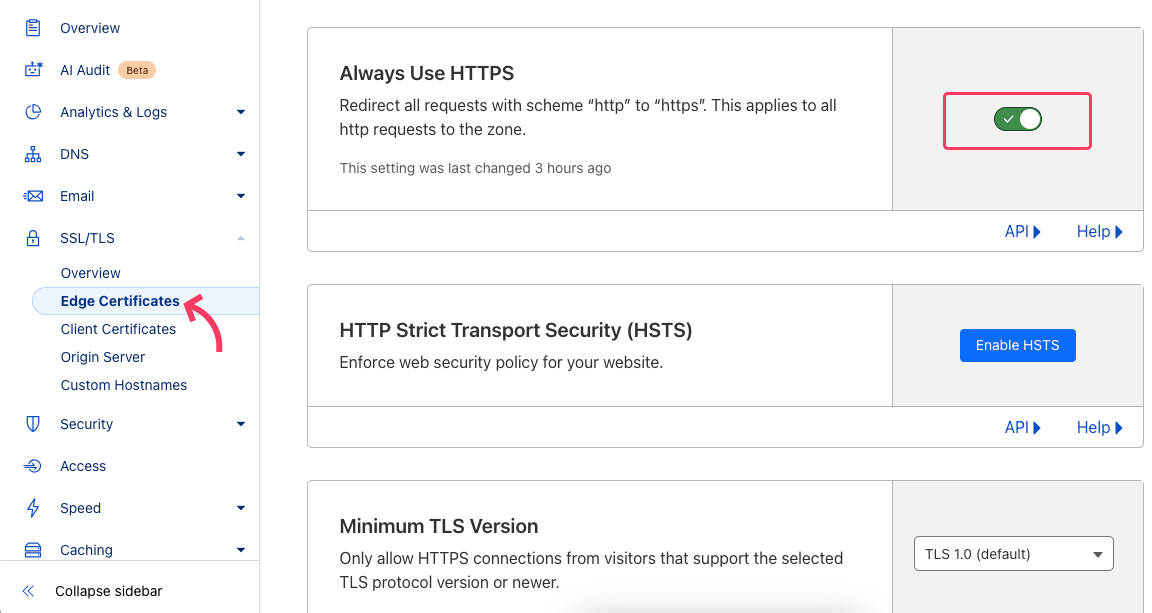
These settings help protect user data, improve SEO rankings, and maintain trust by enforcing secure connections across your site.
Step 7: Verify Your SSL Certificate Is Working
After installing an SSL certificate, follow these steps to confirm that it’s properly set up and securing your website:
- Open your browser and visit the website using
https://yourdomain.com. - Look for a padlock icon in the address bar.
- Click the padlock to view SSL certificate details.
You can also use an SSL Checker Tool. Test your SSL installation with online tools like:
These tools check for expiration, security issues, and proper configuration. If you know how to use commands, run the following command to check SSL on your server:
curl -I https://yourdomain.comIf SSL is working, the response should include HTTP/2 200 OK or HTTP/1.1 301 Moved Permanently (redirecting to HTTPS).
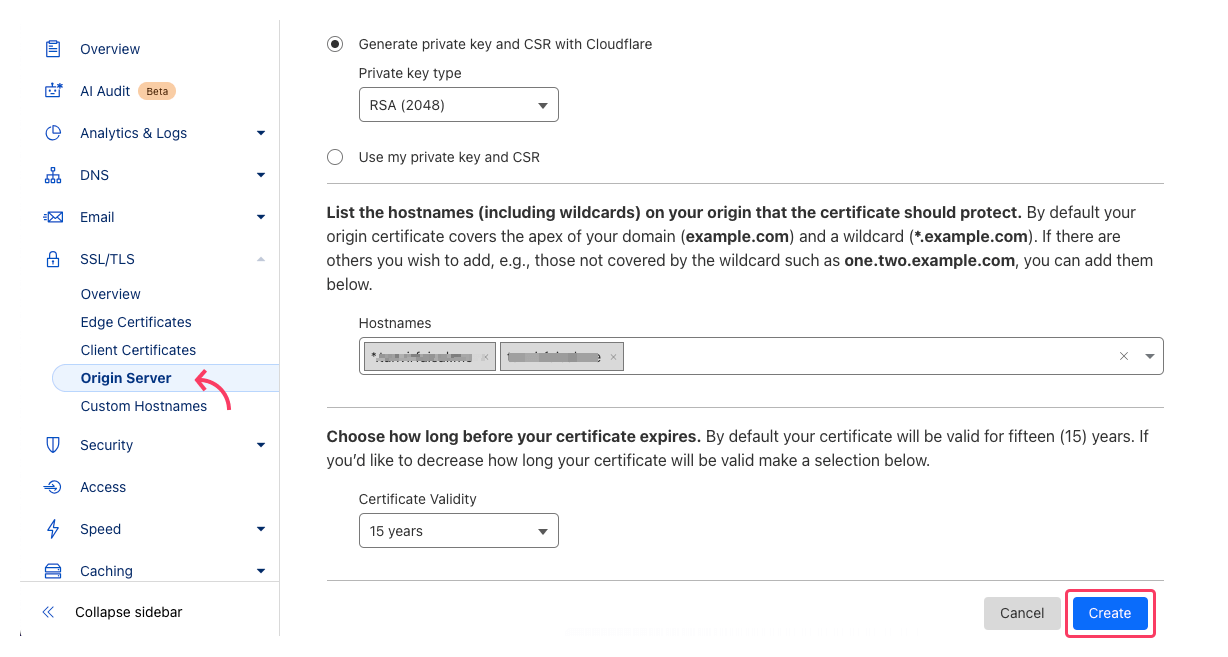
Step 8: (Optional) Generate a Cloudflare Origin Certificate
This step is necessary if your hosting doesn’t support SSL. Install the generated certificate on your web server. Go to SSL/TLS > Origin Server > Create Certificate.
Go to:
SSL/TLS → Origin Server → Create CertificateThen follow these steps:
- Select Generate private key and CSR with Cloudflare
- Choose your private key type
- Add hostnames (for example):
example.com
*.example.com- Choose the certificate validity period (default: 15 years)
- Click Create
Cloudflare will generate:
- Certificate file (cert.pem)
- Private key (privkey.pem)
Install these files on your web server to enable Full (Strict) SSL encryption.
Your Cloudflare Origin SSL certificate is now ready to use.
Step 9: Install SSL Certificate on Your Web Server
After generating the Cloudflare Origin SSL Certificate, you need to install it on your web server. The process differs slightly depending on whether you’re using Apache or Nginx.
Install SSL on Apache
Follow these steps to configure the Cloudflare SSL certificate on an Apache server.
1. Access your server via SSH
ssh [email protected]2. Create a directory for SSL files
sudo mkdir /etc/ssl/cloudflare3. Upload the certificate and private key
Upload the files you downloaded from Cloudflare:
cert.pem
privkey.pem
Place them in:
/etc/ssl/cloudflare/4. Update the Apache configuration
Open your domain’s configuration file:
sudo nano /etc/apache2/sites-available/yourdomain.com.confEnsure the following lines exist:
SSLEngine on
SSLCertificateFile /etc/ssl/cloudflare/cert.pem
SSLCertificateKeyFile /etc/ssl/cloudflare/privkey.pem
5. Enable the site and restart Apache
sudo a2ensite yourdomain
sudo systemctl restart apache2
Your Apache server will now use the Cloudflare Origin SSL certificate.
Install SSL on Nginx
Follow these steps to install the Cloudflare Origin SSL Certificate on an Nginx server.
1. Access your server via SSH
ssh [email protected]2. Create a directory for SSL files
sudo mkdir /etc/nginx/ssl3. Upload the certificate and private key
Copy the files you generated from Cloudflare:
cert.pemprivkey.pem
Upload them to:
/etc/nginx/ssl/4. Update the Nginx configuration
Open your site configuration file:
sudo nano /etc/nginx/sites-available/yourdomain.com.confAdd or modify the SSL configuration inside the server block:
server {
    listen 443 ssl;
    server_name yourdomain.com;    ssl_certificate /etc/nginx/ssl/cert.pem;
    ssl_certificate_key /etc/nginx/ssl/privkey.pem;    location / {
        proxy_pass http://localhost:80;
    }
}
Save the file after making the changes.
5. Test and restart Nginx
Before restarting, check that the configuration is valid:
sudo nginx -tIf everything looks good, restart Nginx:
sudo systemctl restart nginxYour Cloudflare Origin SSL certificate should now be active on your Nginx server.
Install SSL Using cPanel or Other Control Panels
cPanel is a widely used control panel for website management. While we’ve demonstrated the process using cPanel here, the steps are somewhat similar for other popular control panels as well.
- Log in to cPanel.
- Go to Security > SSL/TLS.
- Click Manage SSL Sites under Install and Manage SSL.
- Paste the contents of:
- Certificate (CRT): From
cert.pem. - Private Key (KEY): From
privkey.pem.
- Certificate (CRT): From
- Click Install Certificate.
Finally, verify that the certificate is working correctly by visiting your website over HTTPS, as explained in Step 7.
Simplify SSL Certificate Setup with FlyWP
If you manage WordPress websites on a VPS server, installing and configuring SSL certificates manually can be time-consuming.
The process often involves working with server settings, SSH commands, and web server configurations, which can be challenging if you’re not familiar with server management.
This is where FlyWP makes the process much easier.
FlyWP provides a simple graphical dashboard that allows you to install and manage SSL certificates without dealing with complex server configurations. Even users with minimal technical experience can secure their websites in just a few clicks.
How to Install an SSL Certificate Using FlyWP
Follow these simple steps to install and verify an SSL certificate in FlyWP:
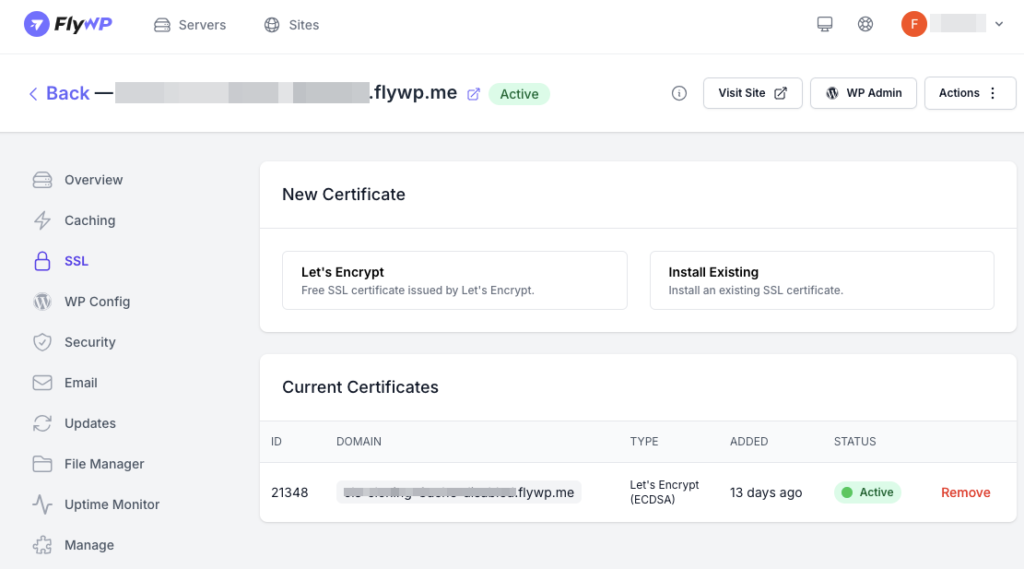
- Log in to your FlyWP dashboard.
- Go to the Sites section.
- Select the server and website where you want to install SSL.
- Click SSL from the left-side menu.
Under the New Certificate section, choose one of the following options:
- Let’s Encrypt – Install a free SSL certificate automatically.
- Install Existing – Upload an existing SSL certificate manually.
Follow the on-screen instructions to complete the installation.
Once the process finishes, your SSL certificate will be installed and verified automatically, and your website will be secured with HTTPS.
Why Use FlyWP for SSL Management:
FlyWP simplifies SSL management by allowing you to:
- Install SSL certificates in one click
- Manage SSL for multiple websites
- Enable secure HTTPS connections quickly
- Avoid complex server configuration
This makes FlyWP an ideal solution for WordPress users, developers, and agencies managing VPS servers.
Learn more about FlyWP’s SSL Management to streamline your website security.
A Cloudflare Origin CA certificate secures the connection between Cloudflare and your origin server. It enables Full (Strict) SSL mode, ensuring end-to-end HTTPS encryption. Unlike Universal SSL, it must be installed manually on your server and can be valid for up to 15 years.
You can get a free SSL certificate by adding your domain to Cloudflare and generating an Origin Certificate. Go to SSL/TLS → Origin Server → Create Certificate, download the PEM files, and install them on your server. Make sure to enable Full (Strict) SSL mode afterward.
Yes, Cloudflare provides free Universal SSL certificates for all domains on its network. These certificates automatically secure traffic between visitors and Cloudflare. For full end-to-end encryption, you should also install an Origin SSL certificate on your server.
Yes, enabling HTTPS can improve SEO because Google uses it as a ranking signal. Secure websites also build more user trust and reduce browser security warnings. Using Cloudflare’s CDN can additionally improve Core Web Vitals and page load speed.
Yes, Cloudflare improves global website performance through its 300+ data center CDN network. Content is cached closer to visitors, reducing latency and improving load times worldwide. Enabling features like Argo Smart Routing can further optimize traffic by geography.
No, Flexible SSL is not recommended because it does not encrypt traffic between Cloudflare and your origin server. This can create security risks and redirect loops. Use Full or Full (Strict) SSL mode for proper end-to-end encryption.
Common errors include CERT_AUTHORITY_INVALID or SSL handshake failures. These usually happen when SSL mode is incorrect or the origin certificate is missing. Verify the orange cloud proxy is enabled and restart your web server after installation.
No, Cloudflare SSL does not fully replace server-side SSL. It secures traffic between visitors and Cloudflare’s edge network. For complete security, install an Origin SSL certificate on your server and use Full (Strict) mode.
No, Cloudflare Origin certificates do not auto-renew. You must generate a new certificate when the validity period expires. Set reminders or monitor certificate status in the Cloudflare dashboard to avoid expiration issues.
Final Thoughts
Securing your website with an SSL certificate is essential for protecting user data and improving trust. While obtaining an SSL certificate from Cloudflare and installing it on your web server can be a bit technical, the benefits of enhanced security, improved SEO, and a better user experience make it well worth the effort.
For those who find manual installation overwhelming, cloud server management platforms like FlyWP can make the process much easier. With its intuitive interface for managing SSL certificates, FlyWP streamlines not only SSL management but also the overall cloud server management. You can easily ensure your website stays secure with minimal effort.
Looking for a simpler way to manage your SSL and cloud server? Try FlyWP to take the hassle out of both and keep your website running securely.