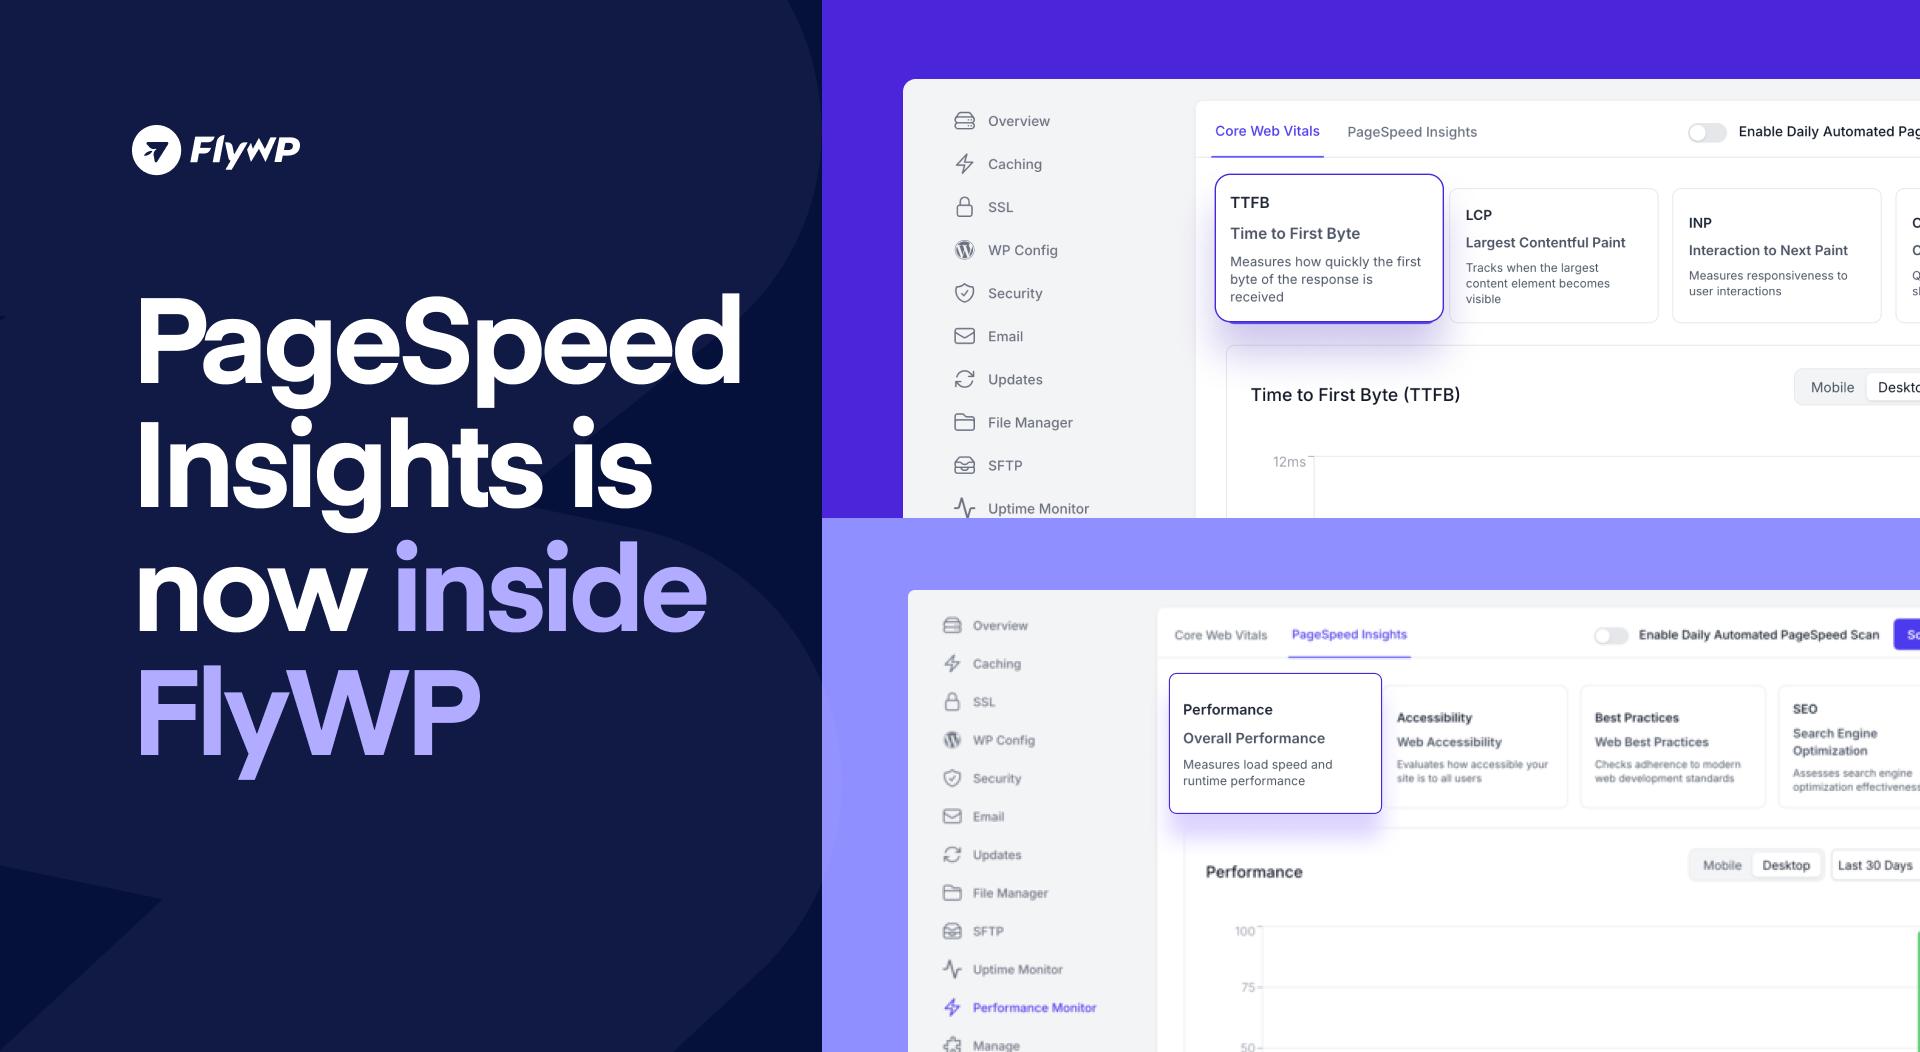
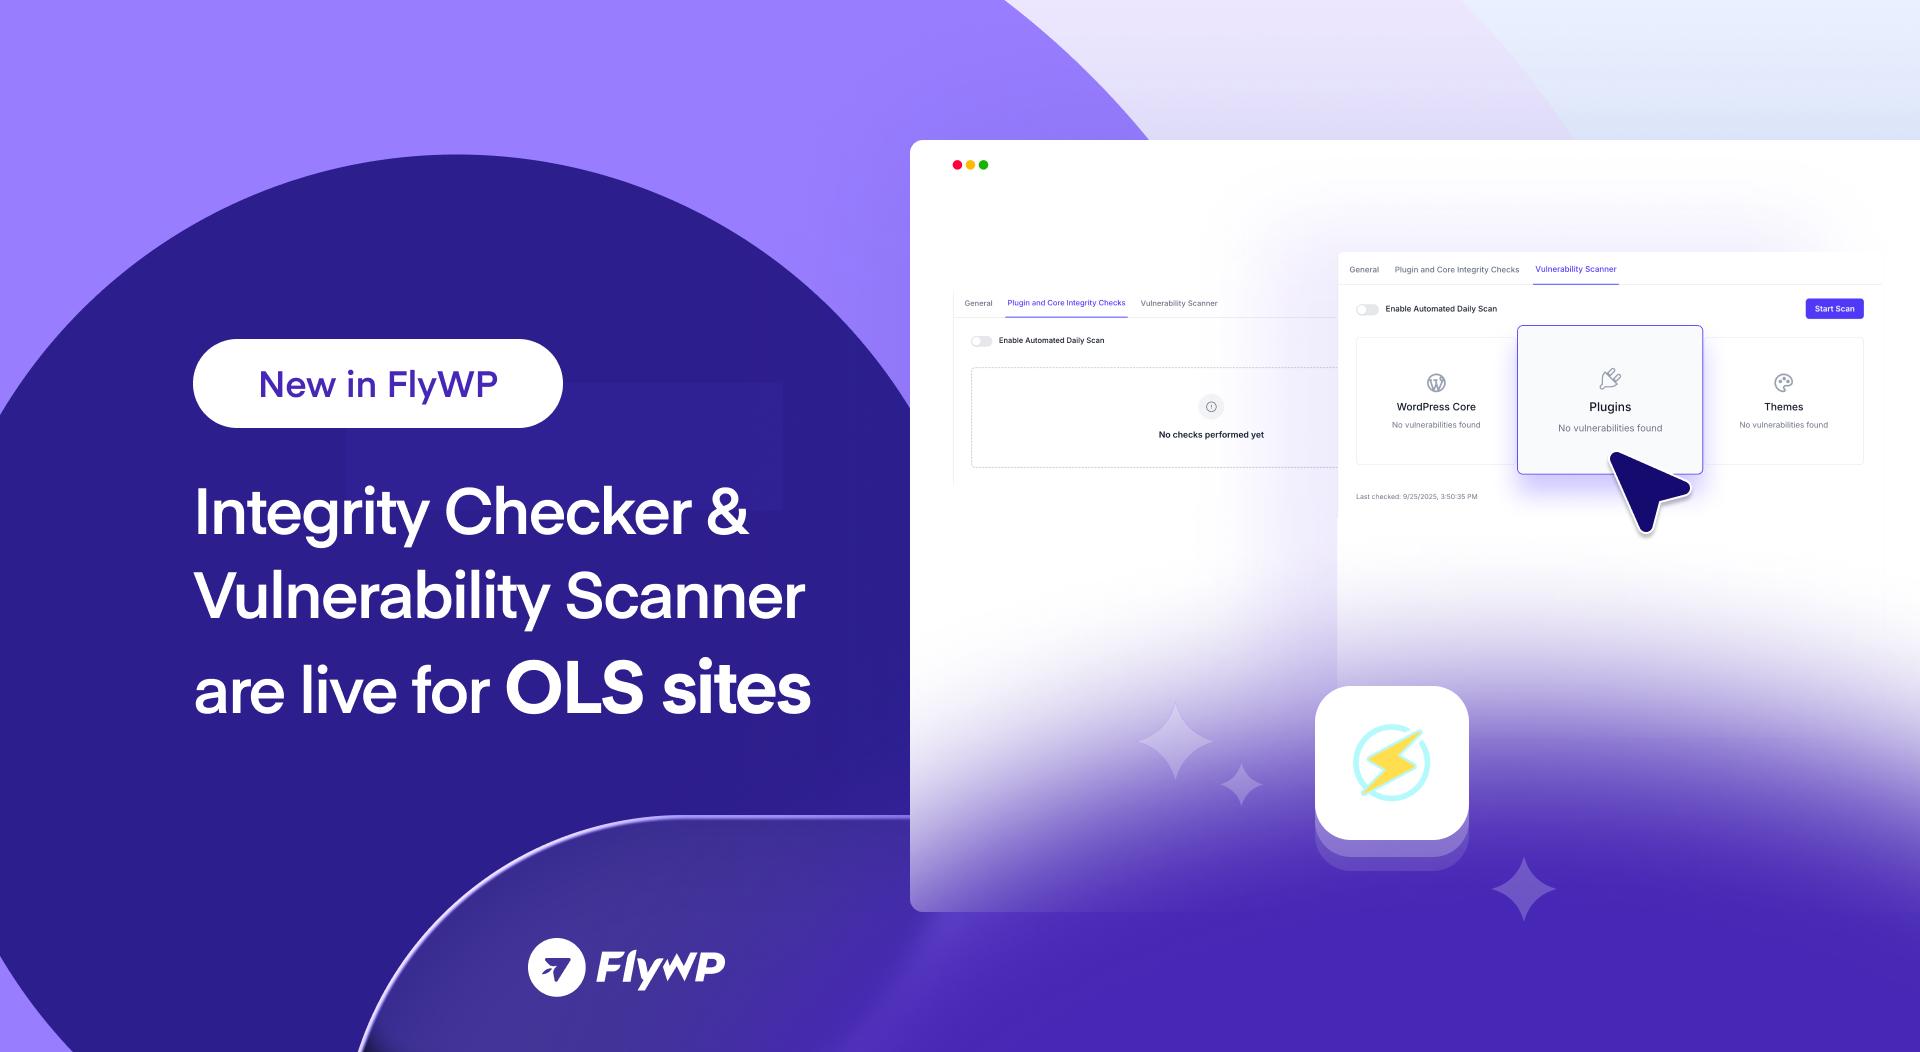
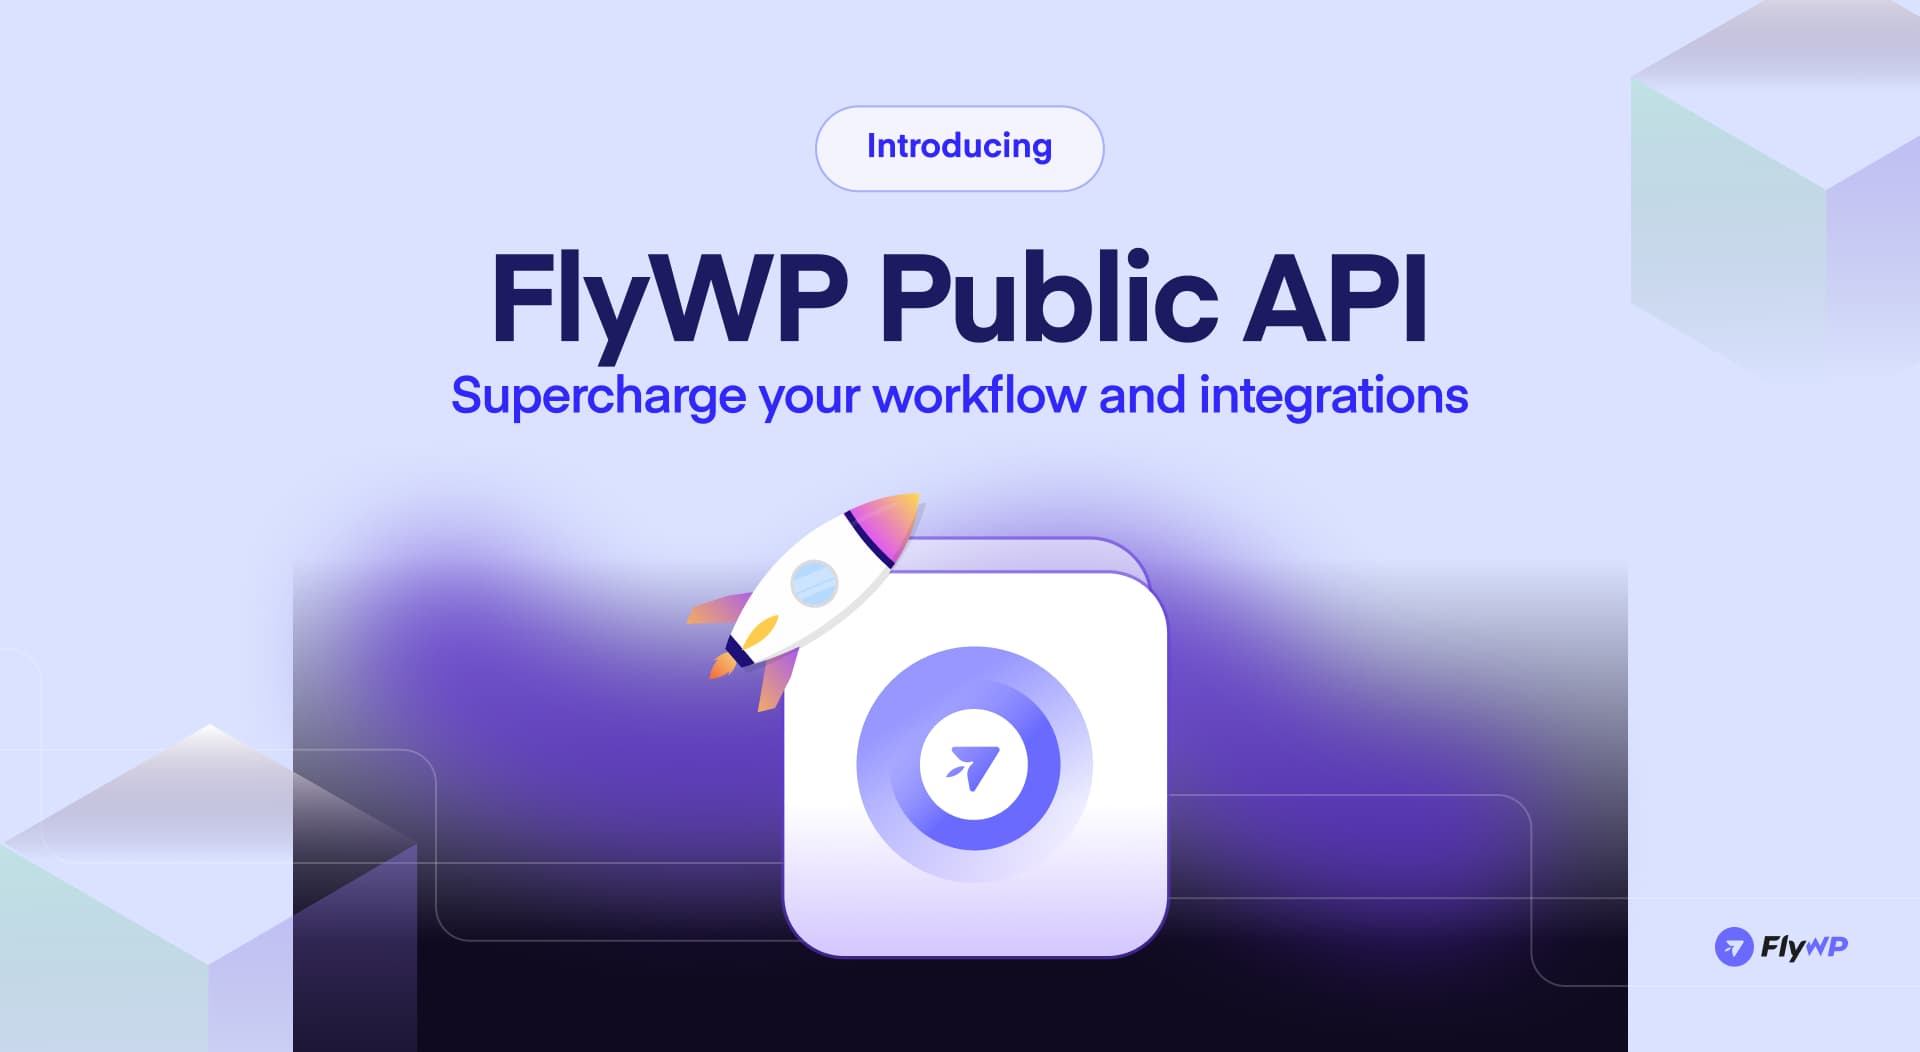
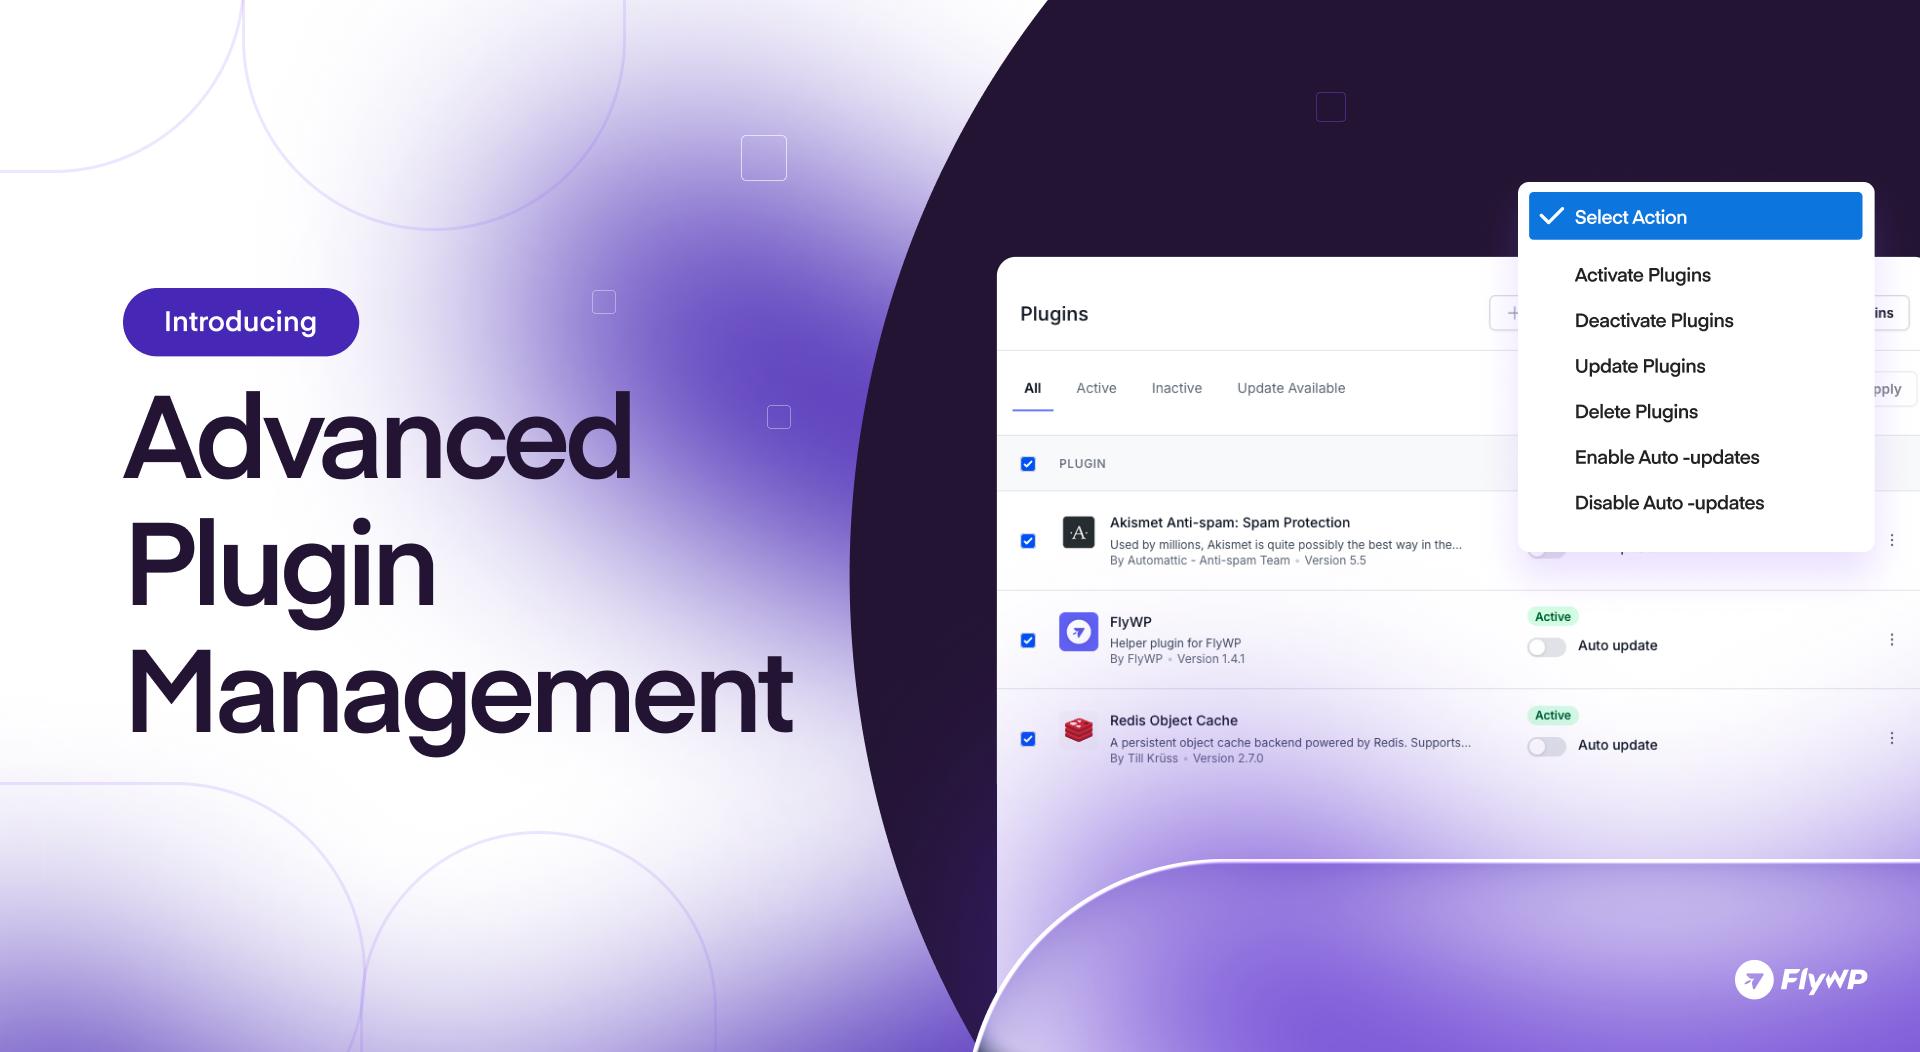
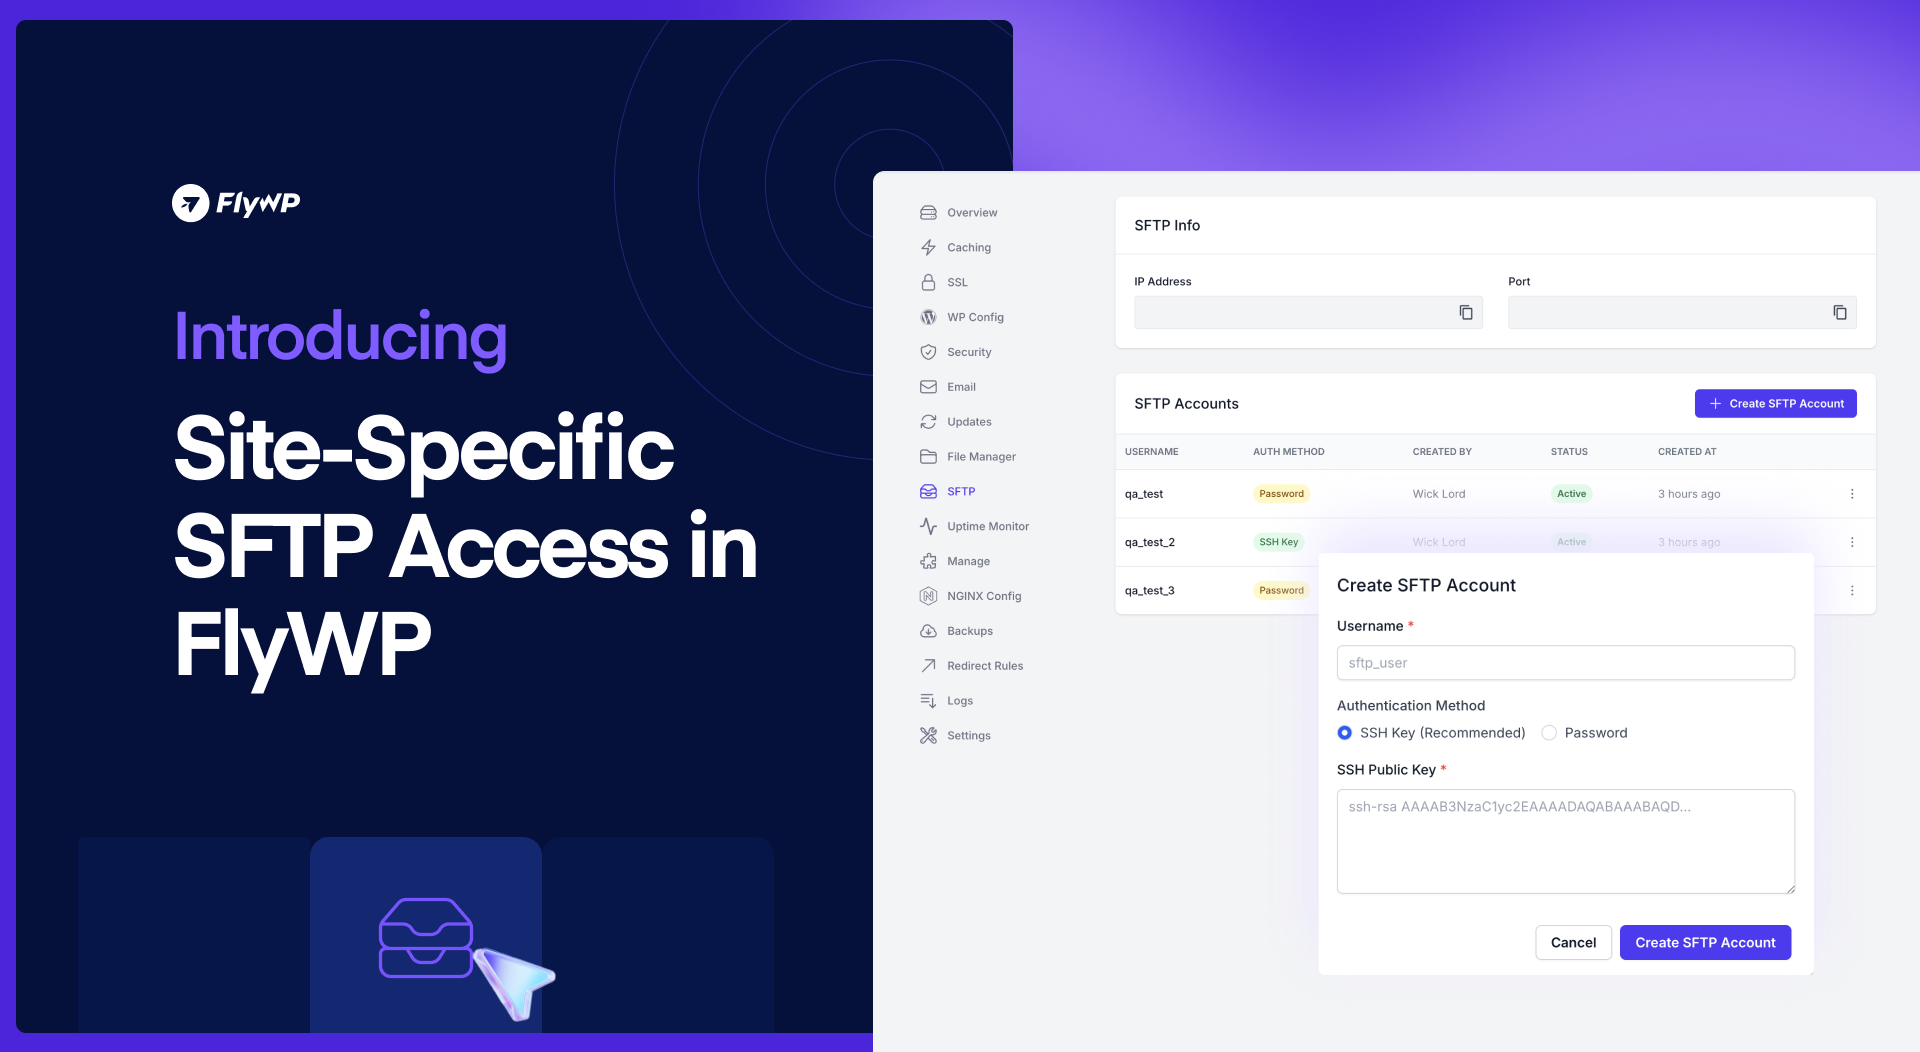
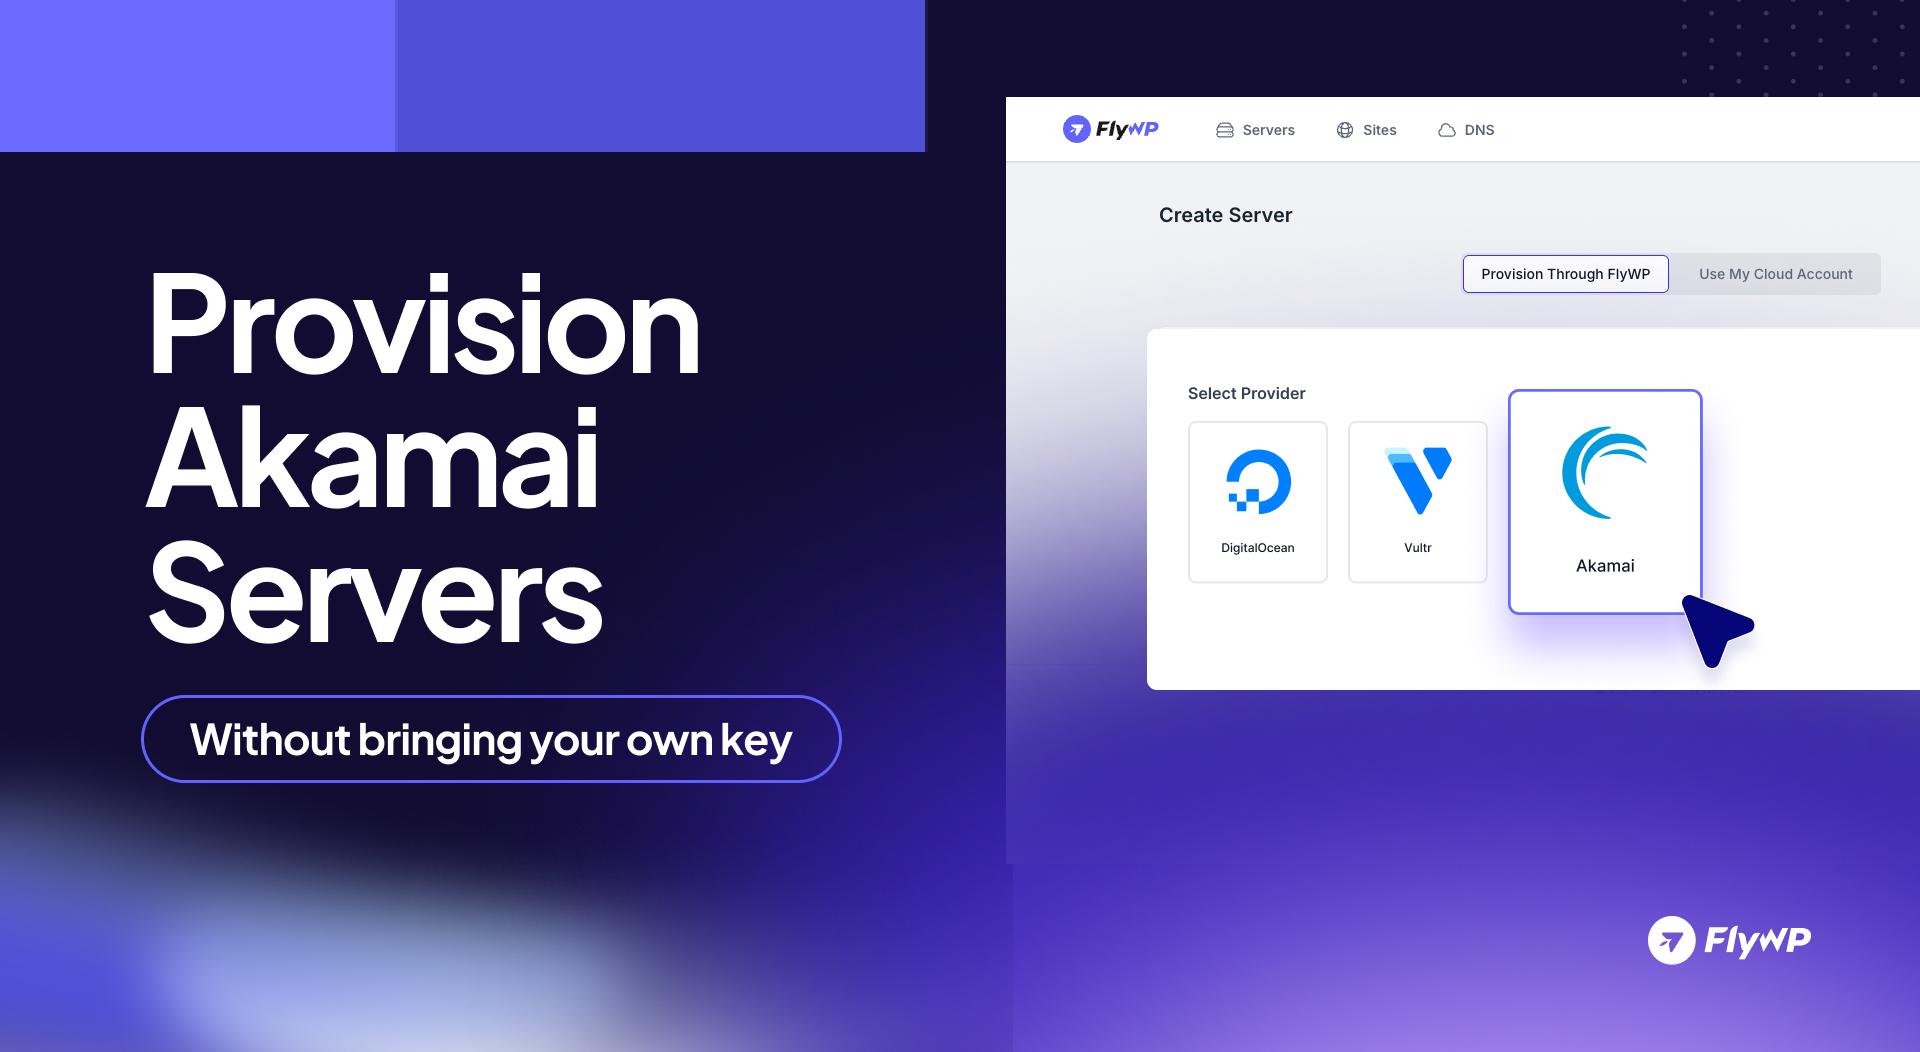
Changelog

All the latest updates, improvements, and fixes to FlyWP.

Subscribe to stay updated

Management and Security Enhancements

We’re excited to share the latest updates that enhance the management and security features of FlyWP. We have added two “Manage” sections for servers and sites.

For Server:

  • Service Management Made Simple: Easily restart server-wide services such as Nginx proxy, MySQL, Redis, and Ofelia directly from the new Manage tab in your server dashboard.
  • Enhanced SSH/SFTP Accessibility: SSH/SFTP information has been repositioned for better visibility in the UI, complete with convenient copy functionality.
  • Security Upgrades: The root password for MySQL was previously sent via email upon server provisioning. Now, for enhanced security, it has been removed from emails. These credentials are now securely accessible within the server dashboard UI.

Read more

New Feature: Email Sending

Now, you have the flexibility to utilize either a custom SMTP server or one from our list of supported providers for sending emails. No longer is it necessary to employ a custom SMTP plugin within your WordPress site. We’ve streamlined the process by automatically configuring the email sending settings for you natively.

Flywp Email Sending

Our integration seamlessly supports the following providers:

  • Postmark
  • SendGrid
  • Mailgun

Read more

Flywp Cron Job Manager

New Feature: Easy Cron Job Scheduling

We’re pleased to announce the release of a highly requested feature: the ability to manage Cron Jobs directly from the FlyWP dashboard. This new functionality allows users to automate repetitive tasks on their server with ease.

What’s New:

  • Simplified Cron Job Creation: Users can now add Cron Jobs through the FlyWP dashboard with a user-friendly interface.
  • Flexible Scheduling Options: Choose how often your jobs run, with options ranging from every minute to monthly, or even upon reboot.
  • User-Specific Execution: Assign Cron Jobs to specific users on your system for better control and security.
  • Instant Feedback: Get immediate confirmation when a new Cron Job is created, with all details readily visible in the dashboard.

Setting up a Cron Job is straightforward:

  1. Navigate to the ‘Crons‘ tab.
  2. Click on ‘Add Cron‘ to schedule a new job.
  3. Fill in the command, user, and frequency.
  4. Confirm the creation and the new job will appear in your Cron Job list, ready to go.

This update is part of our commitment to providing powerful, yet easy-to-use tools to manage your server environment more effectively.

Stay tuned for more updates, and happy automating!

Redis Cache Management

Redis Cache Management Is Now in Dashboard

We’re excited to announce an update that streamlines the caching management experience for FlyWP users. Redis Object Cache control is now directly accessible from the FlyWP dashboard, making it easier than ever to handle your site’s caching needs.

What’s New:

  • Dashboard Integration: Redis Object Cache enable/disable functionality is now a part of the FlyWP dashboard.
  • Renamed Sidebar: The sidebar previously known as “Page Caching” has been aptly renamed to “Caching” to reflect the broader scope of caching options available, including page and object caching.
  • Simplified Cache Clearing: Clear your site’s page and object cache with the click of a button directly from the dashboard, ensuring your content is fresh and your site is performing at its best.

Additional Details:

  • The “Caching” page now includes options for both FastCGI Cache and Redis Object Cache.
  • Enabling Redis Object Cache can significantly speed up your website by storing database query results and API calls in fast-access memory.
  • This update aims to provide more control and flexibility to website administrators and developers directly through the FlyWP interface.

To manage your site’s cache, simply go to the “Caching” tab in your dashboard. Here, you’ll find the options to toggle FastCGI and Redis Object Cache, as well as to clear the cache as needed.

We hope this update enhances your FlyWP experience, providing more convenience and control over your site’s performance.

Happy caching!

Flywpdarkmode

Introducing Dark Mode 🌙 and Minor Style Improvements

We’re thrilled to unveil the latest enhancement to your FlyWP experience: Dark Mode! Say goodbye to eye strain and hello to a sleek, stylish interface designed to complement your workflow, day or night.

With Dark Mode, navigating your FlyWP platform becomes effortlessly smooth as you immerse yourself in a visually stunning environment. Whether you’re burning the midnight oil on a project or simply prefer a more subdued aesthetic, Dark Mode offers the perfect solution.

Git Integration for Bedrock-Based WordPress Sites

We are excited to announce a new feature that greatly simplifies the workflow for developers and site administrators: Git repository support for creating and managing WordPress sites. This new feature is designed to integrate with Bedrock, a modern WordPress stack that helps you get started with the best development tools and project structure.

Key Highlights:

  • Seamless Git Integration: Connect with popular Git hosting providers like GitHub to deploy and manage your WordPress sites easily. Support for GitLab and Bitbucket is coming soon.
  • Bedrock Support: Take advantage of Bedrock’s improved folder structure, easier configuration, and enhanced security features.
  • Effortless Deployment: Clone your repository directly when creating a new site, or set up a deployment script for continuous integration.
  • Push to Deploy: Activate ‘Push to Deploy‘ for your WordPress site and have your code changes automatically deployed upon push to your chosen branch.
  • Enhanced Control: Manage your environment variables directly from the FlyWP portal for better security and control over your WordPress configuration.

Getting Started

  • Connect Your GitHub Account: In your FlyWP dashboard, navigate to Profile >Settings> Git Providers (If you’re logged in at FlyWP, access it here directly) And then click on the Connect your button. This secure connection enables the seamless flow of your projects from GitHub to FlyWP.
  • Authorize your account: In the next step, you will need to authorize your account with FlyWP.
  • Now, when you add new sites — choose “Install from a Git repository” and follow the on-screen instructions to get started

Whenever you push anything new to your Git repo, it’ll trigger the automated deployment and the changes would automatically deployed for the site you have configured. Read more about the feature with detailed documentation here

This feature is now available to all users and can be accessed from the “Create Site” section. Once a site has been created via the Git integration, you will see the “Deployment” tab, which includes Git options and deployment settings.

We hope this update will make managing your WordPress sites more efficient and enjoyable. As always, we value your feedback and look forward to hearing about your experience with this new feature.

Happy Coding!

View All Sites Option

We’ve added an option to view all sites at a glance. You can find it in in the top header section at FlyWP or go to https://app.flywp.com/sites to access it directly

Cleanshot 2024 01 05 At 17.29.04@2x

FlyWP Now Supports External Database

You can now add an external database while creating WordPress site.

How to use External Database with FlyWP?

While creating a new site, you can find a checkbox to use external databases. When you check it on, you’ll have the option to use external databases. The screen will ask you to input external database related information in the next screen

Updates to Site Overview Page

The site overview page was previously blank. Now, we’ve added useful information about the website front and center so you can know about the status of your site easily.

The Site Overview page now shows useful information at a glance.

  • Server Status – Shows if the server is currently active/not active
  • HTTPS Status: Shows if HTTPS is enabled or not, indicating that SSL/TLS encryption is active for secure communications.
  • Maintenance Mode Status: Maintenance Mode is disabled, meaning the site is live and accessible to visitors.
  • Current PHP Version: Shows the current PHP version the site is using.
  • Caching Status: Shows the caching status for the app
  • Multisite Status: Shows if the site is multisite or not
  • The web directory path: Shows the exact path where WordPress is installed for the site
  • Server Creation Date: Shows when the server has been provisioned
  • Created By: Shows who created the site
Image