Automating the deployment of WordPress sites streamlines your development process, minimizes human error, and speeds up the transition from development to production. This tutorial will guide you through using Git, a popular version control system, and FlyWP, a server management solution for WordPress.
Automating the deployment of WordPress sites brings many benefits; it ensures your site is always up-to-date. Using Git and FlyWP, you can streamline your workflow and make deployments easier and more reliable.
In this tutorial, we will guide you step-by-step on how to set up and automate your WordPress deployments using Git and FlyWP. You will learn how to set up your environment, integrate Git with your WordPress project, connect to FlyWP, and automate the deployment process. By the end of this tutorial, you will have a robust system to manage your WordPress site efficiently.
Now, let’s dive into the detailed steps for automating WordPress deployment with Git and FlyWP.
Prerequisites for automating WordPress deployment
Before starting the automation of your WordPress deployment using Git and FlyWP, ensure you have the following tools and knowledge: This preparation will make the process smoother and more understandable.
Necessary tools and accounts
- Git
- Installation: Download and install Git from the official Git website. Follow the installation instructions specific to your operating system (Windows, macOS, or Linux).
- Verification: After installation, open your terminal or command prompt and run the command git –version to confirm Git is installed correctly. You should see the version number of Git displayed.
2. FlyWP account
- Sign-Up: Visit FlyWP and create a new account if you don’t already have one. FlyWP offers various plans, including a free trial (100% Money-Back Guarantee), so choose the one that fits your needs.
- Dashboard access: Once your account is set up, log in to the FlyWP dashboard. Familiarize yourself with the interface, as you will use it to manage your server and deployment settings.
You can also check the documentation on the WordPress Site with FlyWP
3. WordPress project
- Existing project: Ensure you have a WordPress project ready for deployment. This could be an existing site you are working on or a new WordPress installation.
- Local development environment: It’s recommended to set up a local development environment using tools like XAMPP, and WAMP. This allows you to develop and test your site locally before pushing changes to production.
Basic knowledge requirements
- Understanding of Git
- Version control: Git is a distributed version control system that tracks changes in your project files. Basic knowledge of Git commands and concepts like commits, branches, and merges is essential.
- Common commands: Familiarize yourself with common Git commands such as git init, git add, git commit, git push, and git pull. There are many online resources to help you with Git commands.
2. Basic WordPress knowledge
- WordPress structure: Understand the basic structure of a WordPress site, including the roles of themes, plugins, and the wp-content directory.
- Configuration files: Know how to manage WordPress configuration files like wp-config.php. These files often contain sensitive information that should be handled carefully.
3. Basic command line usage
- Terminal commands: You will need to use the terminal (command prompt) to run Git commands and interact with your server. Basic familiarity with navigating directories and executing commands is required.
By ensuring you have the necessary tools installed and a basic understanding of Git, WordPress, and command-line usage, you are well-prepared. If you are new to any of these areas, read this blog and slowly follow step-by-step before proceeding.
Let’s get started on to make your WordPress deployment process more efficient and robust –
How to integrate Git with your WordPress project
Step 1: Setting up your environment
In this step, we will prepare your development environment by installing Git, creating a Git repository, and setting up your WordPress project. This foundational step is crucial for automating your deployment process.
1.1 Installing Git
Git is a powerful version control system that allows you to track changes in your project files and collaborate with others. Follow these steps to install Git on your computer:
- Download Git:
- Visit the official Git website.
- Click on the download link that corresponds to your operating system (Windows, macOS, or Linux).
2. Install Git:
- Windows: Run the downloaded .exe file. Follow the installation prompts. You can use the default settings unless you have specific preferences.
- macOS: Open the downloaded .dmg file and drag the Git application to your Applications folder. Alternatively, you can install Git using Homebrew by running the command brew install git in your terminal.
- Linux: Open your terminal. Use your package manager to install Git.
3. Verify installation:
- Open your terminal or command prompt.
- Run the command git –version. You should see the installed Git version number displayed. This confirms that Git is installed correctly.
1.2 Creating a Git repository
Next, you will create a Git repository for your WordPress project. This repository will track changes and enable automated deployments.
- Navigate to your project directory:
- Open your terminal or command prompt.
- Use the cd (change directory) command to navigate to your WordPress project directory. For example:

2. Initialize a new Git repository:
- In the project directory, run the following command to initialize a new Git repository:

- This command creates a hidden .git directory in your project folder, which Git uses to track changes.
3. Add project files to the repository:
- Add all the files in your project to the repository using the following command:

- The . (dot) indicates that all files in the current directory should be added.
4. Commit the files:
- Commit the added files with a message describing the commit: git commit -m “Initial commit of WordPress project“

- Committing saves a snapshot of your project at this point.
1.3 Setting up your WordPress project
Ensure your WordPress project is organized and ready for version control.
- Verify project structure:
- Make sure your WordPress files (themes, plugins, etc.) are properly organized in the project directory.
- Your project structure should look something like this:

2. Create a .gitignore File:
- The .gitignore file tells Git which files and directories to ignore. This is useful for excluding unnecessary files from version control, such as temporary files, cache files, and configuration files containing sensitive information.
- Create a .gitignore file This configuration makes sure that Git won’t track these files.
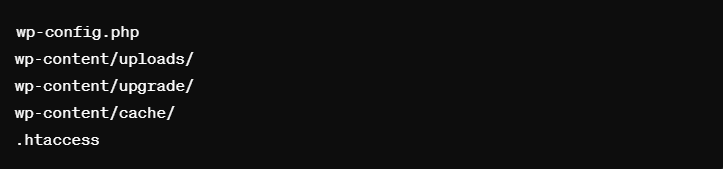
- This configuration ensures that these files and directories are not tracked by Git.
3. Final checks:
- Ensure your WordPress project is functional and ready for deployment.
- Test your site locally to confirm everything works as expected before proceeding to the next steps.
By completing these steps, you have set up your environment with Git and prepared your WordPress project for automated deployment. In the next steps, we will connect the project to FlyWP and configure continuous deployment.
Step 2: Preparing your WordPress project for Git
In this step, we will prepare your WordPress project for version control with Git. This involves initializing a Git repository in your WordPress directory and configuring a .gitignore file to exclude unnecessary files from version control.
2.1 Initializing Git in your WordPress directory
First, we need to initialize Git in your WordPress project directory. This will enable Git to start tracking changes in your project files.
1. Open terminal or command prompt:
- Depending on your operating system, open the terminal (on macOS or Linux) or command prompt (on Windows).
2. Navigate to your project directory:
- Use the cd (change directory) command to navigate to the root directory of your WordPress project. The root directory is the main folder that contains all your WordPress files.
- Example command:

- Replace /path/to/your/wordpress/project with the actual path to your WordPress project directory.
3. Initialize Git:
- Run the following command to initialize a new Git repository in your project directory

- This command creates a hidden .git directory in your project folder, which Git uses to store information about the project’s version history.
2.2 Configuring .gitignore for WordPress
The .gitignore file tells Git which files and directories to ignore. This is important because you do not want to track every file in your WordPress project, especially those that are auto-generated or contain sensitive information.
1. Create a .gitignore file:
- In the root directory of your WordPress project, create a new file named .gitignore.
- You can create this file using any text editor or directly from the terminal.
2. Add exclusions to .gitignore:
- Open the .gitignore file in a text editor.
- Add the following lines to specify which files and directories should be ignored.
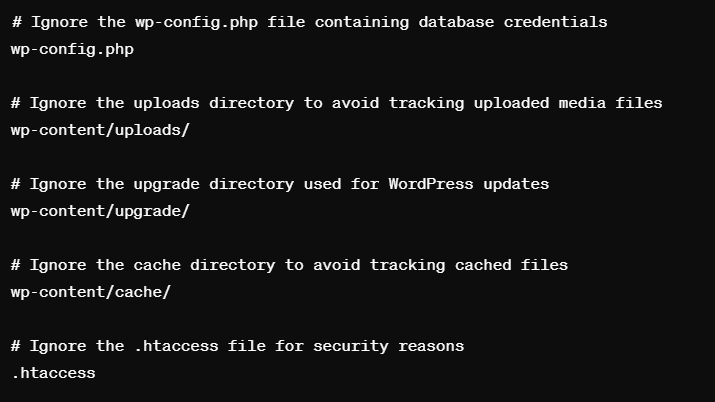
- These exclusions help ensure that only the necessary files are tracked by Git, keeping your repository clean and secure.
3. Save the .gitignore file:
- After adding the exclusions, save the .gitignore file and close the text editor.
By completing these steps, you have successfully prepared your WordPress project for version control with Git. The initialized Git repository will now start tracking changes to your project files (except those specified in the .gitignore file), and you’re ready to move on to the next steps of connecting your project to FlyWP and configuring continuous deployment.
Getting started with FlyWP
In this section, we will connect your Git repository to FlyWP and configure FlyWP for WordPress deployment. This setup will enable seamless deployment from your Git repository to your FlyWP server.
Step 1: Creating a FlyWP Account
To use FlyWP for deploying your WordPress site, you need to have an account. Follow these steps to create and set up your FlyWP account.
1. Sign Up for FlyWP:
- Visit the FlyWP website.
- Click on the “Sign Up” or “Get Started” button.
- Fill in the required information, such as your name, email address, and password.
- Choose a suitable plan. FlyWP offers various plans, including a free trial, so you can pick one that fits your needs.
2. Log In to Your FlyWP Account:
- After creating your account, log in using your email and password.
- You will be directed to the FlyWP dashboard, where you can manage your servers and deployments.
Step 2: Provisioning a server with FlyWP
Now that you have a FlyWP account, the next step is to provision a server where your WordPress site will be deployed.
- Create a new server:
- In the FlyWP dashboard, look for an option to “Create Server”
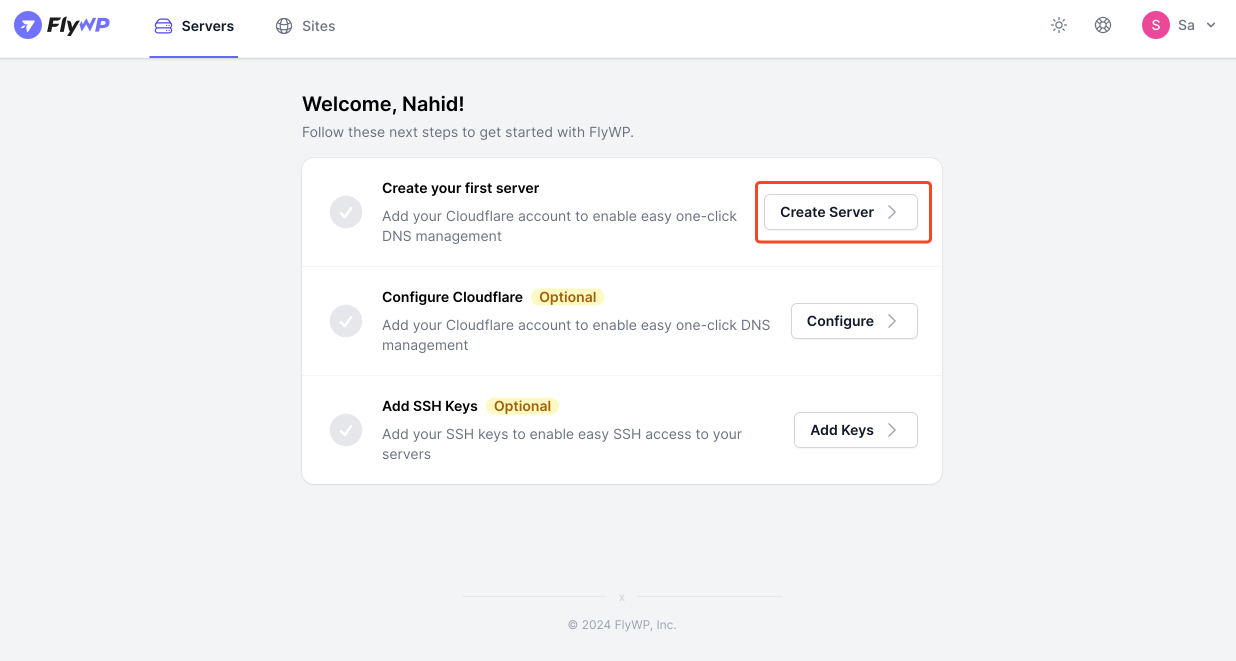
- Then click on the “Create Server” button.
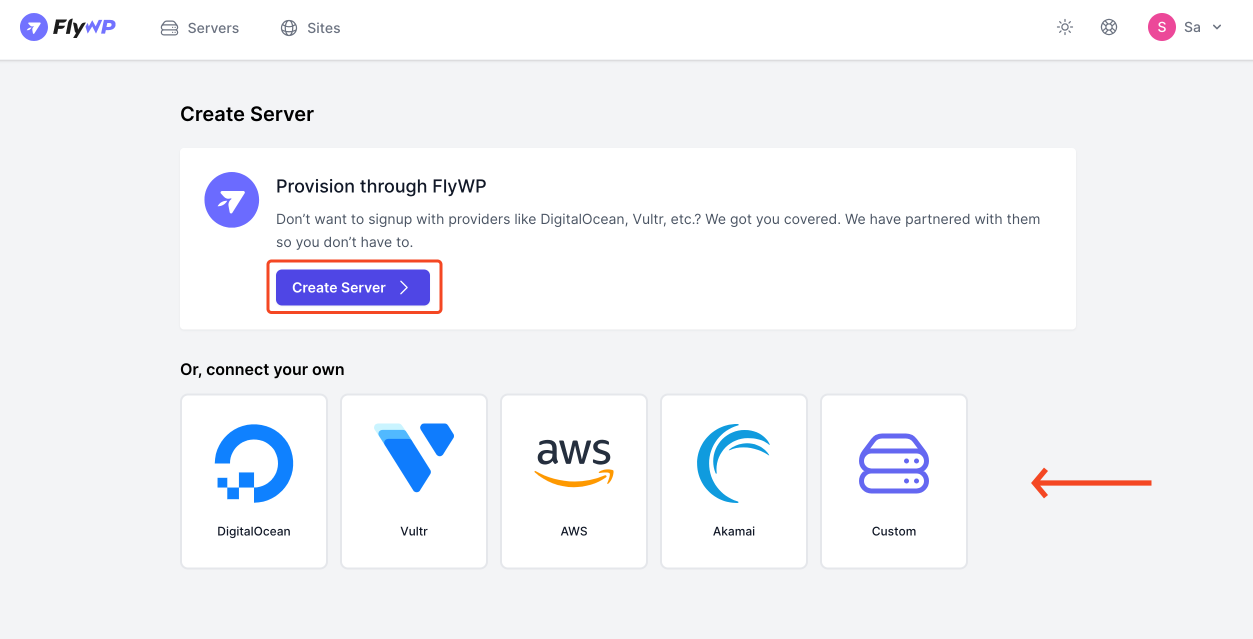
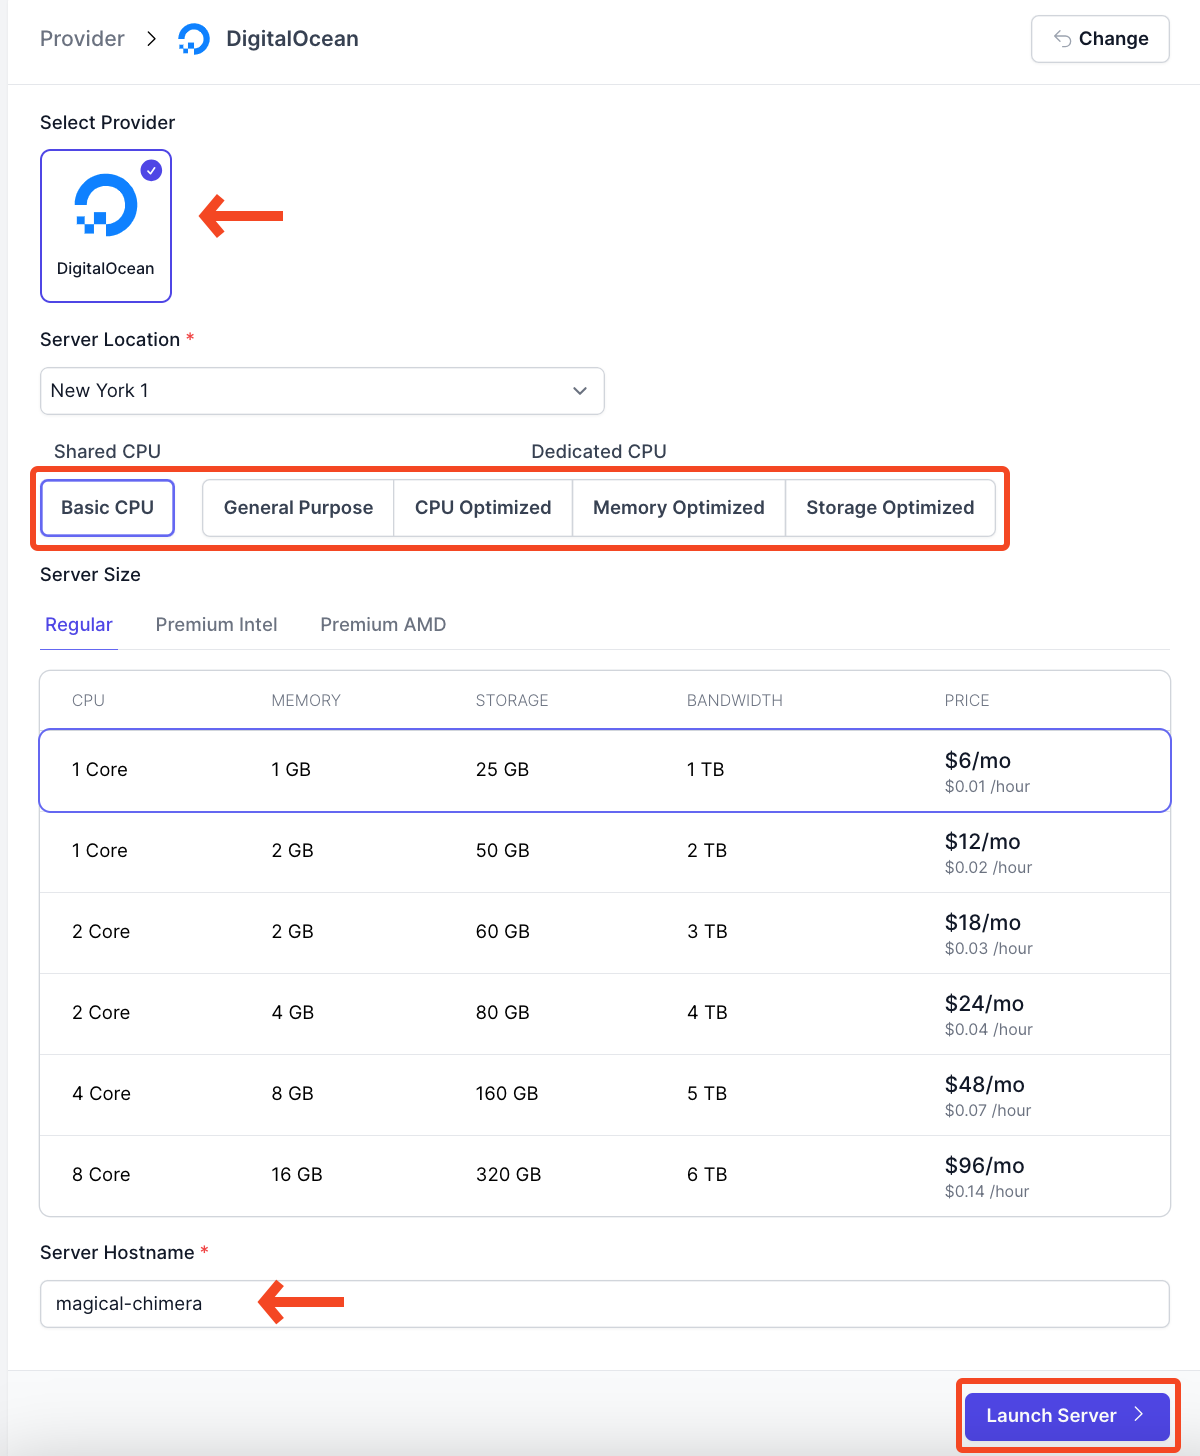
3. Launch the server:
- Select the server provider, location, CPU, size, and hostname. Then click on “launch server”
- Wait for the server to be set up. This might take a few minutes. You will see the server status in your FlyWP dashboard once it’s ready.
4. Server Provisioning Stage
- After the server is created, you will see the server provisioning stage.
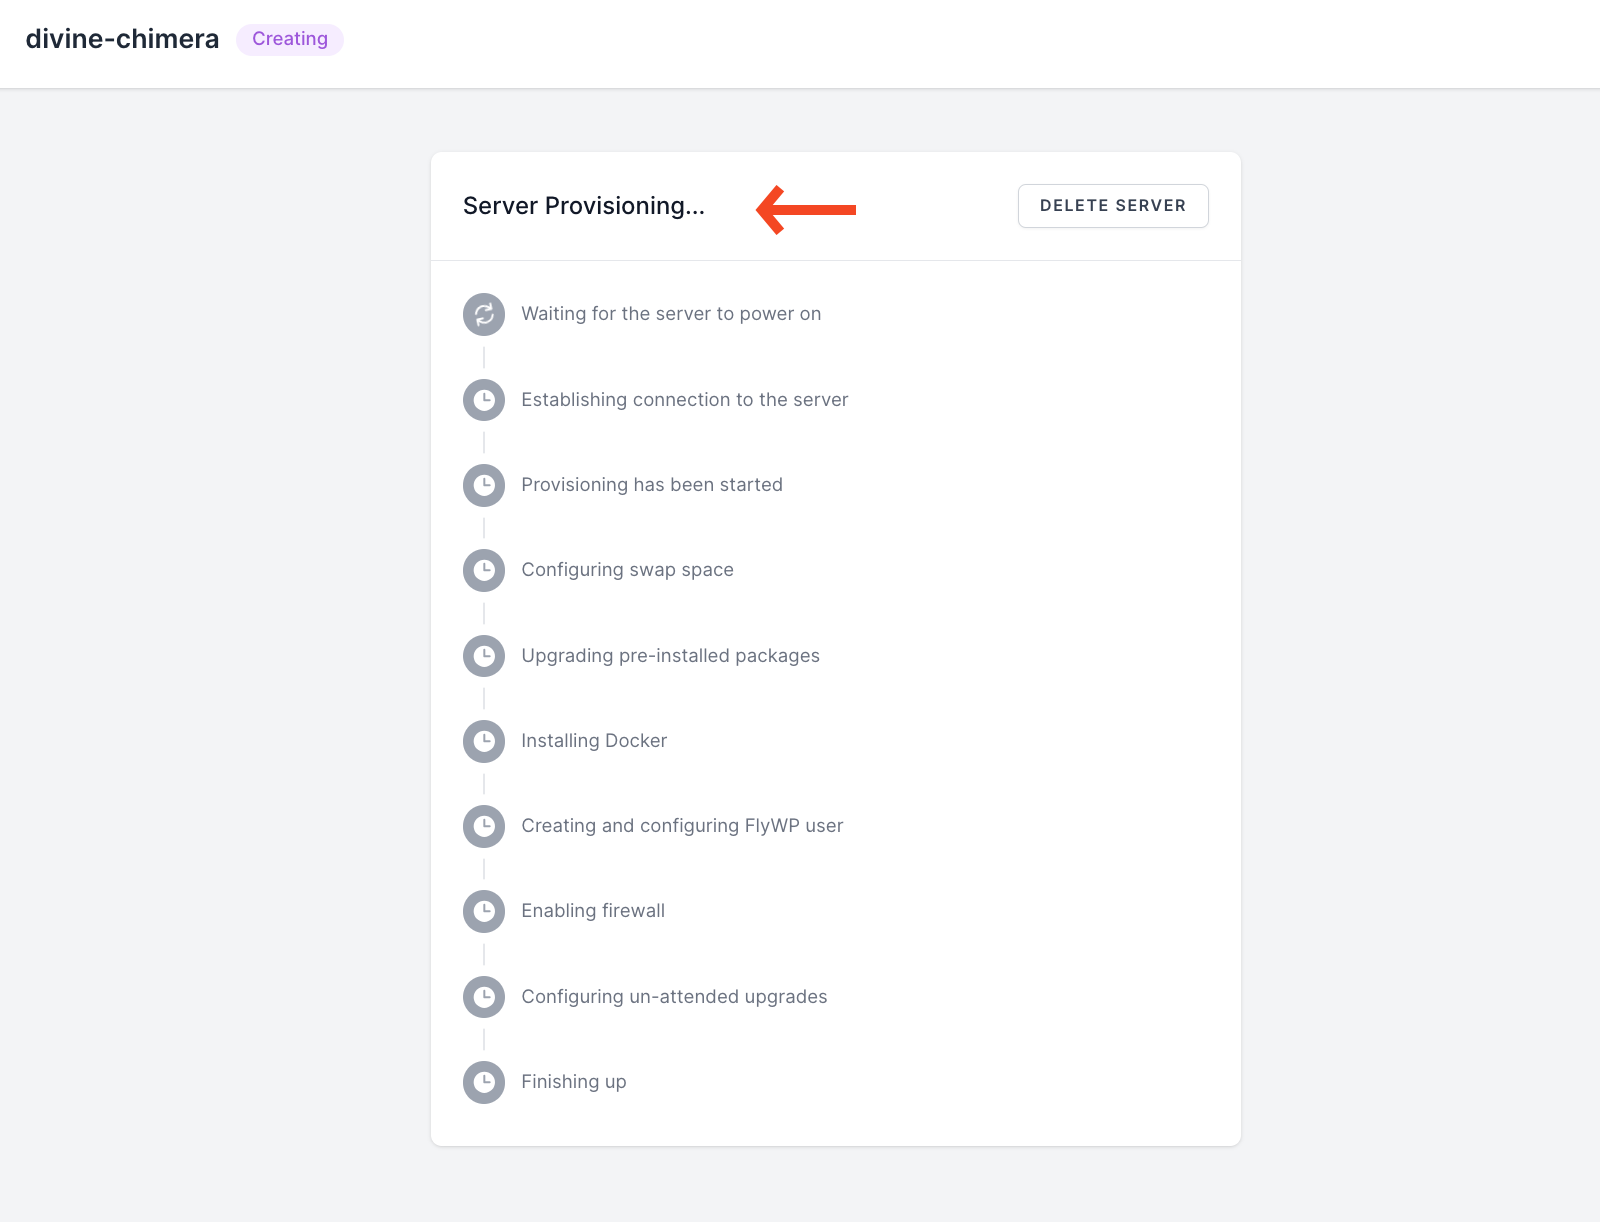
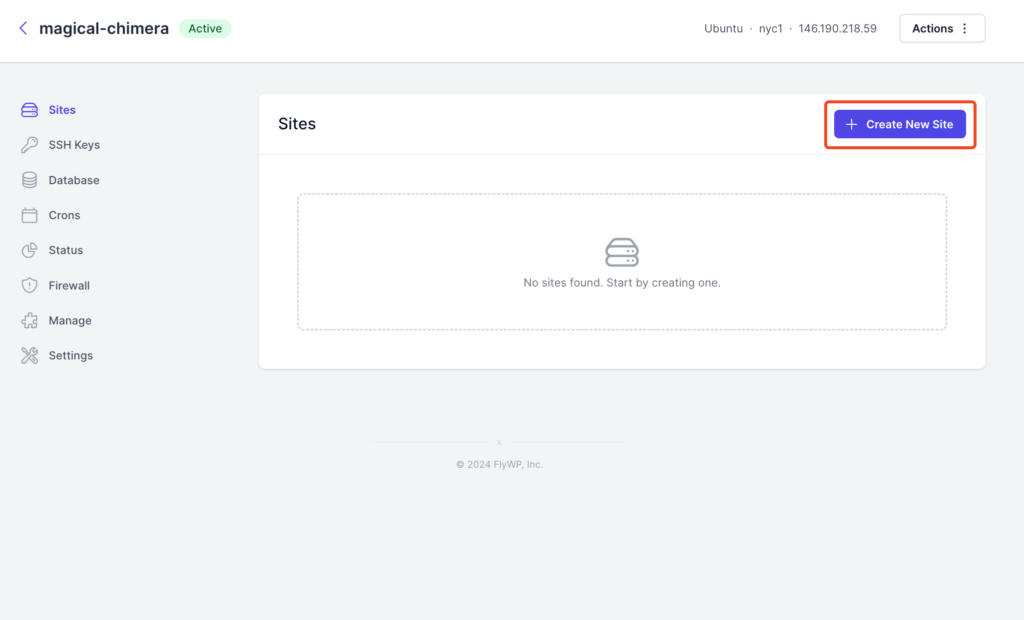
- In this stage, you have successfully created a server with FlyWP. Now, from here, you can create your site, customize it, and do the required things.
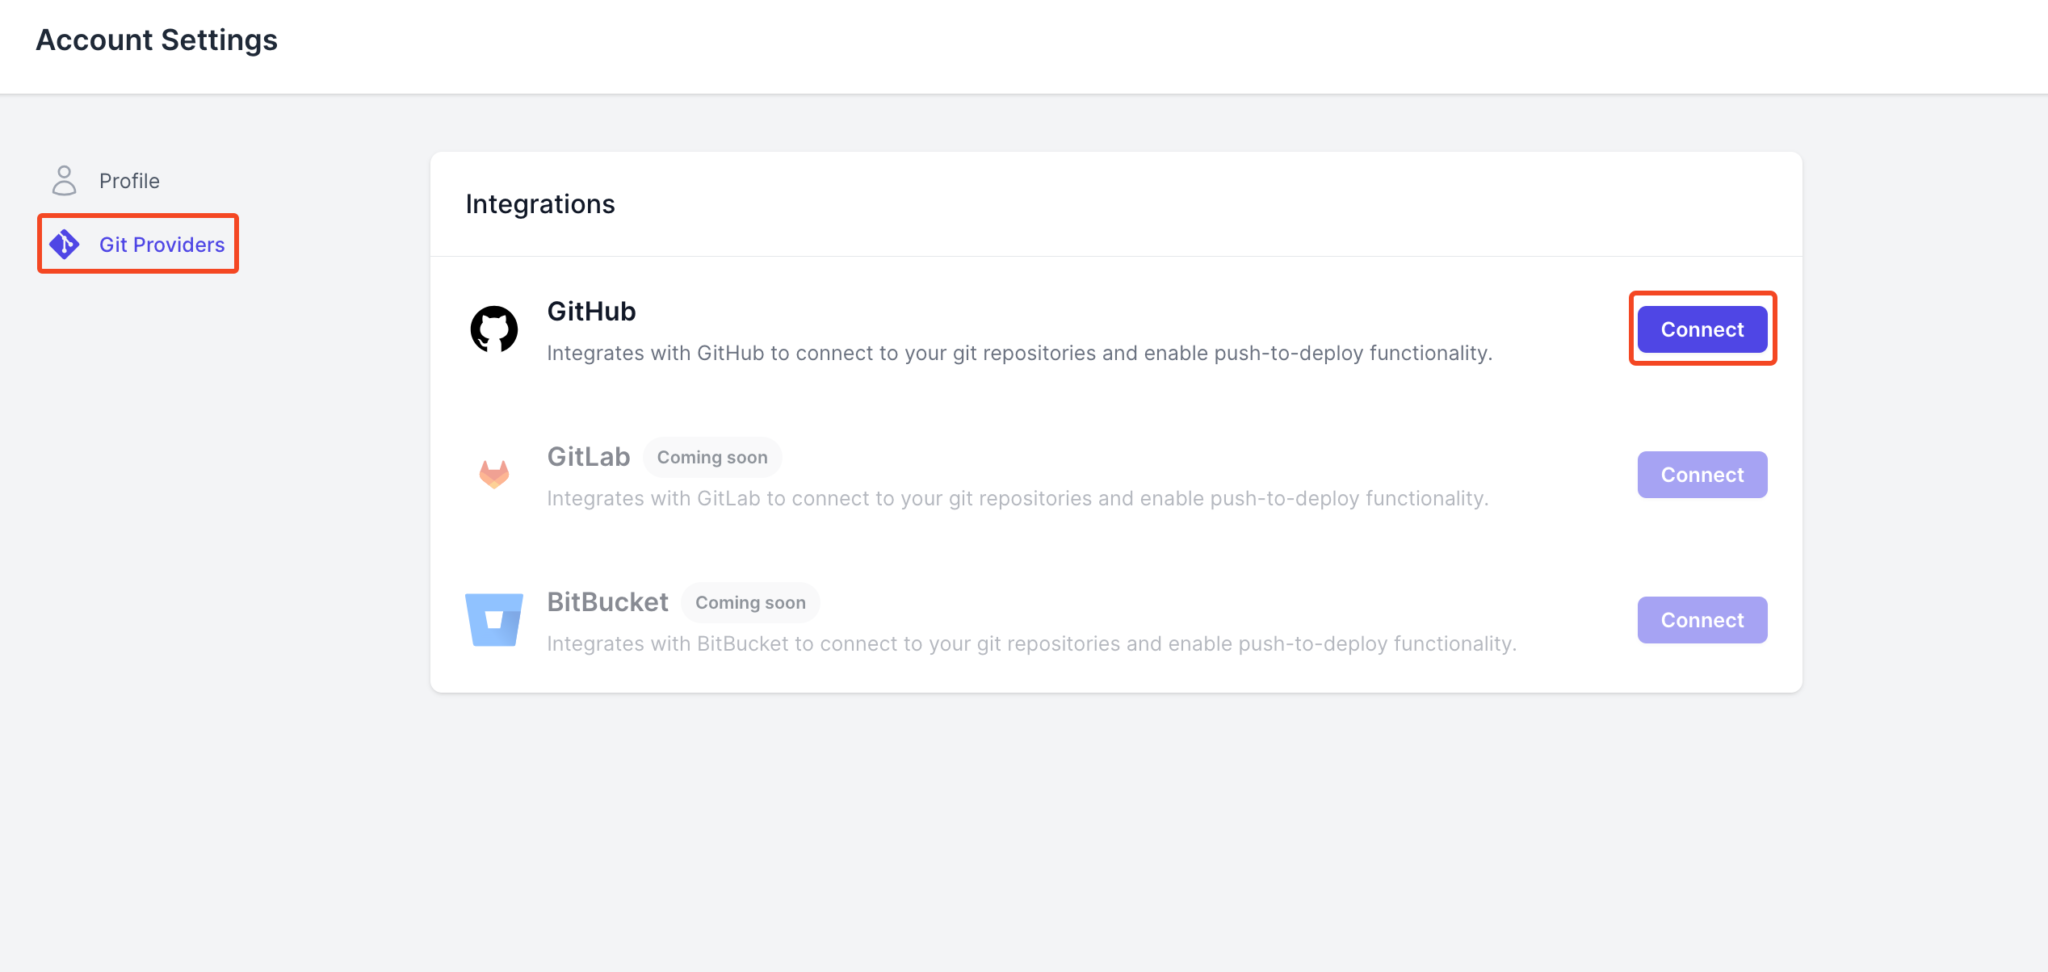
Step 3: Get Started with FlyWP <> GitHub Integration
Connect your GitHub account seamlessly to your FlyWP environment. This integration ensures that your projects are always up-to-date and can be deployed effortlessly whenever changes are pushed to your GitHub repositories.
Getting Started
- Connect your GitHub account:
- In your FlyWP dashboard, navigate to Profile >Settings> Git Providers (If you’re logged in at FlyWP, access it here directly)
- And then click on the “Connect” button.
- This secure connection enables the seamless flow of your projects from GitHub to FlyWP.
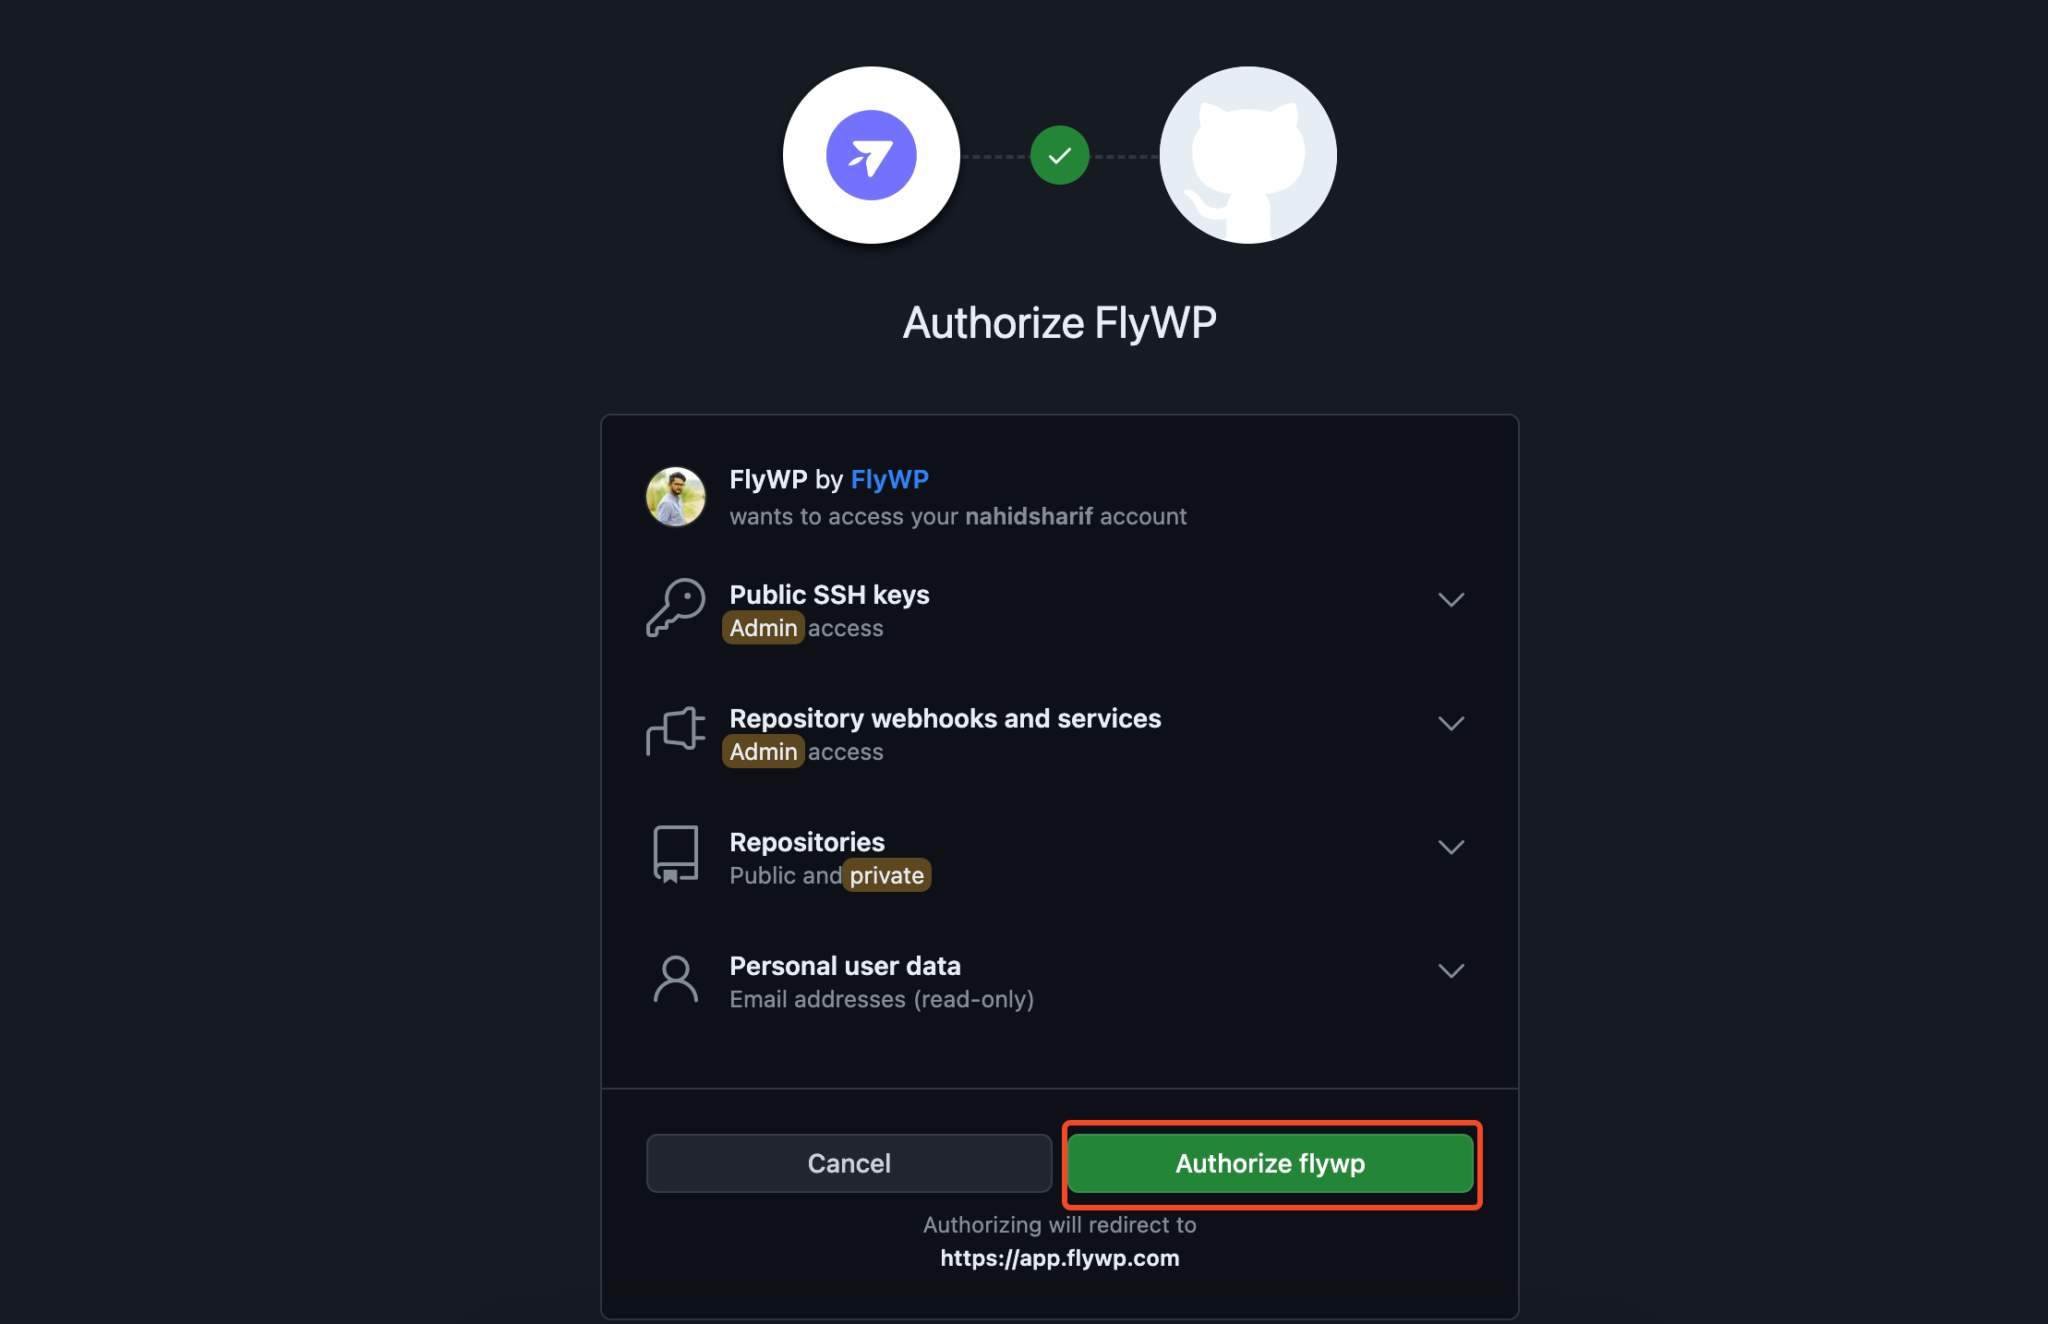
2. Authorize your account:
- In the next step, you will need to authorize your account with FlyWP.
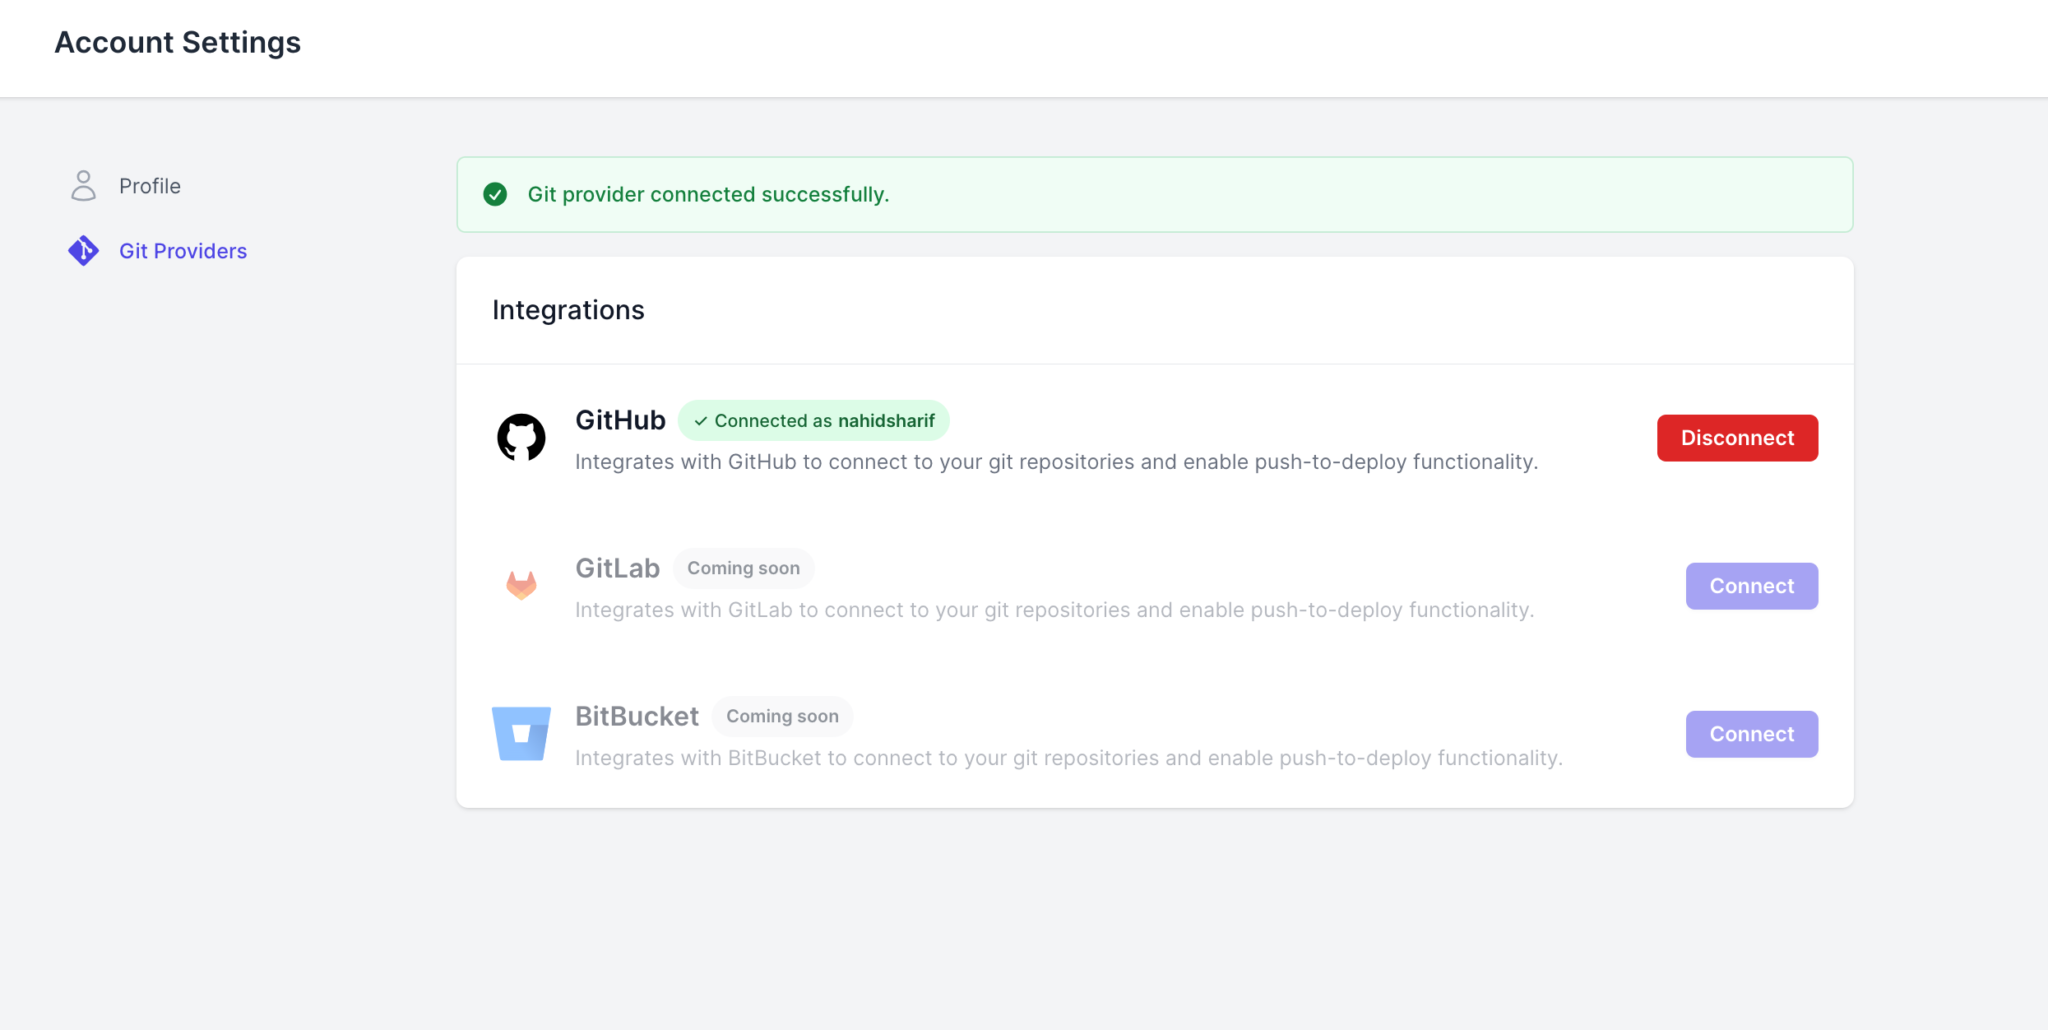
- Now, the connection is successful
- After connecting to the GitHub account, you can see the updated message here.
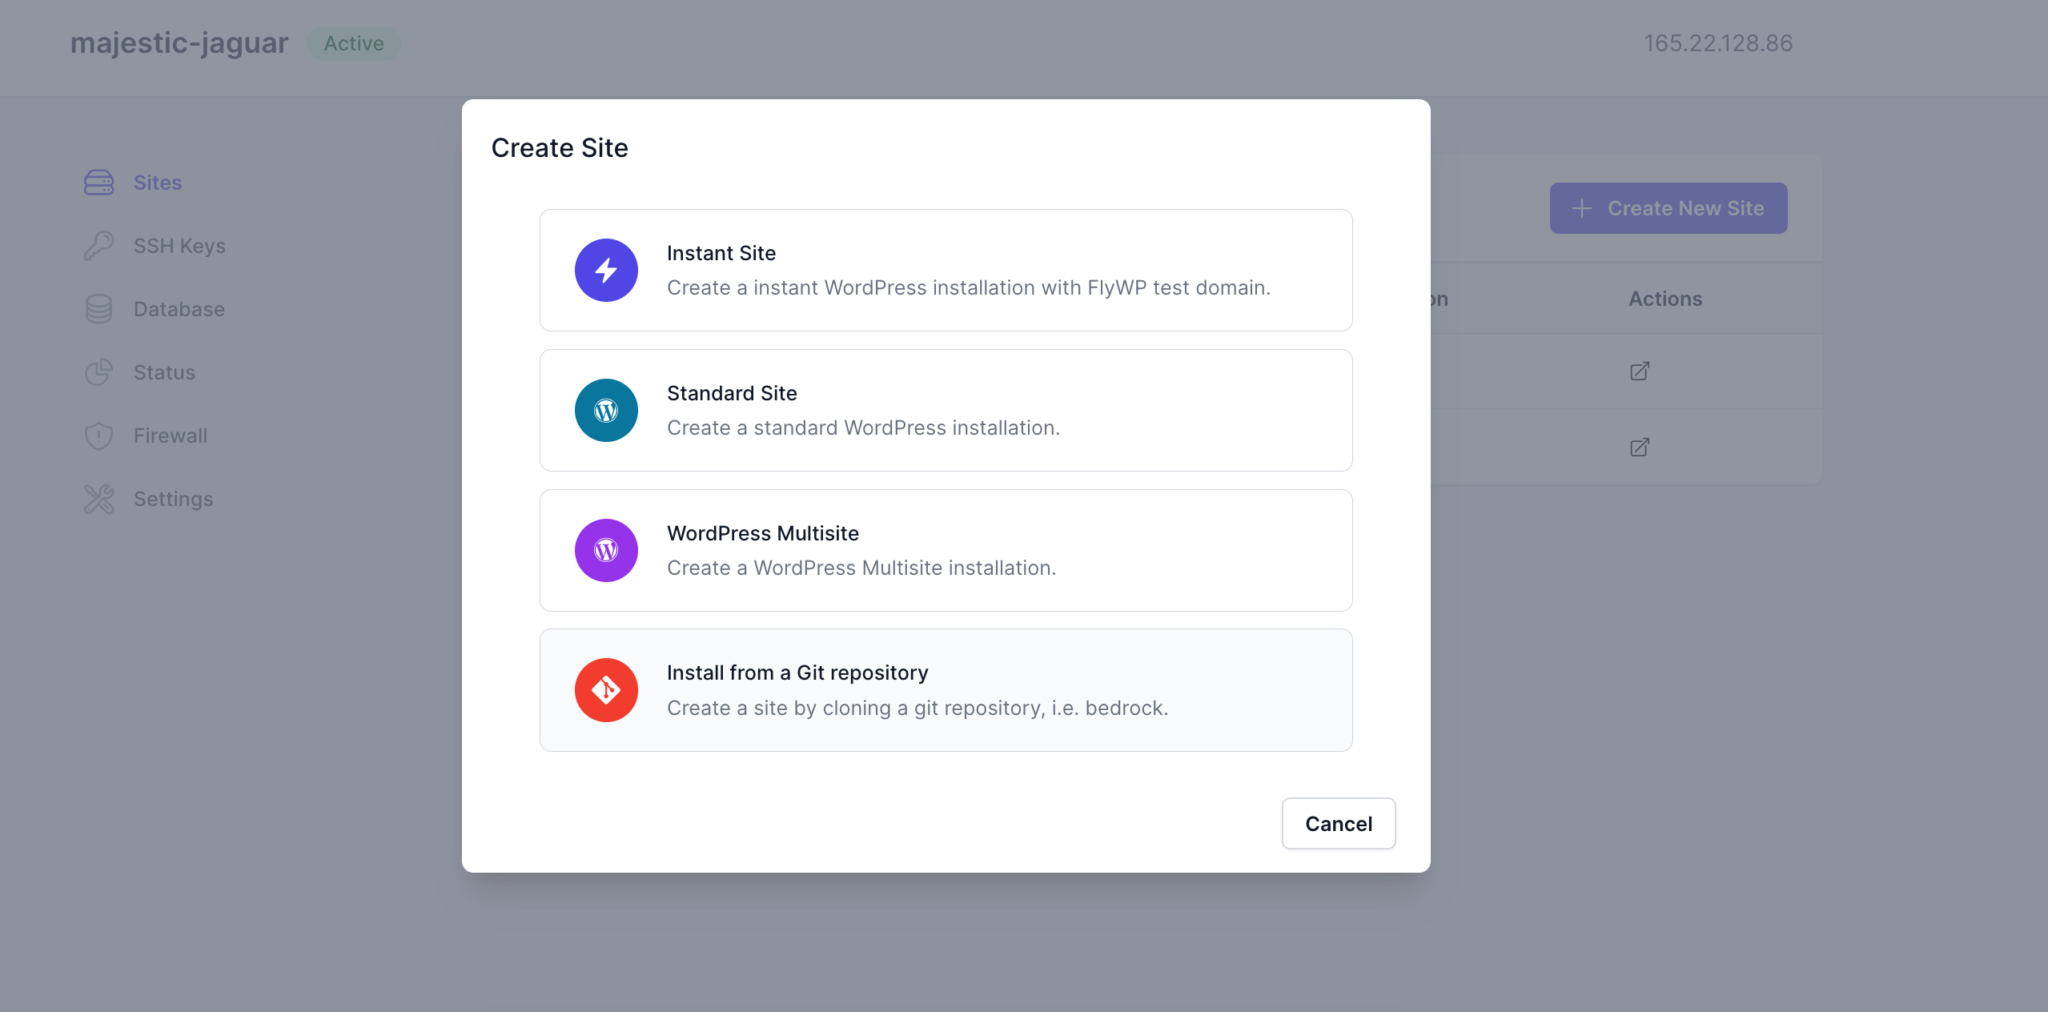
- Now select the option “Install from a Git Repository.“
- Next, you will find the Configure Git option. Click here.
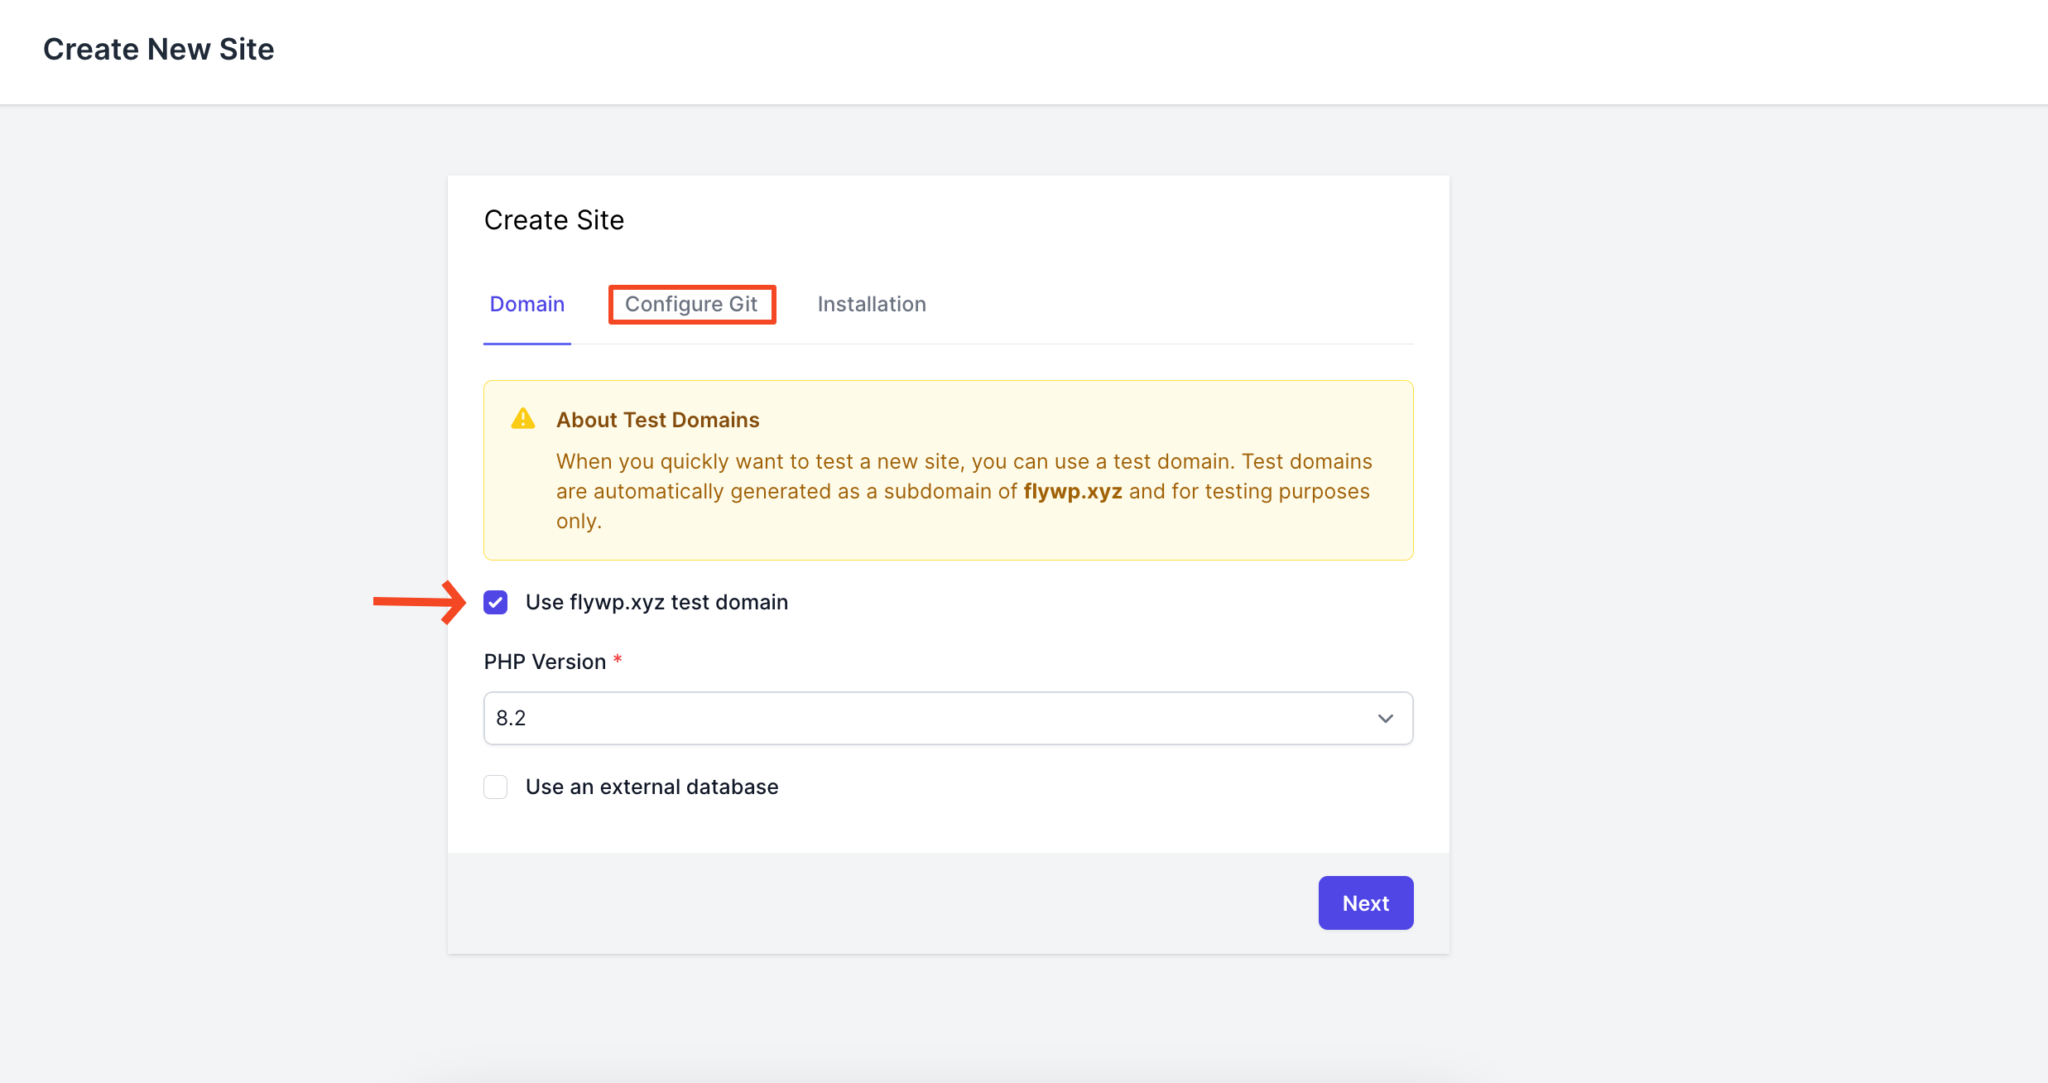
- Select GitHub, repository name, branch, and web directory, and click on “push to deploy.“

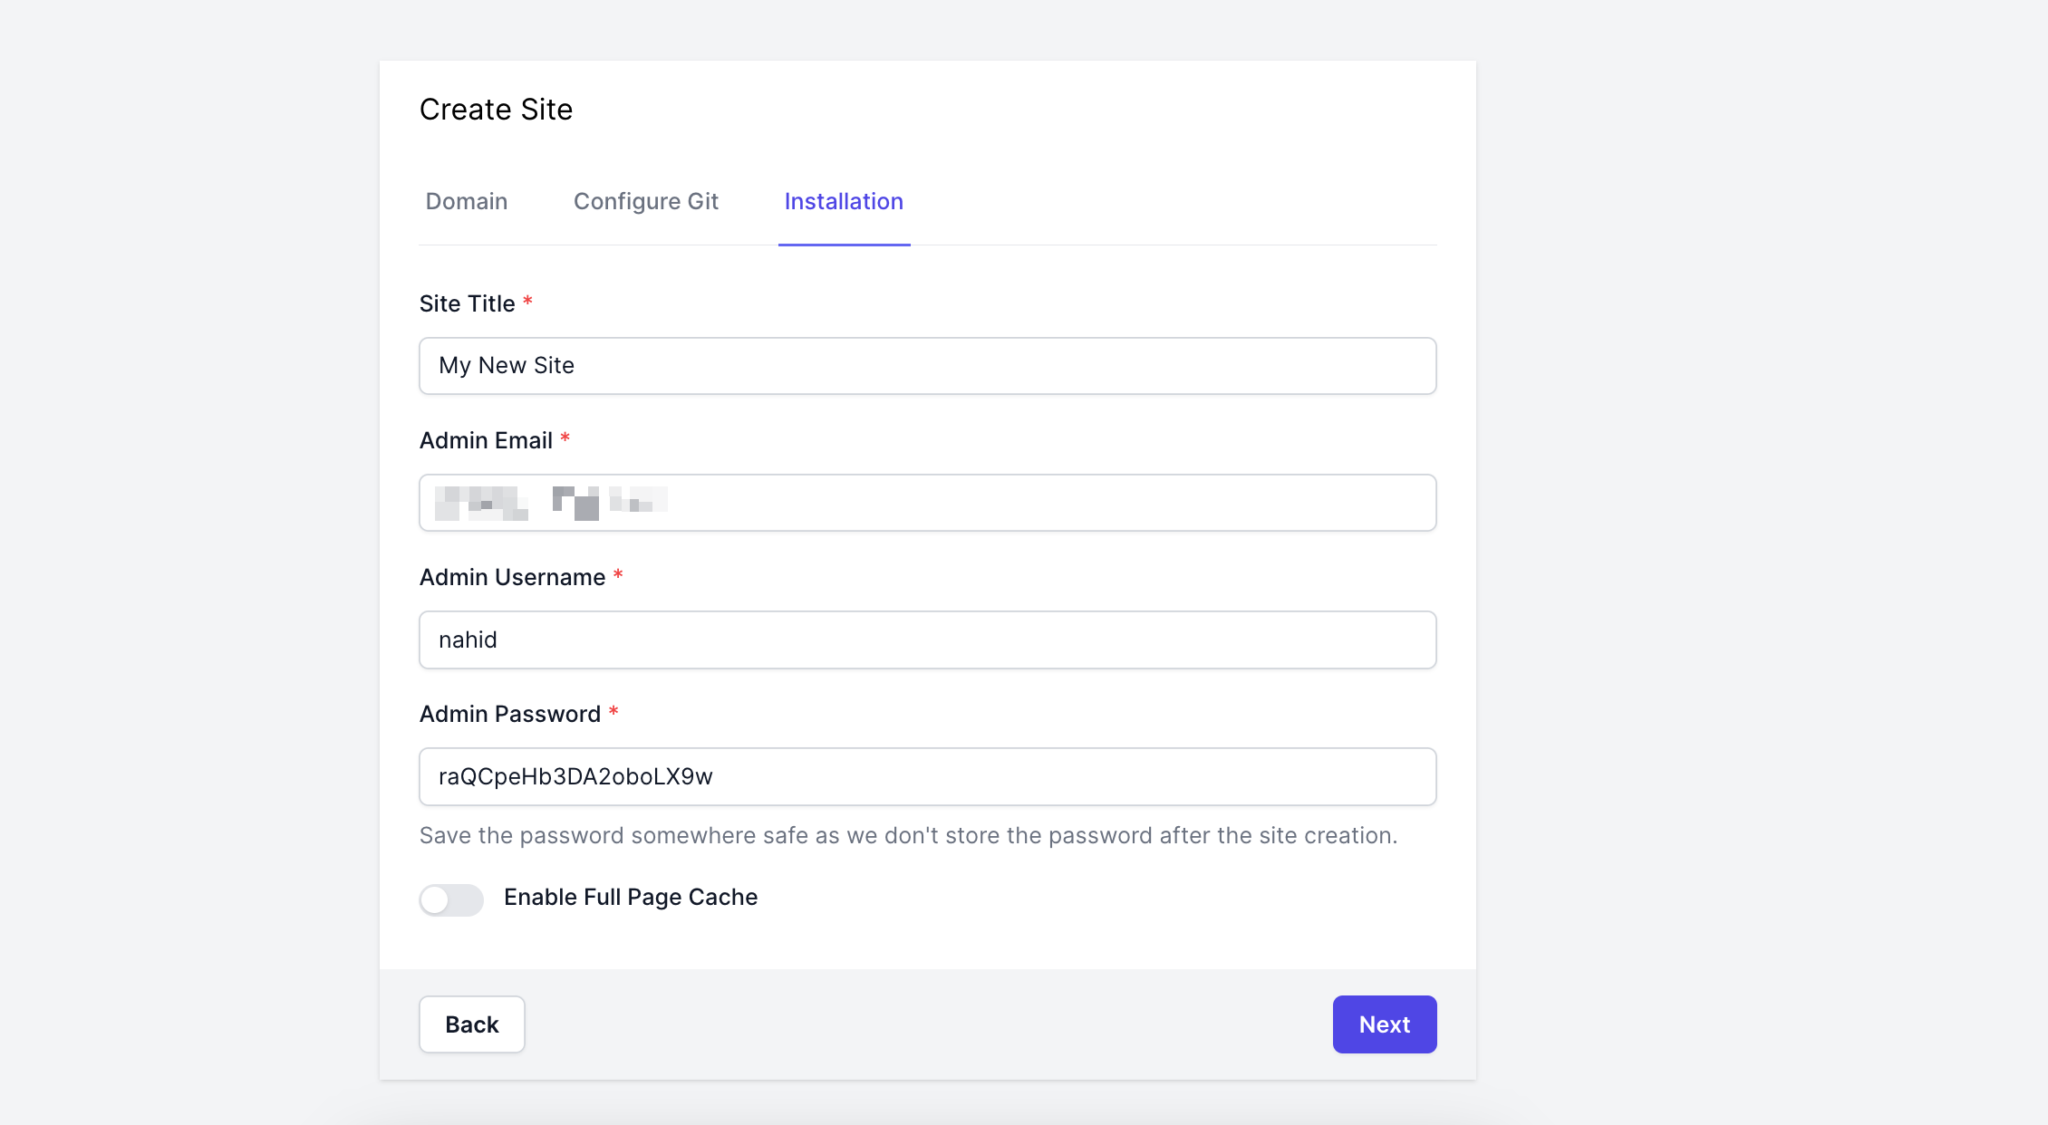
- Now in the installation tab, provide your site title, email, name, and password. Then click on the next button.
Setting up continuous deployment with Git and FlyWP
- Now, after creating the site, you will get a deployment tab. Click on it, and you’ll see all the details.
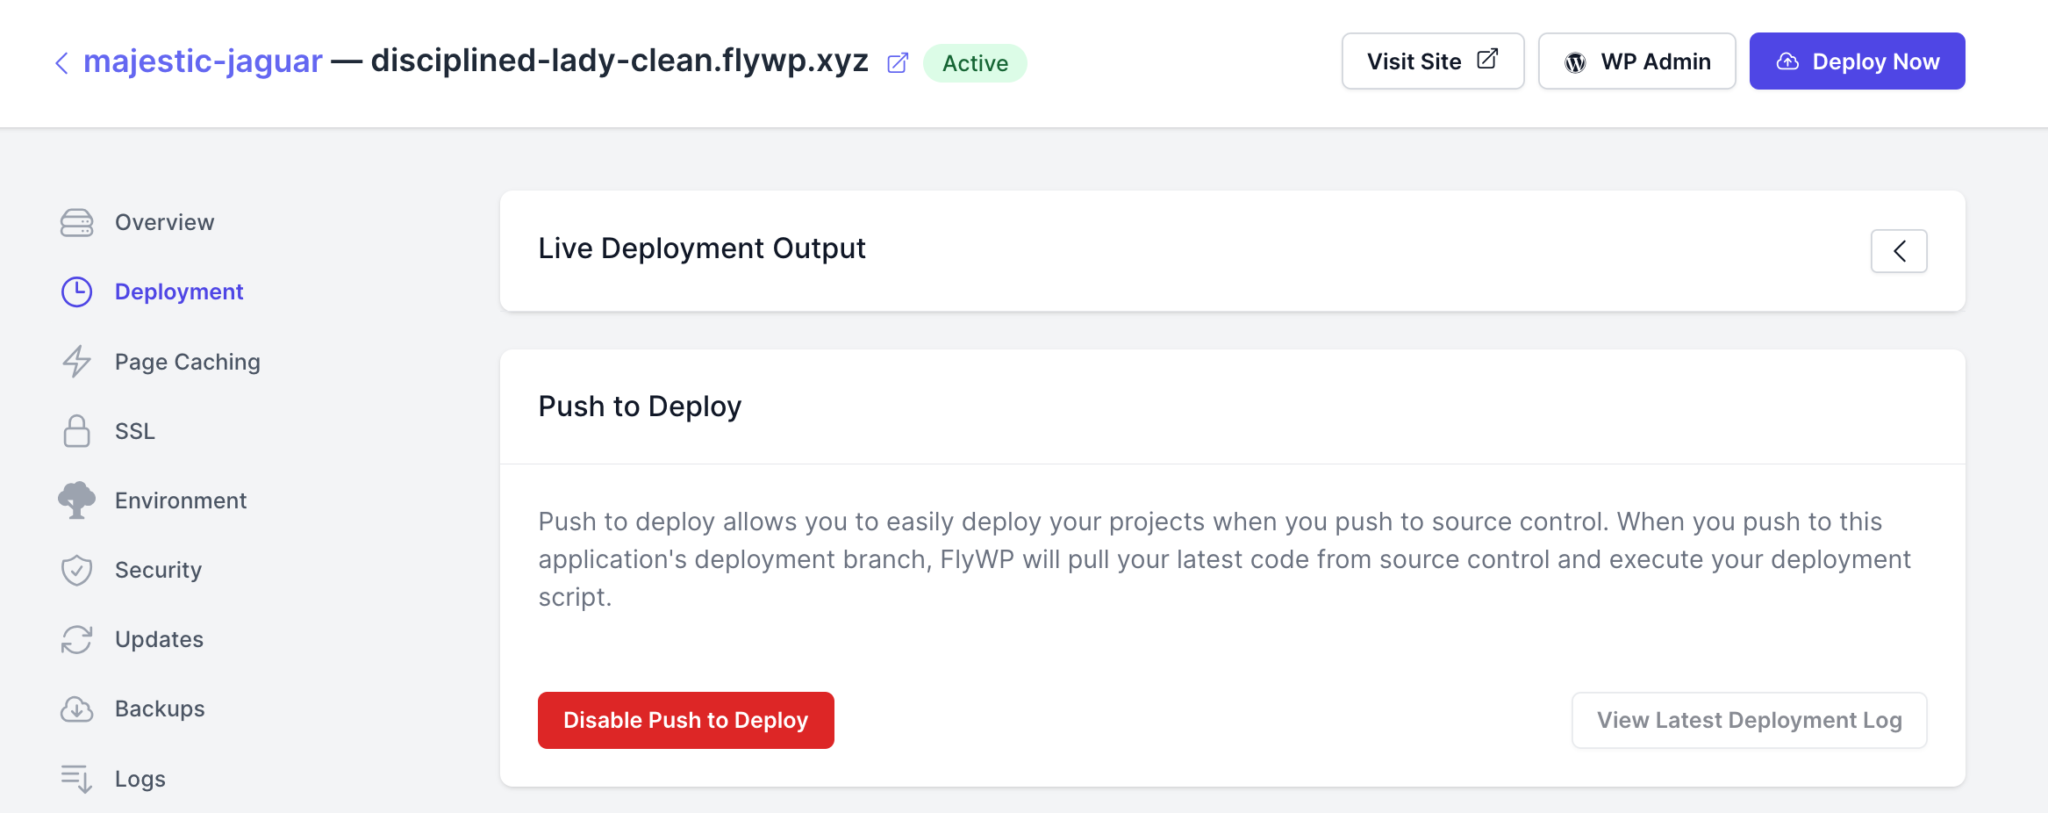
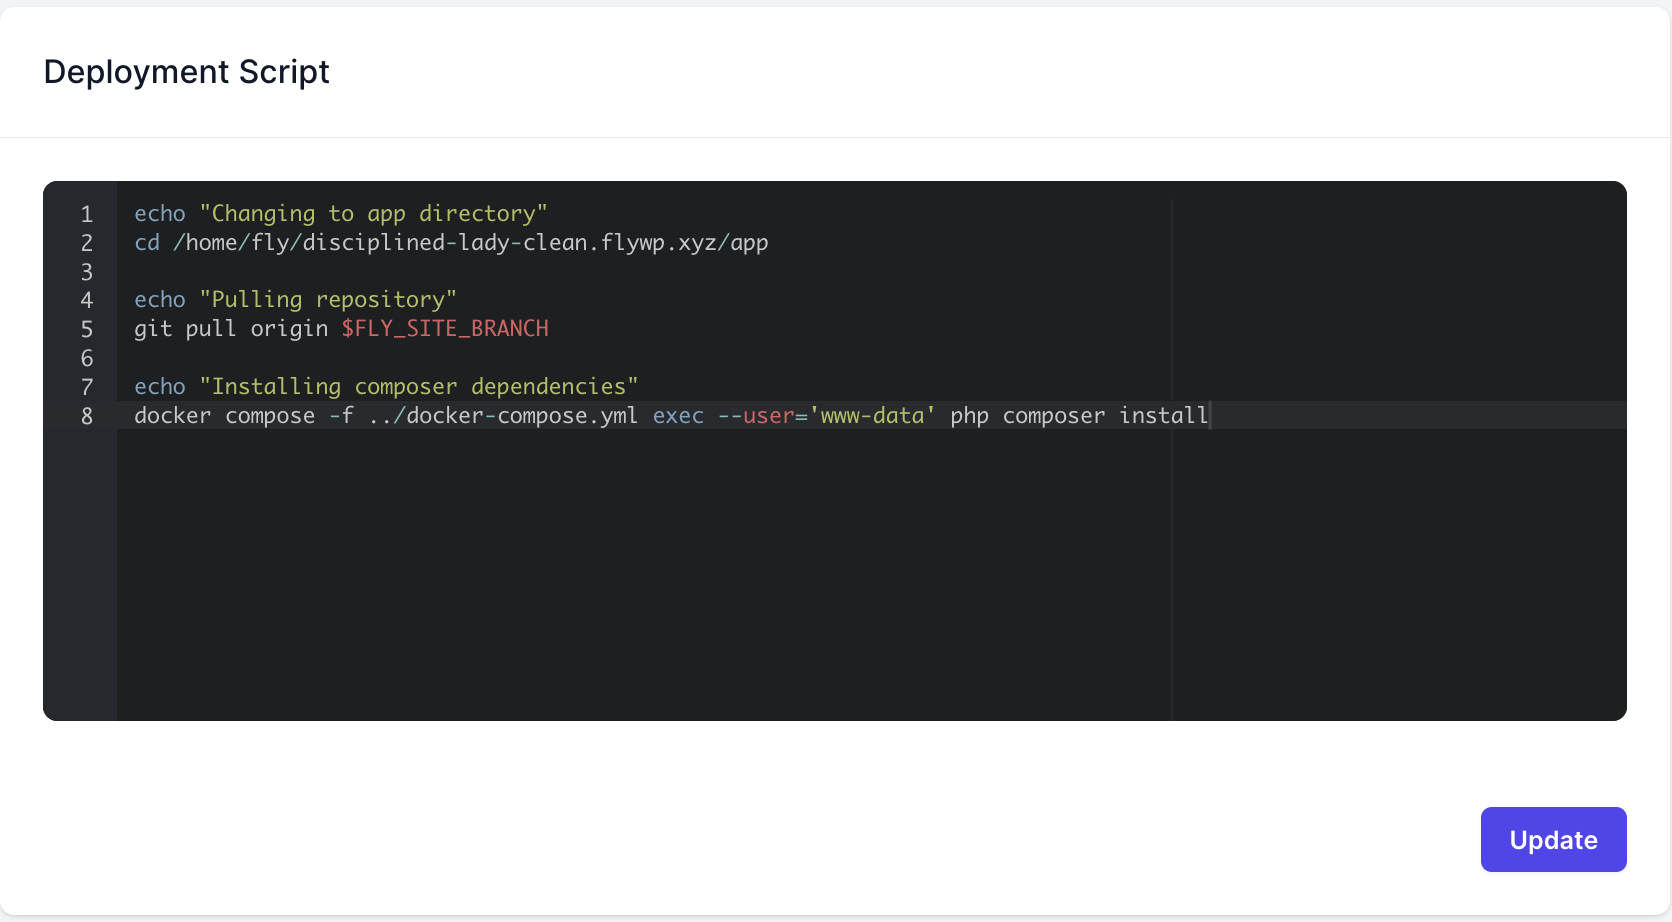
- The deployment script is “below”
- Here are the details for the deployment trigger URL, branch, and history.
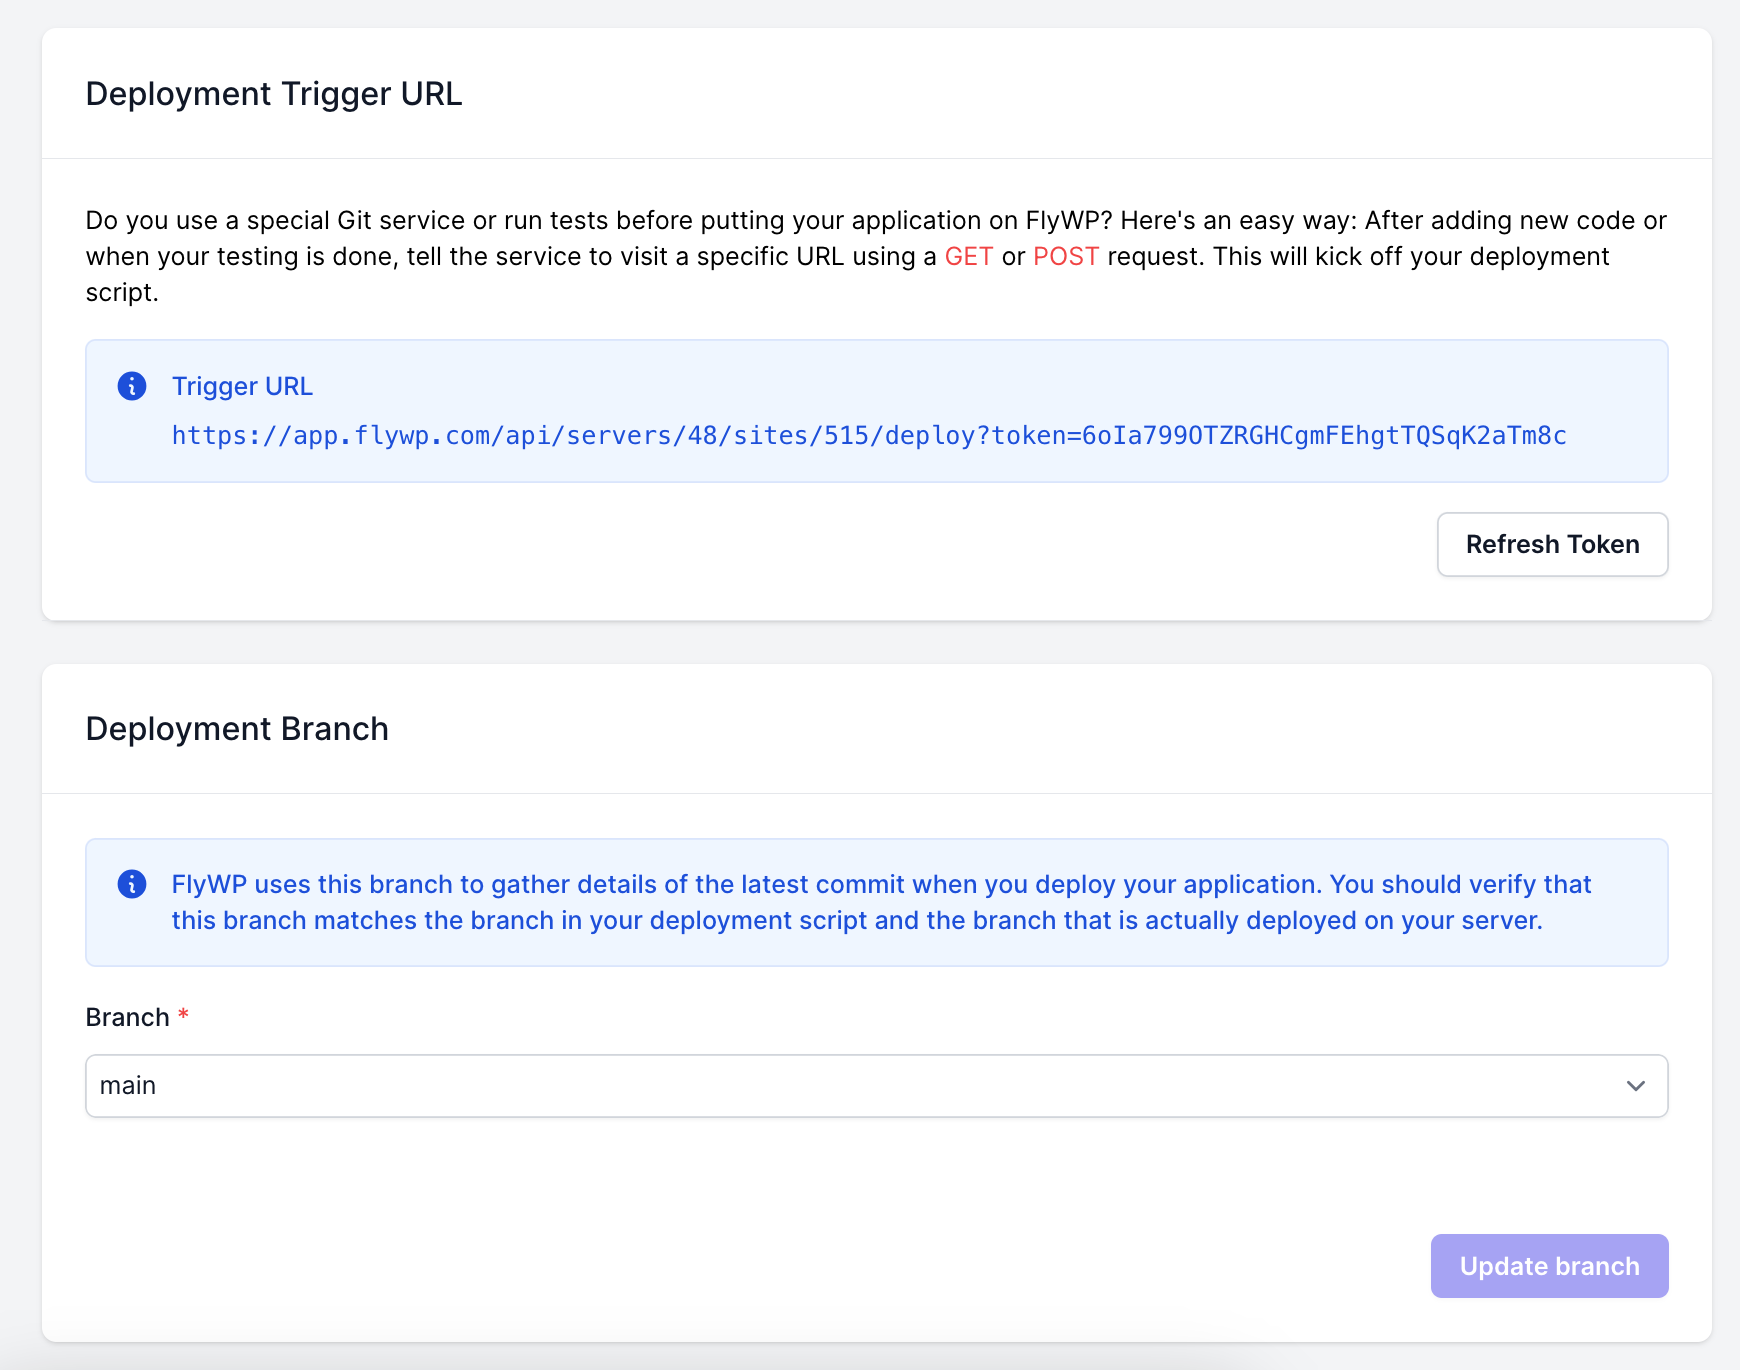
Configuring deployment settings in FlyWP
- So whenever you push any deployment to your Git repository, it will trigger the automated deployment and the changes would automatically deployed for the site you have configured.
Best practices for automated WordPress deployment
Automating your WordPress deployment can significantly enhance your development workflow, reduce errors, and ensure consistent updates. To make the most of this automation, it’s important to follow best practices that ensure a smooth and efficient process. Here are some key best practices for automated WordPress deployment:
- Take regular backups: Use plugins like UpdraftPlus or BackupBuddy to automate regular backups of your site, including files and databases. Schedule backups based on your update frequency to safeguard against data loss.
- Use branches: Utilize branches to manage development stages. Use develop for ongoing work, staging for testing, and main or master for production-ready code.
- Monitor deployments: Regularly review deployment logs in FlyWP to identify and resolve issues promptly. Set up automated alerts for deployment status changes.
- Test locally: Test changes in a local environment using tools like Local by XAMPP, or MAMP. This ensures your changes work as expected before deploying.
- Use CI/CD tools: Implement CI/CD tools like GitHub Actions or GitLab CI to automate build, test, and deployment processes. Write custom scripts for additional tasks as needed.
- Manage environment variables: Use environment variables to manage sensitive information. Store these in .env files and add them to .gitignore to keep them out of version control.
- Proper versioning: Tag releases with version numbers and maintains a changelog. This helps track changes and ensures compatibility.
- Security practices: Keep WordPress core, themes, and plugins updated. Use security plugins like Wordfence and Sucuri for added protection. Conduct regular code reviews to identify vulnerabilities.
Following these best practices ensures a smooth, efficient, and secure automated deployment process for your WordPress site.
End note
Automating WordPress deployment with Git and FlyWP simplifies the deployment process and ensures consistency across different environments. By following these steps, you can establish a reliable deployment pipeline that not only saves time but also minimizes errors.
Automation not only enhances productivity but also boosts the overall reliability of your web applications. It eliminates the common pitfalls associated with manual deployments, ensuring that your updates are deployed smoothly and efficiently. By integrating Git and FlyWP into your development process, you create a robust system that supports continuous improvement
Embracing automation also allows you to streamline your workflow, reducing the need for manual intervention and enabling you to focus more on developing great features and enhancing your site. With this automated setup, you can ensure your WordPress site is always up-to-date, secure, and performing at its best.
FAQs on automating WordPress deployment with Git and FlyWP
01. Why should I use Git for WordPress deployment?
Git allows for version control, making it easy to track changes, collaborate with others, and revert to previous states if needed.
02. What are the benefits of automating WordPress deployment?
Automation reduces manual errors, saves time, and ensures a consistent deployment process.
03. How do I handle sensitive data like wp-config.php?
Use environment variables or exclude sensitive files using .gitignore.
04. How often should I deploy updates?
It depends on your project needs, but regular, small updates are generally better than infrequent, large updates.
05. What if a deployment fails?
FlyWP provides logs and error messages to help diagnose and fix issues quickly.
06. Is FlyWP suitable for large-scale WordPress sites?
Yes, FlyWP is scalable and can handle sites of various sizes and complexities.