Automating the deployment process for WordPress can significantly streamline your workflow, increase efficiency, and ensure consistency across environments. Automating these deployments not only saves time but also increases the reliability and consistency of your website.
By leveraging Docker and CI/CD pipelines, you can automate the entire lifecycle of your WordPress site, from development to production. Implementing these tools allows for a smoother, faster, and more error-free deployment process.
This blog post will guide you through the setup of continuous integration and continuous deployment for WordPress using Docker, focusing on making the deployment process as automatic as possible.
A quick navigation:
- Understanding the basics
- Setting up your environment
- Overview of CI/CD Tools
- Implement CI/CD for WordPress with Docker
- Building the CI/CD Pipeline
- Deployment strategies
- Monitoring and maintenance
- Final thoughts
- Some common FAQs on automating WordPress deployment
Understanding the basics of Docker and CI/CD Pipelines
Streamlining software development requires both efficiency and reliability. Docker and CI/CD pipelines are powerful tools that work together to achieve these goals. We’ll explore how they function to create a smoother development experience.
What is Docker?
Docker is a platform that makes creating, deploying, and running applications using containers easier. Containers allow you to package up an application with all of its parts, such as libraries and other dependencies, and ship it as one package. For your WordPress site, this means you can wrap the entire website—its software, libraries, configuration files, and other dependencies—into a single container.
This container can then be run on any computer that also has Docker installed, ensuring that your site works the same way everywhere, regardless of the environment. This eliminates common issues like “it works on my machine” by providing a consistent environment for development, testing, and production.
Must-read: Docker-Based Server Management: How FlyWP Manages Your Servers Securely
What are CI/CD Pipelines?
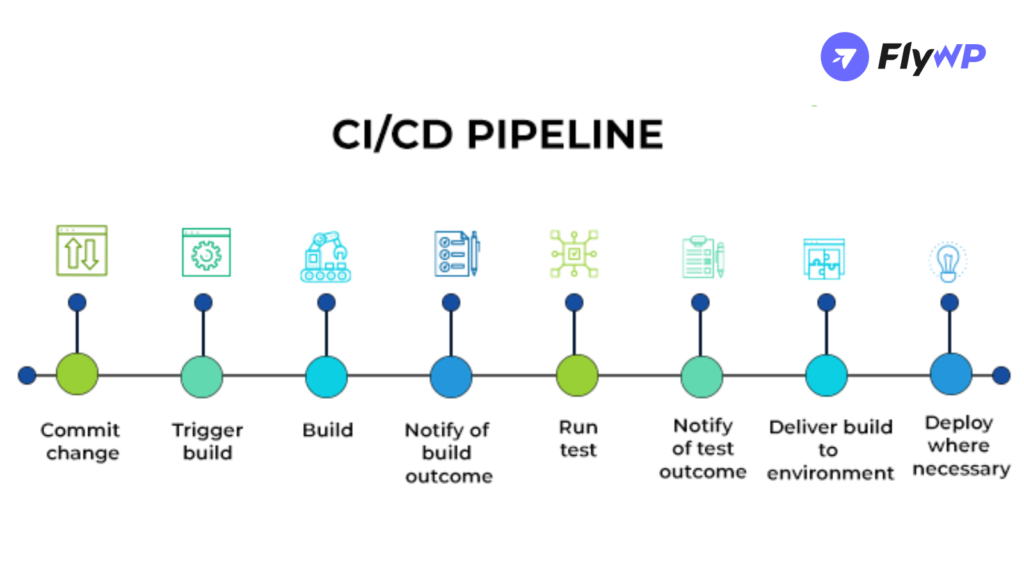
CI/CD stands for continuous integration and continuous deployment, which are strategies for software delivery that incorporate automation at various stages of development.
Here’s what each part means:
- Continuous integration (CI): Developers frequently merge their code changes into a central repository, after which automated builds and tests are run. The main goal of CI is to catch bugs or issues early in the development cycle, which saves time and effort in the long run.
- Continuous deployment (CD): This practice goes a step further by automatically deploying all code changes to a testing and/or production environment after the build stage. This means that new features, configuration changes, and bug fixes are rapidly and reliably made live, without manual intervention.
CI/CD pipelines are incredibly beneficial because they reduce the manual steps in deploying new code, thereby minimizing the risk of human error. They also speed up the feedback loop, allowing teams to quickly introduce improvements.
This system addresses the challenges that come with integrating new code into existing code bases, often referred to as “integration hell,” by ensuring that software can be developed, tested, and released faster and with fewer issues.
Setting up environment
1. Requirements for Docker and CI/CD Pipeline
Before you start automating your WordPress deployment, it’s essential to ensure your system meets the requirements. This includes having a compatible operating system like Linux, macOS, or Windows that supports Docker.
You’ll also need sufficient RAM and CPU resources, especially if you plan to run multiple containers for development, testing, and production environments simultaneously. Additionally, having a stable internet connection and administrative access to install software is crucial.
2. Installing Docker
Docker needs to be installed and properly configured on your machine. Here’s how to do it step-by-step:
- Download Docker: Go to the Docker official website and download the Docker Desktop application suitable for your operating system.
- Install Docker: Run the installer and follow the on-screen instructions to install Docker Desktop. This typically includes agreeing to the license, selecting the installation path, and possibly adjusting your system’s network settings for Docker.
- Verify Installation: After installation, open a terminal or command prompt and type docker –version to ensure Docker was installed correctly. You should see the Docker version number displayed.
- Run Docker Daemon: Depending on your OS, Docker may need to be started manually. Ensure the Docker daemon is running by checking the Docker icon in your system tray (Windows) or menu bar (macOS).
Overview of CI/CD tools
Choosing the right CI/CD tools is vital for automating your deployment effectively. Each tool has specific features that might be more suitable depending on your project’s needs.
- Jenkins: An open-source automation server that provides plugins to support building, deploying, and automating any project. Jenkins is highly customizable and widely used due to its robust community and plugin ecosystem.
- GitLab CI: Integrated directly into the GitLab platform, GitLab CI offers a seamless experience if you are already using GitLab for version control. It supports parallel builds across multiple machines and integrates deeply with Docker.
- GitHub Actions: A CI/CD feature available within GitHub that allows you to automate your workflow from idea to production directly from your GitHub repository. It’s particularly convenient for projects already hosted on GitHub
By understanding these components and properly setting up your environment, you create a solid foundation for the subsequent steps in the Dockerization and automation of your WordPress site.
Implement CI/CD for WordPress with Docker
Here’s a detailed step-by-step guide to help you implement CI/CD for WordPress with Docker:
1. Set up your WordPress project with Docker
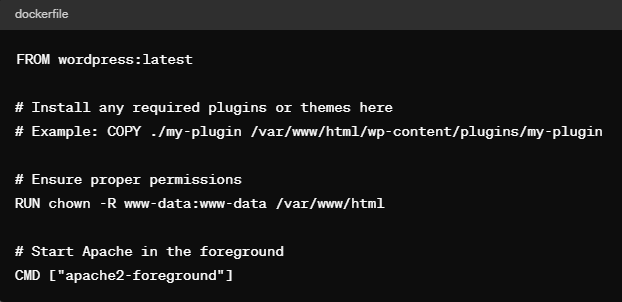
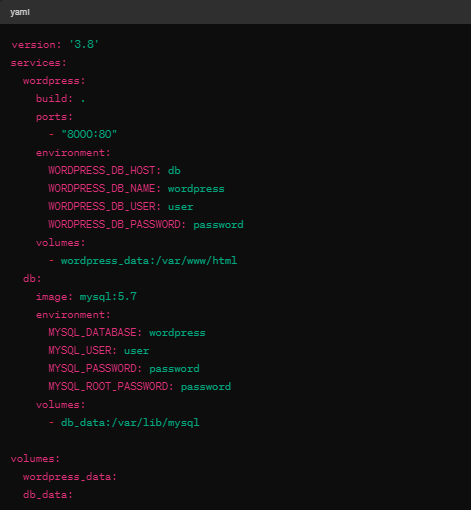
First, you need to containerize your WordPress project. You can do this by creating a ‘Dockerfile’ and a ‘docker-compose.yml’ file in your project directory.
Dockerfile
This file builds the WordPress image.
docker-compose.yml
This file defines services, networks, and volumes.
2. Version Control
Ensure your WordPress and Docker configurations are stored in a version control system like Git. This setup allows you to track changes and collaborate with others.
3. Set up continuous integration (CI)
Choose a CI service such as Jenkins, GitHub Actions, GitLab CI, or CircleCI. Here’s how you can set it up using GitHub Actions:
GitHub Actions Workflow
Create a ‘.github/workflows/main.yml’ file in your repository:
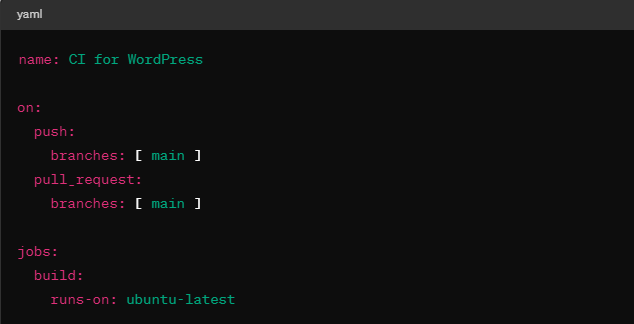
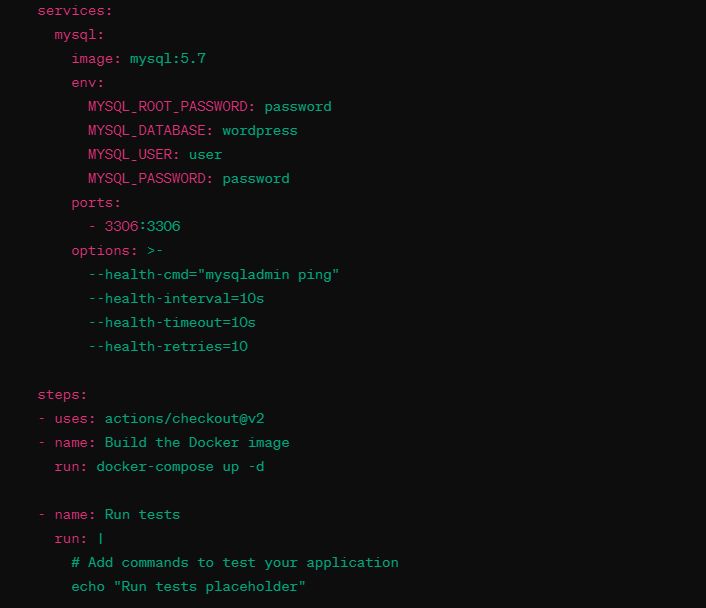
This workflow builds the Docker image and sets up MySQL. It’s triggered on pushes and pull requests to the main branch.
4. Set up continuous deployment (CD)
For the CD part, you can use the same CI tools. The CD process usually involves pushing your Docker images to a Docker registry and then deploying them to a production server.
Extend GitHub Actions for CD
Add the following steps to your workflow after successful CI tests:
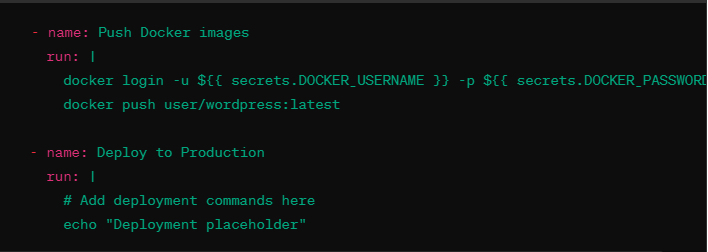
Ensure to replace placeholders with actual commands and credentials.
5. Automate and monitor
Automate as much as possible and regularly monitor the CI/CD pipelines for failures or unexpected behavior.
6. Security best practices
- Keep your Docker images and base images updated.
- Use secret management for credentials and sensitive information.
By following these steps, you can set up a robust CI/CD pipeline for WordPress using Docker, which enhances productivity and reduces the chances of human error in deployments.
Building the CI/CD Pipeline
- Version control with Git
Store your WordPress and Docker files in a Git repository. This makes it easier to track changes and integrate with CI/CD tools.
- Integrating with a CI/CD Tool
Set up a pipeline in your chosen CI/CD tool. Define steps for pulling code from Git, building Docker images, running tests, and deploying to production.
- Automating tests
Automate testing by defining test scripts in your pipeline. This could include checking if the server starts correctly and making HTTP requests to ensure that your WordPress site is responding as expected.
Deployment strategies
1. Blue/Green Deployment
Blue/Green deployment is an effective strategy to minimize downtime and reduce risk by running two identical production environments, known as Blue and Green. This strategy involves running two identical environments. Only one of the environments is life at any given time. If something goes wrong in the new environment, you can quickly switch back to the old one.
Here’s how it works:
- Blue Environment: This is your current live production environment, where all your active users are directed.
- Green Environment: This is a parallel environment that mirrors the Blue environment but is used for deploying and fully testing new changes.
- Switching: Once the Green environment has been tested and is confirmed stable, traffic is switched from the Blue to the Green environment. Frequently, changing DNS settings or load balancer configurations can achieve this switch.
- Fallback Plan: If issues arise after the switch, you can quickly revert to the Blue environment, ensuring continuous service availability and minimal impact on users.
This method allows you to deploy and test new changes in the Green environment without disrupting the live Blue environment. It offers a safety net, as you can quickly revert to the old version if something goes wrong.
2. Rollback strategies
Implementing rollback strategies is essential to recovering quickly from a failed deployment. Here’s how you can set up effective rollback capabilities:
- Version Control: Ensure every deployment is versioned so that previous states of the application are accessible and can be redeployed.
- Automated Rollbacks: Configure your CI/CD pipeline to automatically trigger a rollback if certain conditions are met, such as failing health checks after a deployment.
- Manual Triggers: Besides automated rollbacks, allow for manual rollback triggers to give your team the ability to react quickly to unforeseen issues.
Rollback strategies are a critical safety measure that helps maintain uptime and ensures that any deployment errors can be quickly remedied without significant disruption to end users.
Monitoring and maintenance
After you have taken the initiative, now it’s time to do proper monitoring and maintenance for better results.
1. Monitoring tools
Effective monitoring is crucial for maintaining the health of your WordPress environment. Here are detailed steps to integrate monitoring tools like Prometheus or Grafana:
- Prometheus: Set up Prometheus to continuously collect and store metrics from your Docker containers and WordPress application. This includes metrics like response times, server load, and resource usage.
- Grafana: Use Grafana for a more user-friendly interface to visualize the metrics collected by Prometheus. You can create dashboards that display real-time data about your application’s performance.
- Alerts: Configure alerts in Prometheus or Grafana to notify your team if certain thresholds are breached, indicating potential issues that need attention.
2. Maintaining and updating the CI/CD pipeline
Regular maintenance and updates are vital to ensure that your CI/CD pipeline remains efficient and secure:
- Review and Update Tools: Regularly check for and implement updates to the tools and plugins used in your pipeline. This not only secures your pipeline but also enhances its functionality with the latest features.
- Feedback Loops: Establish feedback loops with your development and operations teams to continuously improve the deployment process based on real-world use and challenges.
- Documentation: Keep detailed documentation of changes and updates to the pipeline to aid in troubleshooting and training new team members.
By actively monitoring and routinely updating your deployment strategies and tools, you ensure that your WordPress site remains robust, secure, and highly available. This proactive approach to web operations can significantly reduce downtime and improve overall reliability
Final thoughts
Implementing automation in your WordPress deployment using Docker and CI/CD pipelines can transform the way you manage your website significantly. These technologies not only boost the efficiency and reliability of your site but also enhance its security. By providing a solid foundation, they support seamless updates and maintenance.
If you integrate Docker and CI/CD into your development process, you can ensure that your WordPress site remains robust, adaptable, and capable in any circumstance. Automating updates on your website ensures that they are implemented smoothly and consistently, which greatly reduces the risk of errors that can occur when done manually.
This approach not only saves time but also allows you to focus more on the creative and strategic aspects of your web presence. The shift towards automation can greatly benefit your website, making it more adaptable and better equipped to handle the demands of its online audience. Embracing automation is not just a step forward but a significant stride toward a more efficient and polished online presence.
Some common FAQs on automating WordPress deployment
01. Why should I use Docker with WordPress?
Docker ensures that your WordPress environment is consistent across different development and production setups. This helps eliminate issues that arise from different configurations, simplifying deployment and scaling.
02. What are the benefits of using CI/CD pipelines for WordPress?
CI/CD pipelines automate the process of testing, building, and deploying your WordPress site, reducing the risk of human error, improving deployment frequency, and enabling faster response to issues.
03. Can I use any CI/CD tool for WordPress?
Yes, most CI/CD tools can be configured to work with WordPress as long as they support Docker. Popular choices include Jenkins, GitLab CI, and GitHub Actions, each offering unique features and integrations.
04. How does the Docker Compose file integrate with CI/CD?
Docker Compose helps define and run multi-container Docker applications. In CI/CD, Docker Compose can be used to set up the environment needed for testing or deploying your WordPress site, ensuring that all necessary services are launched and configured automatically.
05. What is a blue/green deployment in the context of WordPress?
Blue/green deployment is a strategy where two identical environments are maintained. The ‘blue’ environment is active while the ‘green’ environment is updated and tested (as we mentioned in the blog). Once ready, traffic is switched from blue to green, minimizing downtime and the risks associated with direct live updates.
06. How do I handle database updates during WordPress deployments?
During CI/CD deployments, you can use migration plugins or scripts that apply database changes automatically. This ensures that your database structure is always in sync with your site’s codebase.
07. What should I monitor in my WordPress CI/CD pipeline?
Monitor the build and deployment processes for failures, track the performance and health of the production environment, and keep an eye on application logs for unexpected errors or security issues.
08. Are there security concerns with automating WordPress deployments?
Automation can enhance security by reducing the likelihood of human error and ensuring that security practices are consistently applied. However, it’s important to secure your CI/CD pipeline and Docker configurations, use secret management for credentials, and implement robust access controls.
