Securing a WordPress site is essential, particularly when hosted within Docker containers and served by Nginx. Docker provides excellent flexibility and isolation, but it also requires careful configuration to keep your site protected. we will discuss all the necessary steps to harden your WordPress security using Nginx in Docker containers.
Imagine you just launched a brand-new WordPress site in a Docker environment. It’s fast, scalable, and ready to handle anything. But as soon as it’s live, it is also a target. Hackers, bots, and malicious actors are constantly scanning the internet for vulnerable sites to exploit.
Now, the question is not whether you have built a great site—whether you have made it secure enough to withstand these inevitable threats.
That’s where Nginx comes in. Known for its speed and efficiency, Nginx is more than just a web server; it is a powerful tool that, when properly configured, can serve as the first line of defense for your WordPress site. But to truly lock down your site, you need more than just the basics. You need a comprehensive approach that includes both server-side and application-level security measures.
In this blog, we go through the exact steps you need to take to secure your WordPress site when using Nginx within Docker containers. From configuring HTTPS to implementing crucial security headers, we’ll cover everything you need to know to protect your site from potential threats.
So, let’s get started and ensure your WordPress site is as secure as it is fast.
Setting Up the basic configuration
To protect your WordPress site effectively, it is important to start with a strong and secure setup. We will cover the essential steps you need to take to build a solid foundation for your site’s security.
By addressing these basics, you ensure that your site is well-prepared to handle potential threats. These initial configurations act as the first line of defense, making sure that your site is not only functional but also secure from the start.
Here’s what you should focus on:
01. Configuring HTTPS with Nginx
Securing your website begins with ensuring that all data exchanged between the server and the users is encrypted. This is achieved by implementing HTTPS, which protects sensitive information such as login credentials, personal data, and payment details from being intercepted by unauthorized parties.
Here’s how you can configure HTTPS on your Nginx server:
- Install SSL certificates:
The first step in setting up HTTPS is obtaining an SSL certificate, which encrypts the data transmitted between the server and the browser.
You can easily obtain and install an SSL certificate using a tool like Certbot, which simplifies the process by handling the certificate issuance and renewal for you. Once installed, the SSL certificate ensures that your website is served over a secure connection.
- Redirect HTTP to HTTPS:
After securing your site with an SSL certificate, it’s important to ensure that all traffic is directed to use HTTPS, rather than the less secure HTTP. This is done by configuring Nginx to automatically redirect all incoming HTTP requests to HTTPS.
This step prevents any unencrypted data from being transmitted, safeguarding your site and its users from potential security risks.
Below is an example configuration that you can add to your Nginx server block to achieve this:
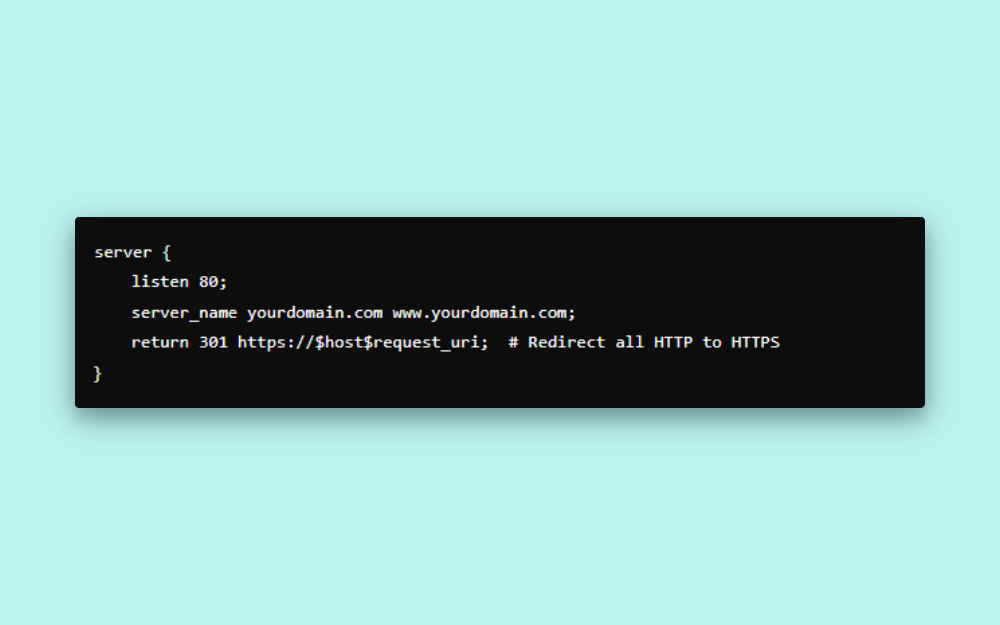
This configuration listens for incoming traffic on port 80 (the default port for HTTP) and redirects it to the corresponding HTTPS URL, ensuring that all data exchanges occur over an encrypted connection.
- Configure SSL settings:
Simply enabling HTTPS isn’t enough; you also need to ensure that your SSL settings are strong enough to protect against vulnerabilities. This involves configuring Nginx to use secure protocols and ciphers.
By default, SSL settings can vary in their security, so it’s important to customize them to meet modern standards. Below is an example configuration:
server {
    listen 443 ssl;
    server_name yourdomain.com www.yourdomain.com;

    ssl_certificate /etc/letsencrypt/live/yourdomain.com/fullchain.pem;
    ssl_certificate_key /etc/letsencrypt/live/yourdomain.com/privkey.pem;

    ssl_protocols TLSv1.2 TLSv1.3;  # Use only secure versions of TLS
    ssl_prefer_server_ciphers on;
    ssl_ciphers "ECDHE-ECDSA-AES128-GCM-SHA256:ECDHE-RSA-AES128-GCM-SHA256:ECDHE-ECDSA-AES256-GCM-SHA384:ECDHE-RSA-AES256-GCM-SHA384";
}
In this configuration:
- ‘ssl_certificate’ and ‘ssl_certificate_key’ specify the paths to your SSL certificate and its private key.
- ‘ssl_protocols’ restricts the server to using only the secure versions of TLS (Transport Layer Security), which is the successor to SSL.
- ‘ssl_prefer_server_ciphers’ and ‘ssl_ciphers’ ensure that only strong encryption algorithms (ciphers) are used to protect the data.
By setting up these configurations, you ensure that your site’s HTTPS connection is not just functional, but also resilient against various security threats, such as outdated protocols or weak ciphers that could be exploited by attackers.
This approach to HTTPS setup helps maintain a secure and trusted environment for your website visitors.
02. Setting up a firewall
A firewall acts as a protective barrier between your server and potential threats from the internet. It controls the flow of incoming and outgoing network traffic based on predetermined security rules, ensuring that only safe and necessary connections are allowed.
Setting up a firewall is an essential step in protecting your WordPress site from unauthorized access and attacks.
Here’s how you can set up a basic firewall for your server:
- Use UFW (uncomplicated firewall):
UFW, short for Uncomplicated Firewall, is a user-friendly tool that makes it easy to manage firewall settings on your server. It allows you to specify which types of network traffic should be allowed or blocked, giving you control over who can access your server and which services they can use.
- Allowing traffic on port 443 (HTTPS):
Port 443 is the standard port used for HTTPS traffic, which is secure and encrypted. By allowing traffic on this port, you ensure that visitors can access your website over a secure connection.
Command to allow HTTPS traffic:
‘sudo ufw allow 443/tcp‘
- Blocking unnecessary ports and redirecting HTTP (Port 80) to HTTPS:
While your website might also receive traffic on port 80 (used for HTTP), this traffic is not encrypted and therefore less secure. It’s a good practice to block traffic on port 80 and redirect it to port 443, ensuring that all visitors use the secure HTTPS connection.
Additionally, blocking other unnecessary ports helps to close off potential entry points for attackers.
Command to block HTTP traffic:
‘sudo ufw deny 80/tcp’
If you prefer to keep port 80 open but redirect traffic to HTTPS, you can configure this in your Nginx settings (as previously discussed), rather than blocking the port entirely.
2. Docker-specific firewall rules:
When using Docker, each container can potentially expose ports that could be accessed from outside the server, which may introduce security risks if not properly managed. It’s important to ensure that only the necessary ports are open and accessible, especially for services like your web server.
- Limit Access with ‘iptables’: ‘iptables‘ is a tool used to configure the rules that govern incoming and outgoing traffic at the network level. When using Docker, you can set up ‘iptables’ rules to control which ports are exposed and limit access to your containers.
For example, you might want to allow traffic only to specific containers (like your Nginx web server) while blocking access to others (like your database). This can help prevent unauthorized access to sensitive parts of your application.
Although UFW simplifies firewall management, ‘iptables‘ provides more granular control, particularly for Docker environments. It’s important to carefully consider which ports need to be accessible and to use firewall rules to restrict access as much as possible.
By configuring a firewall using UFW and ‘iptables’, you create a secure environment where only the necessary and safe network traffic is allowed, significantly reducing the risk of unauthorized access or attacks on your WordPress site. This adds an extra layer of protection, ensuring that your site remains secure and available only to legitimate users.
03. Configuring docker networking for security
Properly configuring Docker networking is essential for maintaining the security of your WordPress site. Without the right setup, your containers could be vulnerable to unauthorized access and other security risks.
Here’s how to secure your docker environment:
1. Isolate containers:
When running WordPress, Nginx, and MySQL in Docker containers, it’s crucial to keep these containers on the same network. This setup allows them to communicate securely with each other while preventing unauthorized access from outside the network.
By isolating these containers within a shared network, you ensure that only the necessary services interact, reducing the exposure of sensitive data, like your database, to potential threats.
2. Use bridge networks:
Docker’s bridge networks provide a way to control how containers communicate with each other. By creating a custom bridge network, you can ensure that the communication between your containers remains isolated from the host system and any other networks.
This is important because it prevents external entities from accessing your internal container traffic, such as database queries or server responses. Using a bridge network also allows you to manage network settings, such as IP addresses and DNS, specifically for the containers within the network.
Example setup:
To set up a secure Docker network for your WordPress environment, follow these steps:
1. Create a custom docker network:
Start by creating a custom network that your containers will use to communicate securely.
Command: ‘docker network create WordPress-network‘
This command creates a network named ‘wordpress-network‘.
2. Run containers on the same Network:
When launching your containers, connect them to the WordPress network to ensure they can securely interact with each other.

In these commands:
‘–network wordpress-network‘ connects each container to the custom network.
The ‘-d’ option runs the containers in the background, allowing them to function continuously without taking up your terminal.
By following these steps, you create a secure environment where your WordPress, Nginx, and MySQL containers can communicate safely, isolated from external threats. This configuration helps protect your application’s internal communication, ensuring that only the intended containers can access sensitive information.
04. Implementing Nginx security headers
Security headers in Nginx are essential tools for protecting your website from common web vulnerabilities. These headers instruct the browser on how to handle various aspects of your website’s content and data, helping to prevent attacks like cross-site scripting (XSS) and data leaks.
Below are some key security headers you should implement to enhance your site’s security.
1. Content security policy (CSP)
The Content Security Policy (CSP) header is designed to prevent cross-site scripting (XSS) attacks, which occur when malicious scripts are injected into a website. XSS attacks can be particularly dangerous because they can allow attackers to steal user data or hijack user sessions.
The CSP header works by specifying which sources of content (like scripts, images, or stylesheets) are allowed to be loaded by the browser. For example, you can configure the header to only allow resources from your domain (self) and trusted external sources. This limits the ability of attackers to inject harmful scripts from untrusted sources.
Example configuration:
add_header Content-Security-Policy “default-src ‘self’; script-src ‘self’ ‘unsafe-inline’ ‘unsafe-eval’;” always;
- ‘default-src ‘self’: This directive allows all resources (scripts, images, etc.) to be loaded only from your domain.
- ‘script-src ‘self’ ‘unsafe-inline’ ‘unsafe-eval”: This allows scripts from your domain while also permitting inline scripts and dynamic script evaluations (though these should be used carefully, as they can still pose risks)
Implementing a CSP header is a powerful way to control what content is allowed on your site, significantly reducing the risk of XSS attacks.
2. X-Content-Type-Options
The ‘X-Content-Type-Options‘ header is another important security feature that helps prevent attacks related to MIME-type sniffing. MIME-type sniffing is a process where browsers try to guess the type of content being served, which can sometimes lead to incorrect interpretations and open up security vulnerabilities.
By setting the ‘X-Content-Type-Options’ header to ‘nosniff’, you tell the browser to strictly adhere to the declared content type, rather than trying to guess it. This helps prevent certain types of attacks where malicious content could be executed by the browser if it misinterprets the content type.
Example configuration:
add_header X-Content-Type-Options “nosniff” always;
This simple header greatly reduces the risk of MIME-type related vulnerabilities, ensuring that browsers handle your content as intended.
3. Referrer-Policy
The ‘Referrer-Policy’ header controls how much information about the previous page (the referrer) is included in the ‘Referer’ header when a user clicks a link to another site. By managing this information, you can protect your users’ privacy and reduce the risk of leaking sensitive data through the ‘Referer‘ header.
For example, suppose a user is on a secure page of your site (like a payment page) and clicks a link to an external site. In that case, the ‘Referrer-Policy’ header can limit the amount of information shared about the user’s previous activity.
Example configuration:
add_header Referrer-Policy “no-referrer” always;
‘no-referrer’: This directive ensures that no referrer information is sent when the user navigates away from your site. It’s one of the strictest policies, maximizing user privacy.
By implementing the ‘Referrer-Policy’ header, you can control what information is passed on when users move from your site to another, enhancing both privacy and security.
By adding these Nginx security headers, you create additional layers of protection for your website. Each header serves a specific purpose in preventing common web vulnerabilities, from XSS attacks to data leakage through referrer information. Implementing these headers is a straightforward but effective way to improve your site’s security posture, helping to protect both your site and your users from potential threats.
05. WordPress-specific hardening techniques
Securing WordPress is just as important as securing the server it runs on. Here are some straightforward techniques to enhance WordPress security
1. Disabling XML-RPC
XML-RPC is often targeted for brute-force attacks. If your site doesn’t need it, disable this feature:
- Use a plugin: You can install a plugin like “Disable XML-RPC” to turn off this feature easily.
- Manual disable in Nginx: Add the following rule to your Nginx configuration to block all XML-RPC requests:

2. Limiting login attempts
Brute-force attacks are a common threat to WordPress sites. Limiting login attempts can help:
- Use a plugin: You can install a plugin like “Limit Login Attempts Reloaded” to restrict the number of login attempts.
- Server-side configuration: Tools like Fail2Ban can be used to limit login attempts directly on the server.
3. Ensuring regular updates
Keeping WordPress, themes, and plugins up to date is crucial for security:
- Enable auto-updates: Set up WordPress to automatically update itself, along with themes and plugins.
- Manual checks: Regularly check for updates and apply them as soon as possible.
4. Utilizing security plugins
Security plugins provide additional protection:
- Wordfence: Offers firewall protection and malware scanning.
- Sucuri: Includes firewall, malware scanning, and DNS-level protection.
After installation, configure these plugins to suit your needs and monitor them regularly.
- Implementing a robust backup strategy
Backups are essential for recovery in case of a breach:
- Automated backups: Use a plugin like UpdraftPlus to schedule regular backups.
- Offsite storage: Store backups in a secure location like Amazon S3 or Google Drive to ensure data safety.
06. Monitoring and logging
Monitoring and logging are critical for identifying and responding to security threats on your WordPress site. Here’s how you can effectively implement these practices:
1. Setting up Fail2Ban for intrusion prevention
Fail2Ban is a tool that monitors your server logs for signs of malicious activity, such as repeated failed login attempts. When it detects suspicious behavior, it automatically bans the offending IP addresses to prevent further attacks.
- Install Fail2Ban: Start by installing Fail2Ban on your server.
- Configure for Nginx: Set up Fail2Ban to specifically monitor your Nginx logs.
For example, you can configure it to ban IPs that have too many failed login attempts:
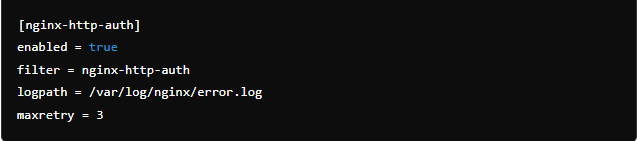
This setup helps prevent brute-force attacks by blocking attackers before they can gain access.
2. Monitoring access logs for unusual activity
Regularly reviewing your server’s access logs is crucial for spotting unusual activity that might indicate an attempted breach.
- Log review: Look for patterns like repeated failed login attempts, unusual requests, or access from suspicious IP addresses.
- Automated tools: To simplify the process, use automated tools like Logwatch or GoAccess, which can analyze logs and highlight potential issues.
By actively monitoring and logging activity on your server, you can detect and respond to security threats before they escalate, keeping your WordPress site safer.
07. Example Nginx configuration for WordPress
Here’s a simple example of how to configure Nginx for your WordPress site, including key security measures:
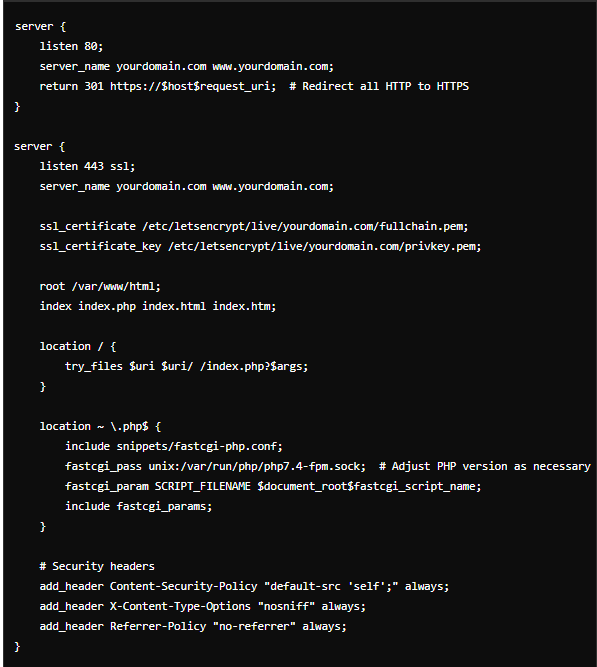
Here’s what this configuration does:
1. Redirect HTTP to HTTPS:
The first block listens for traffic on port 80 (HTTP) and redirects it to HTTPS. This ensures all connections to your site are secure.
2. SSL configuration:
The second block listens on port 443 (HTTPS) and includes the SSL certificate and key files. This setup encrypts traffic between the server and visitors, protecting sensitive information.
3. Serving your WordPress site:
The root directive points to your WordPress files, and the index directive specifies the default files to serve (like index.php). The location block handles requests, passing them to the appropriate files or the PHP processor.
4. PHP handling:
The configuration passes PHP requests to the PHP processor using FastCGI, ensuring your WordPress site can run PHP scripts.
5. Security headers:
Finally, security headers are added to protect against common vulnerabilities like XSS attacks and data leakage. These include:
- Content-security policy: Limits the sources of content that can be loaded.
- X-Content-type options: Prevents browsers from interpreting files as something other than what they are.
- Referrer policy: Controls what information is sent in the Referer header when users navigate to another site.
This configuration provides a strong starting point for securing your WordPress site with Nginx.
08. Testing and verifying security measures
Once you have implemented security measures for your WordPress site, it’s crucial to test and make sure they’re working effectively.
Here’s how:
1. Run security audits:
Use tools like WPScan to scan your WordPress site for any security issues. This helps you find and fix vulnerabilities that might have been overlooked.
2. Penetration testing:
Perform penetration testing, which simulates attacks on your site to see how well it holds up. This helps you identify any remaining weaknesses that need to be addressed.
3. Regular testing:
Security is an ongoing process. Regularly check your site for new vulnerabilities, as threats can evolve. Continuous testing ensures your site stays secure.
By regularly testing and verifying your security measures, you can better protect your WordPress site from potential threats.
Wrapping up
Hardening WordPress security when using Nginx in Docker containers is essential to protect your site from potential threats. By carefully following the steps we discussed in this blog—from configuring HTTPS and setting up a secure Docker network to implementing critical Nginx security headers and WordPress-specific hardening techniques—you can create a robust defense against security breaches.
Every security measure, like setting up firewalls, limiting login attempts, or regular monitoring, helps strengthen the protection of your site. However, security is not a one-time effort; it’s an ongoing process. Regularly updating your system, conducting security audits, and staying informed about new threats is crucial to maintaining a secure WordPress environment within Docker.
By combining Nginx’s powerful features with Docker’s flexibility and applying consistent security practices, you can significantly reduce the risk of attacks and ensure your WordPress site remains safe and reliable over time.