If you’re running a website, especially one that makes you money, you need to know the second it goes down. That’s where uptime monitoring comes in. And guess what? You don’t need to pay a dime for it.
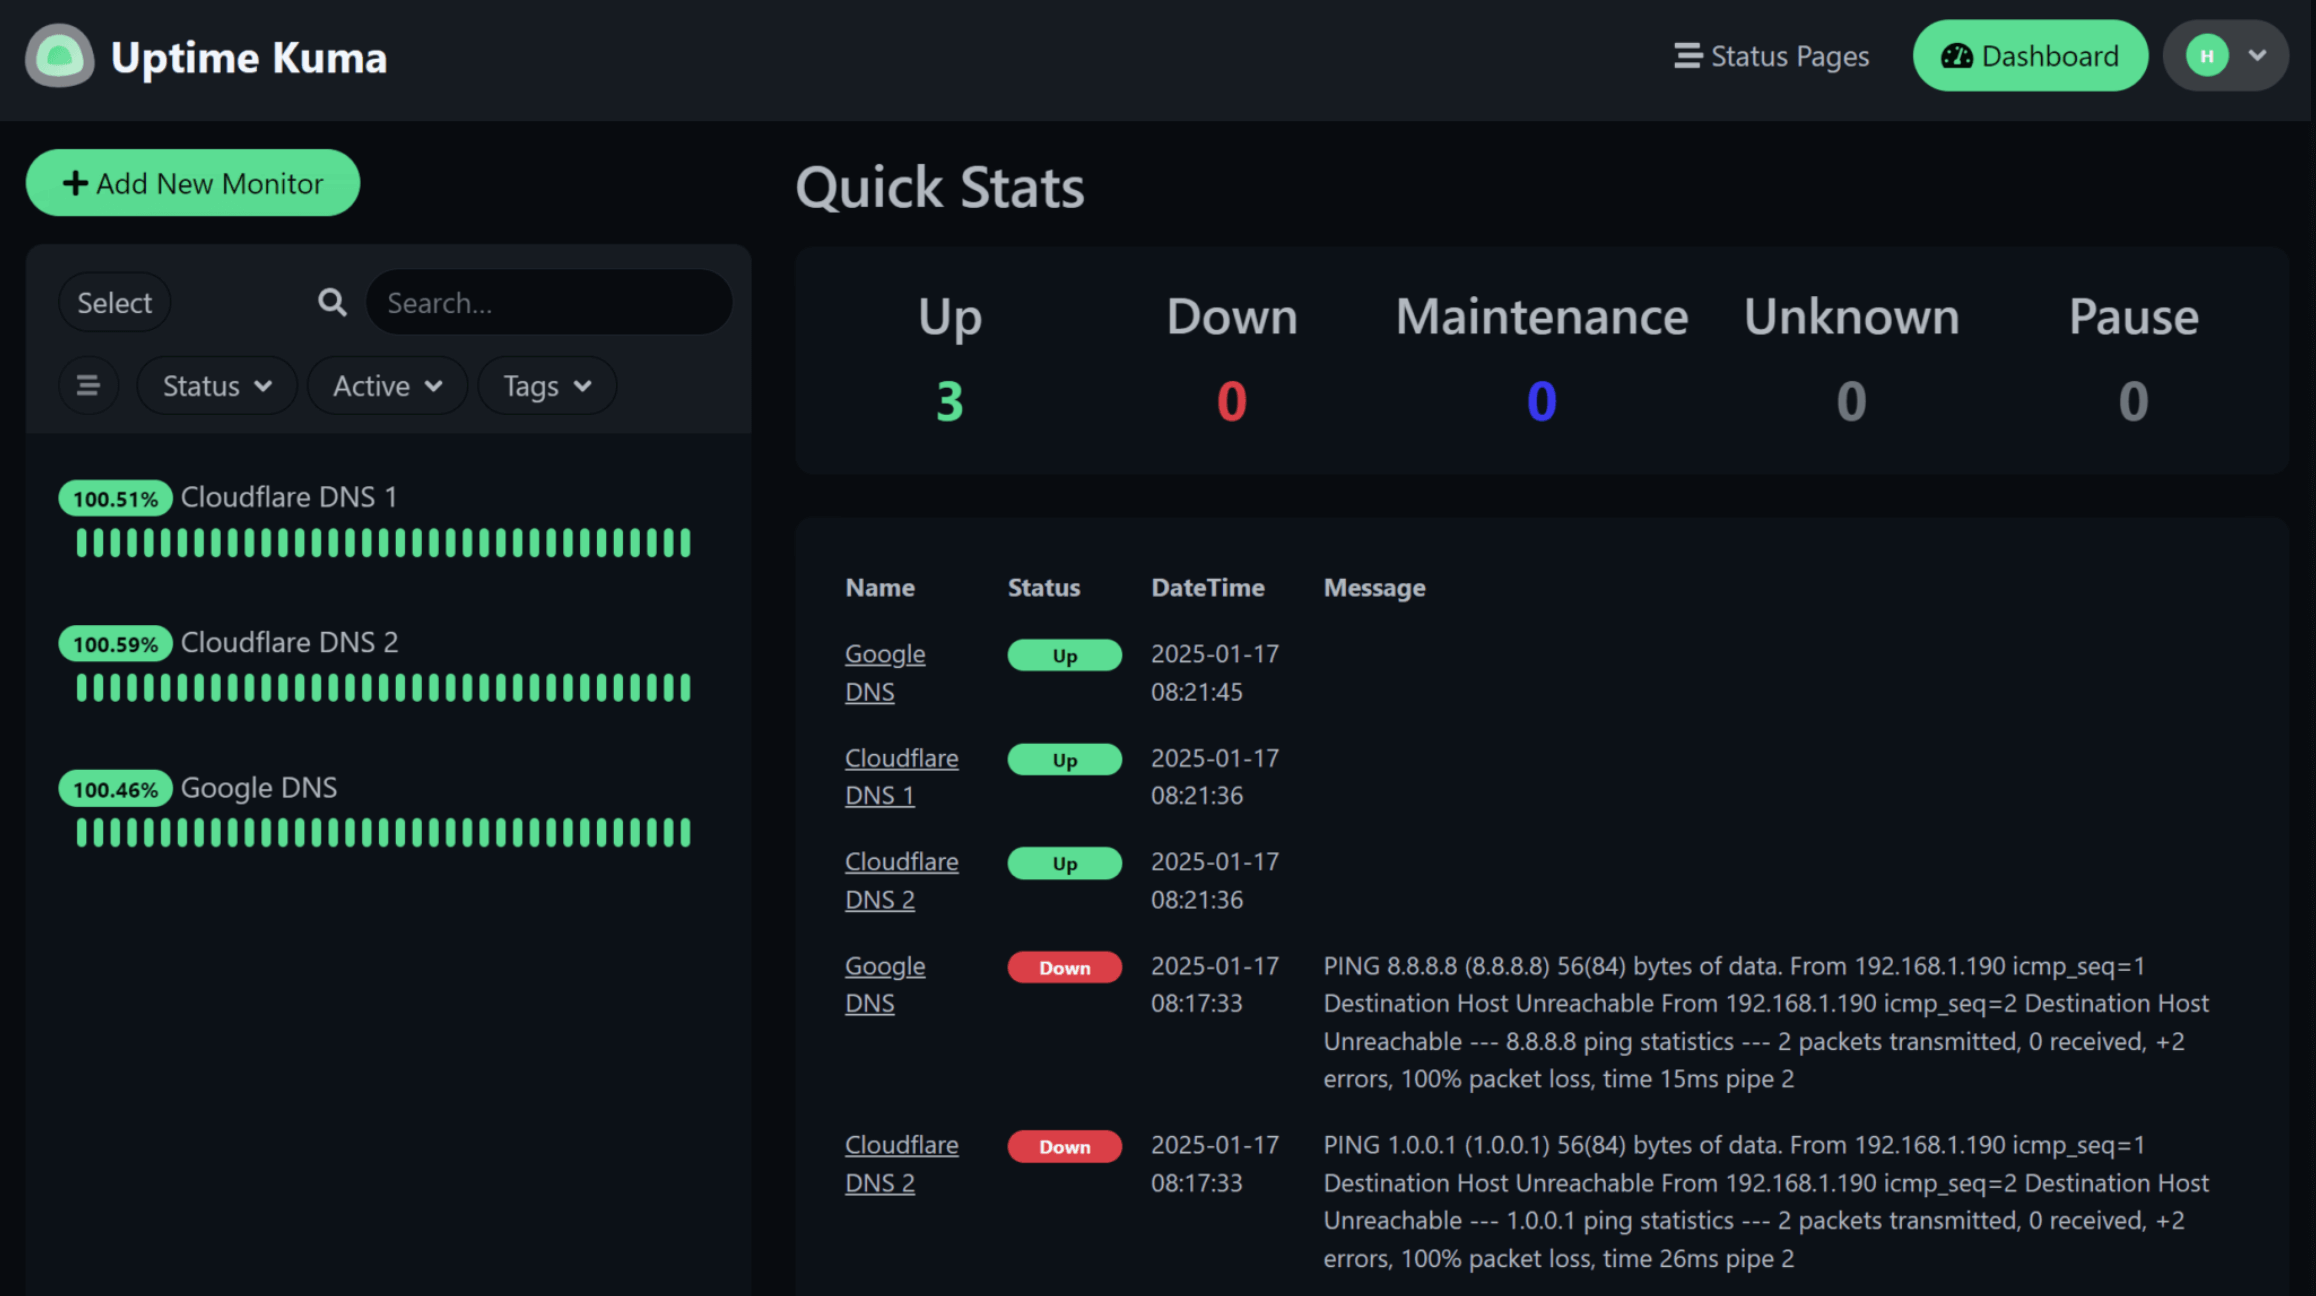
Meet Uptime Kuma. Think of it as your free, open-source watchdog that keeps an eye on your website 24/7. It pings your site, tracks downtime, and sends you alerts before your users even notice something’s wrong. It’s like having your own status page but without the premium price tag.
So, why not use something like Pingdom or UptimeRobot? Well, if you care about data privacy, customization, and total control, Kuma’s the way to go. No limitations on how many sites you can monitor. No “upgrade to Pro” pop-ups. Just you, your server, and full visibility.
And here’s the best part: you can self-host Uptime Kuma with Docker Compose in just a few minutes. Especially if you’re already using a Docker-friendly server, like one managed by FlyWP. Ready to set it up? Let’s get started.
How to Self-Host Uptime Kuma Using Docker Compose
Uptime Kuma is often referred to as a free alternative to StatusPage or Better Uptime. If you’re using FlyWP to manage your WordPress infrastructure or Dockerized stack, deploying Uptime Kuma can give you real-time visibility into system uptime and performance.

This tutorial walks you through setting up Uptime Kuma using Docker Compose, assuming you’re running it inside the FlyWP environment. Here are the prerequisites:
- SSH access to your server.
- Docker and Docker Compose are installed.
- The nginx-proxy container is already running (as part of the FlyWP stack).
Step 0: SSH Into Your Server
Connect to your server using SSH:
ssh fly@your-server-ipStep 1: Create Docker Network
Create a new Docker network for Uptime Kuma and optionally connect nginx-proxy to it for future extensibility:
# Create a network for Kuma
docker network create uptime-kuma# Connect existing nginx-proxy to it (optional, for potential future use)
docker network connect uptime-kuma nginx-proxyStep 2: Prepare Docker Compose File
Create a folder and docker-compose.yml file for Uptime Kuma:
mkdir ~/kuma && cd ~/kumanano docker-compose.ymlPaste the following Docker Compose configuration:
version: '3.8'

services:
  uptime-kuma:
    image: louislam/uptime-kuma:latest
    container_name: uptime-kuma
    restart: unless-stopped
    networks:
      - uptime-kuma
    ports:
      - "3001:3001"
    volumes:
      - uptime-kuma-data:/app/data

networks:
  uptime-kuma:
    external: true

volumes:
  uptime-kuma-data:
Step 3: Deploy Uptime Kuma
Run the following command to start the service:
docker compose up -dStep 4: Access Uptime Kuma
Access Uptime Kuma in your browser via the server’s IP address and specified port:
http://<your-server-ip>:3001No SSL certificate is configured in this setup. You can access the Uptime Kuma dashboard using HTTP only.
Alternative: Deploy Uptime Kuma with SSL and Domain Support
If you’d rather expose Uptime Kuma with a domain name and automatic SSL (Let’s Encrypt), here’s a script-based alternative:
Step-by-Step Script Deployment
- SSH into your server and save the script:
nano install-uptime-kuma.sh- Paste the following content into the file:
#!/bin/bash

set -e

echo "Uptime Kuma installer by FlyWP"
read -p "Domain for Kuma (e.g. status.example.com): " DOMAIN
read -p "Internal port for Kuma (default 3001): " PORT
PORT=${PORT:-3001}
EMAIL="[email protected]" # Replace with your actual email for Let's Encrypt

# Step 1: Create nginx-proxy network if it doesn't exist

if ! docker network inspect nginx-proxy &>/dev/null; then
    docker network create nginx-proxy
fi

# Step 2: Start nginx-proxy container if not running

if ! docker ps --format '{{.Names}}' | grep -q "^nginx-proxy$"; then
    docker run -d \
        --name nginx-proxy \
        -p 80:80 -p 443:443 \
        -v /etc/nginx/certs:/etc/nginx/certs:ro \
        -v /etc/nginx/vhost.d \
        -v /usr/share/nginx/html \
        -v /var/run/docker.sock:/tmp/docker.sock:ro \
        --network nginx-proxy \
        --restart unless-stopped \
        nginxproxy/nginx-proxy:alpine
else
    docker network connect nginx-proxy nginx-proxy 2>/dev/null || true
fi

# Step 3: Start Let's Encrypt companion if not running

if ! docker ps --format '{{.Names}}' | grep -q "^nginx-letsencrypt$"; then
    docker run -d \
        --name nginx-letsencrypt \
        --volumes-from nginx-proxy \
        -v /var/run/docker.sock:/var/run/docker.sock:ro \
        -v /etc/acme.sh:/etc/acme.sh \
        --network nginx-proxy \
        --restart unless-stopped \
        jrcs/letsencrypt-nginx-proxy-companion
fi

# Step 4: Launch Uptime Kuma with environment variables for domain and SSL

docker run -d \
    --name uptime-kuma \
    -e VIRTUAL_HOST=$DOMAIN \
    -e VIRTUAL_PORT=$PORT \
    -e LETSENCRYPT_HOST=$DOMAIN \
    -e LETSENCRYPT_EMAIL=$EMAIL \
    -v uptime-kuma-data:/app/data \
    --network nginx-proxy \
    --restart unless-stopped \
    louislam/uptime-kuma:latest

# Step 5: Wait for SSL certificate

ATTEMPTS=0
while [ $ATTEMPTS -lt 18 ]; do
    STATUS_CODE=$(curl -sL -o /dev/null -w "%{http_code}" https://$DOMAIN || true)
    if [ "$STATUS_CODE" = "200" ]; then
        echo "SSL is ready and Uptime Kuma is live!"
        break
    else
        echo "[$((ATTEMPTS+1))] Waiting... ($STATUS_CODE)"
        sleep 5
        ATTEMPTS=$((ATTEMPTS+1))
    fi
done
if [ $ATTEMPTS -eq 18 ]; then
    echo "Timeout waiting for SSL. Check logs."
else
    echo "Open: https://$DOMAIN"
fiImportant: Make sure you change the email address in the script.
- Make it executable and run:
chmod +x install-uptime-kuma.sh./install-uptime-kuma.shImportant: Make sure your domain’s DNS points to the server IP.
What Happens After Running the Script?
- Docker containers for nginx-proxy, nginx-letsencrypt, and uptime-kuma are launched.
- If your DNS is correctly pointed to the server and ports are open, SSL certificates are automatically issued by Let’s Encrypt.
- You’ll be able to access your Uptime Kuma dashboard securely via HTTPS.
Set Uptime Kuma to Start on Boot (Optional but Recommended)
You’ve got Uptime Kuma up and running, great! But what happens if your server restarts? You don’t want to log in and relaunch it every time. Here’s the fix: add a simple line in your Docker Compose file.
restart: always
This line tells Docker to automatically restart the container if it crashes or when your server boots up. It’s a set-it-and-forget-it move that saves you headaches down the line. Just make sure you’ve already mounted your volume correctly, so all your settings and logs stick around after a reboot.
Bonus: Monitor Other Services on Your FlyWP Server
Think Uptime Kuma is just for checking if your main site is online? Think again.
If you’re using a FlyWP-managed server, chances are you’re running more than just WordPress. Maybe Redis is powering your cache. Maybe MariaDB is handling your database. Maybe you’ve got a couple of test sites or APIs living on subdomains.
Good news: Kuma can keep tabs on all of them.
Add internal IPs, ports, or custom URLs. Want to know if your database goes down at 3 AM? Kuma’s got your back. Want alerts when your API starts throwing errors? Easy. This isn’t just uptime monitoring anymore. It’s full-on server observability.
FlyWP’s Uptime Monitor vs. Uptime Kuma: What’s the Difference?

FlyWP already includes a powerful uptime monitoring add-on. It keeps track of your site’s availability and performance, with no setup needed. So you might wonder, why bother with Uptime Kuma at all? Here’s the breakdown:
| Feature | FlyWP Uptime Monitor | Uptime Kuma (Self-Hosted) |
|---|---|---|
| Setup | Built-in, zero config | Manual Docker setup |
| Interface | Integrated with FlyWP | Separate dashboard |
| Notifications | Built-in alerts | Fully customizable (Telegram, Discord, etc.) |
| Monitoring Scope | WordPress only | Anything (WordPress, DB, APIs, ports) |
| Status Page | No | Yes (public or private) |
| Control | Managed by FlyWP | 100% self-hosted, fully private |
So, which should you use?
If you want simplicity, FlyWP’s native monitor has you covered. But if you’re running multiple apps, want a public status page, or prefer complete control over how your uptime is tracked, then deploying Uptime Kuma makes perfect sense. Better yet, you can use both.
Common Issues and Fixes When Self-Hosting Uptime Kuma
Even with something as simple as Kuma, a few hiccups can pop up. Here’s how to squash them:
1. Can’t Access the UI?
- Double-check the port in your
docker-compose.yml. Default is usually3001. - Make sure the port is open in your firewall or security group.
2. “Port Already in Use” Error?
- Something else is already using that port.
- Solution: Change
3001:3001to another available port like3002:3001.
3. Container Won’t Start?
- Run
docker-compose logsto see what’s breaking. - It could be a permissions issue or a bad volume mount.
4. File Permission Denied?
- Try running
chmod -R 755on the data folder. - Or run with
sudoit if you’re on a restricted user.
Needless to say, 90% of issues are fixable in under five minutes, especially with Docker.
FAQs About Deploying Uptime Kuma with Docker + FlyWP
Is Uptime Kuma really free? Yup. 100% free and open-source. No hidden paywalls. No premium tiers.
Can I use it to monitor multiple websites?
Absolutely. You can add as many sites, services, and ports as you want.
Does it work well with WordPress sites hosted on FlyWP?
Like a charm. Just enter your WordPress URL, pick your monitoring method (HTTP, keyword check, etc.), and you’re good to go.
How much memory does it use?
Barely any. Most small servers can handle it without even noticing. It runs lightweight in the background.
Can I get alerts via email or Telegram?
Yes! Kuma supports email, Telegram, Discord, Slack, and more. You just need to set up the notification channels from the dashboard.
Final Thoughts
Uptime Kuma is a smart, no-cost way to keep tabs on your site’s uptime. And when you’re hosting WordPress on FlyWP, deploying Kuma alongside it is effortless. With FlyWP’s Docker-powered setup, you don’t just get managed WordPress, you get the freedom to run any container-based tool you want. Like Uptime Kuma. Right on the same box. No limitations. No bloat. Just power, performance, and peace of mind.
Whether you opt for the quick Docker Compose setup using HTTP or the automated SSL and domain script, you now have a flexible and production-ready way to run Uptime Kuma within the FlyWP environment. Stay up and monitored!
