# Publish a Static Site
> Publish a static HTML copy of a FlyWP WordPress site with Cloudflare Pages, Cloudflare Workers, S3 storage, or an HTML site on your server.
Source: https://flywp.com/docs/site/performance/static-site/
FlyWP can publish a static HTML copy of a WordPress site on another domain. The original WordPress site stays on its existing domain. You can serve the copy through **Cloudflare Pages**, **Cloudflare Workers**, **S3 storage**, or an **HTML site on this server**.
This walkthrough uses `xynoslab.com` as the demo WordPress site and `static.xynoslab.com` as the example static domain. Use your own site and a new hostname in your Cloudflare account.
## Open Static Site
1. [Sign in to FlyWP](https://app.flywp.com/).
2. Open your **Site Dashboard**. For this example, go to **Sites** and select **xynoslab.com**.
3. In the site sidebar, expand **Performance**.
4. Select **Static Site**.
**Access path:** **Site Dashboard → Performance → Static Site**
The page displays four destinations. The steps below cover each one.
## Before you deploy
- For the Cloudflare destinations, connect a Cloudflare account to your FlyWP team. Select **Connect an account** on the Static Site page, or go to **Team Settings → Integrations → Cloudflare → Add Account**.
- Choose a static domain that belongs to the selected Cloudflare account and has **no existing DNS record**. FlyWP checks the domain with Cloudflare before deployment; the check can take a minute.
- Use a separate hostname for the copy. In this example, WordPress remains on `xynoslab.com`, and visitors would see the static copy at `static.xynoslab.com`.
- Review any interactive features on your site. **Forms, search, comments, logins, and WooCommerce do not work on the static copy.**
## Deploy with Cloudflare Pages
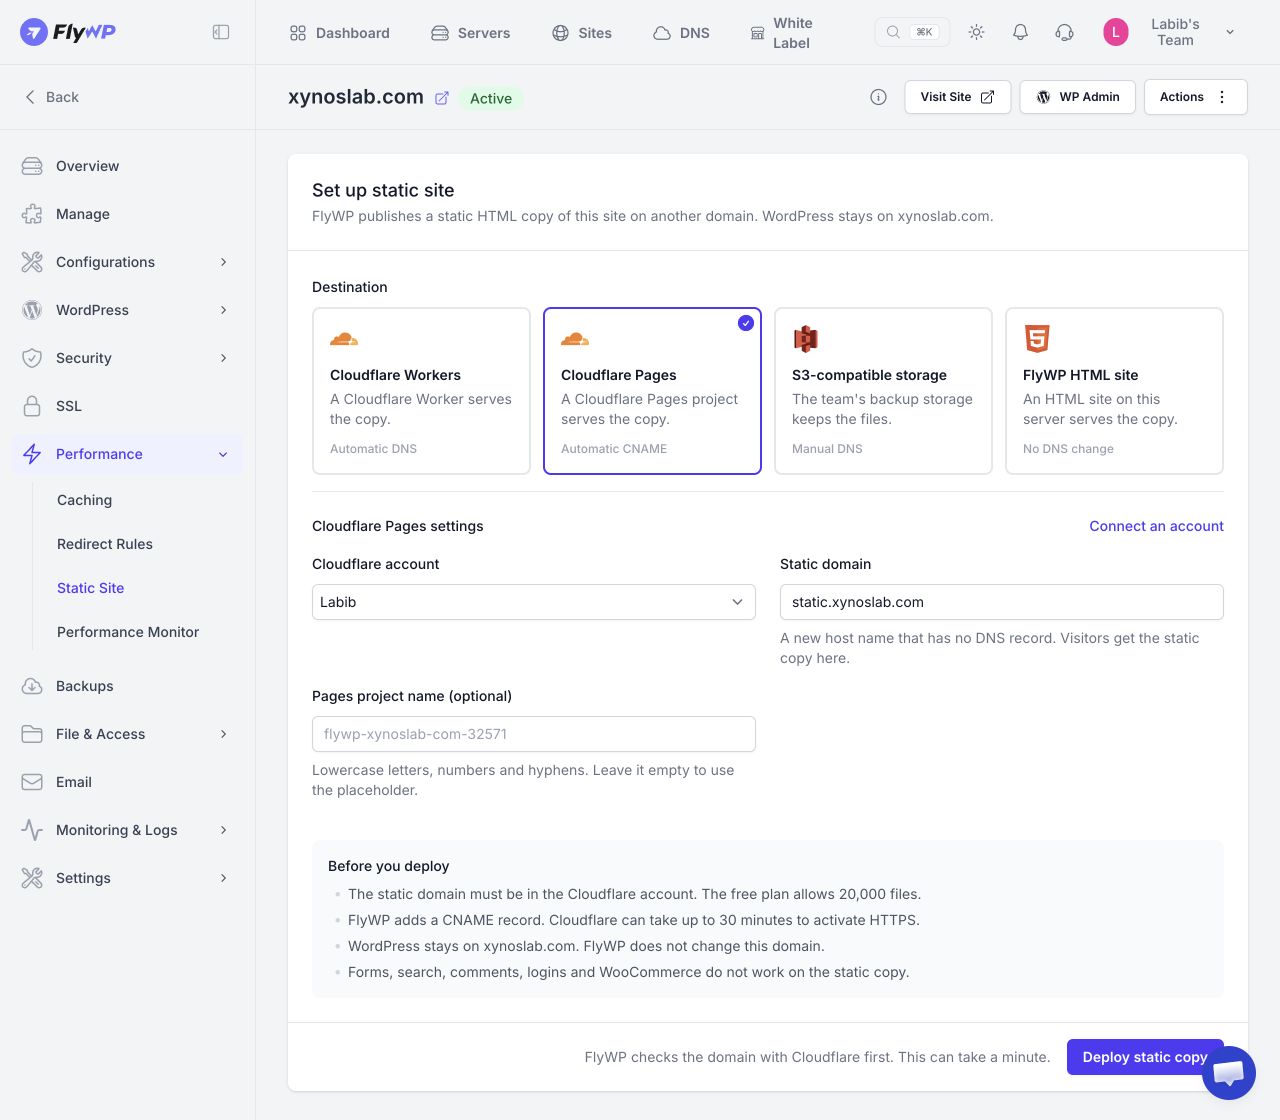
Cloudflare Pages serves the copy from a Pages project. FlyWP labels this destination **Automatic CNAME**.
1. Under **Destination**, select **Cloudflare Pages**.
2. Select the **Cloudflare account** containing your static domain.
3. Enter the **Static domain**. The demo shows `static.xynoslab.com`; enter your own new hostname.
4. Optionally enter a **Pages project name**. Use lowercase letters, numbers, and hyphens. If you leave it empty, FlyWP uses the name shown as the field's placeholder.
5. Read the **Before you deploy** notice, then select **Deploy static copy**.
FlyWP says it adds a CNAME record. Cloudflare can take up to **30 minutes** to activate HTTPS. The setup screen also notes that the Cloudflare Pages free plan allows **20,000 files**.
Cloudflare Pages setup. Select the image to view the full screen.
## Deploy with Cloudflare Workers
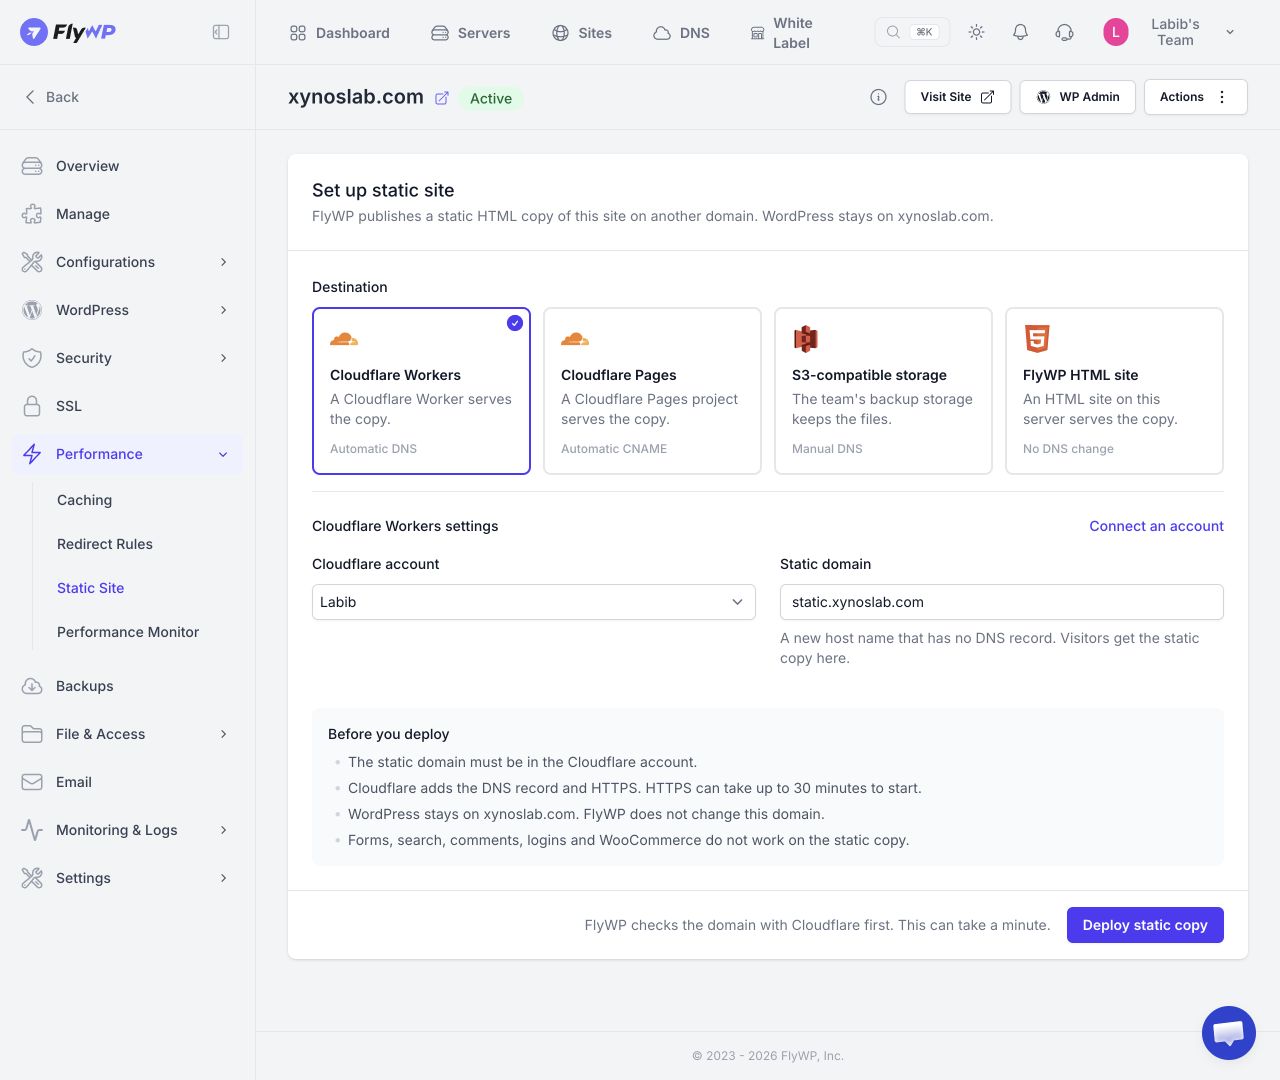
A Cloudflare Worker serves the copy. FlyWP labels this destination **Automatic DNS**.
1. Under **Destination**, select **Cloudflare Workers**.
2. Select the **Cloudflare account** containing your static domain.
3. Enter a **Static domain** with no existing DNS record.
4. Read the **Before you deploy** notice, then select **Deploy static copy**.
FlyWP says Cloudflare adds the DNS record and HTTPS. HTTPS can take up to **30 minutes** to start.
Cloudflare Workers setup. Select the image to view the full screen.
## Deploy with S3 Storage
FlyWP can keep the static copy in the S3-compatible storage you connected under **Team Settings → Backups** (Backup Providers). FlyWP labels this destination **Manual DNS**.
1. Under **Destination**, select **S3**.
2. Select the **Storage account** to use.
3. Enter a **Static domain** with no existing DNS record.
4. Enter the **Bucket** name. For Amazon S3, the bucket name must be the same as the static domain. Some providers also ask for a **Region**.
5. Read the **Before you deploy** notice, then select **Deploy static copy**.
Use an empty bucket for the static site only. A deploy deletes only the old files that FlyWP uploaded. After the deploy, you make the bucket public and connect the domain to it at your storage provider. Amazon S3 website buckets serve HTTP only.
## Deploy as an HTML Site on this Server
This destination serves the static copy from an HTML site on the same FlyWP server, so it needs no external storage or DNS change. FlyWP labels this destination **No DNS change**.
1. Under **Destination**, select **HTML site on this server**.
2. Choose an **HTML site** from the list. Only HTML sites on this server that no other static site uses are shown. If there is none, create an HTML site on this server first. The static copy uses the domain of the HTML site.
3. Read the **Before you deploy** notice, then select **Deploy static copy**.
FlyWP replaces the files and nginx config of the chosen HTML site, so any changes you made to them are lost.
## Destination Comparison
| Destination | Serves Through | DNS Configuration | Setup Requirements |
| --- | --- | --- | --- |
| **Cloudflare Pages** | Cloudflare Pages project | Automatic CNAME | Cloudflare account, Static domain, optional project name |
| **Cloudflare Workers** | Cloudflare Worker | Automatic DNS | Cloudflare account, Static domain |
| **S3 Storage** | S3 / S3-compatible bucket | Manual DNS | Storage account, Static domain, Bucket (and Region for some providers) |
| **HTML site on this server** | An HTML site on the same FlyWP server | No DNS change | An existing HTML site on this server |
After deployment completes, open the static domain and check the home page, important pages, links, and images. Allow for the HTTPS activation time shown above. Continue editing WordPress on its original domain.
The screenshots show the setup page for the demo site. They do not show a completed deployment.
## If a deploy stops
- **No progress for 30 minutes.** FlyWP marks the deploy as failed and stops its build on the server. Start the deploy again.
- **Running for more than 48 hours.** FlyWP marks the deploy as failed and stops its build.
- **Low disk space.** The crawl stops when less than about 1 GB stays free on the server. FlyWP keeps the pages it has crawled and reports the reason in the deploy result. Free disk space, then select **Deploy** on the Static Site page. The next deploy continues the crawl. It starts again from the beginning if the destination, the site address or the FlyWP engine has changed. **Full rebuild** always crawls the site again.
## Frequently asked questions
### Does this replace my WordPress site?
No. FlyWP says WordPress stays on its existing domain and that domain is not changed by this setup.
### Can I reuse the WordPress domain for the static copy?
The setup page asks for a **new host name that has no DNS record**. Use a separate hostname in the selected Cloudflare account.
### Will my forms, search, comments, logins, or WooCommerce work?
No. FlyWP lists these as unavailable on the static copy. Keep visitors on the WordPress site for functions that require them.
### Where do I connect Cloudflare?
Go to **Team Settings → Integrations → Cloudflare → Add Account**, or select **Connect an account** on the Static Site setup page.